Collecting & Analyzing Data on an Android Device
‹View Table of Contents
From the Epi Info™ main menu, click Create Forms or select Tools > Create Forms from the navigation menu. Open the desired project form or create a new form to transfer to the mobile device. (See Form Designer). The Epi Info™ Mobile Companion for Android uses a form template to produce the data entry fields on the mobile device. The form template must be transferred from Form Designer on the desktop to the ‘\Download\EpiInfo\Questionnaires’ folder on the Android device. There are three methods to transfer the form template to the device.
- ‘Copy Form to Android Device’ uses a direct connection between the desktop and the device.
- ‘Save Form as Template’ saves the template of the form as a file in the \Templates\Forms folder on the desktop which must be copied to the correct folder on the mobile device.
- ‘Share Form via Email’ saves the template of the form as a file in the \Templates\Forms folder and also attaches the file to an email that can be received and saved to the correct folder on the mobile device.
Use the method that best suites your situation.
Copy Form to Mobile Device
This method is best when you have direct access to the mobile device and can connect it to the desktop via the device’s USB cable.
- Connect the mobile device to your computer via a USB cable. Ensure that the PC recognizes the mobile device in disk drive or media device mode before proceeding to the next step.
- From the Form Designer menu, select Copy Form to Android Device.

Figure 6.3: Copy Form to Android Device
The form automatically transfers to the device and is ready for use.

Figure 6.4: Form Copied
When a form is uploaded to a mobile device to replace an existing one of the same name, an error may occur indicating that fields no longer match.

Figure 6.5: Data Table Error Message
Select Yes to delete the data table and continue data collection.

Figure 6.6: Unsupported Field Types error message
To meet publishing requirements, the non-supported fields must be deleted or the field type must be changed. Before deleting a field, be aware that any associated data with that field will be deleted as well. The data removal is automatic and irreversible. Consider backing up all data prior to deleting a field. Alternatively, use the “Change To” option to change the field to a supported field type. This action can only be performed if a data table is not associated with the form.

Figure 6.7: Fields Change To function
NOTE: If you are unable to copy the form into your device because the device is not recognized by Epi Info 7, you could copy the form into your device by creating a template of your form. In order to create a form template, please review the Form Designer chapter of the User’s Manual. Once the form template is created, you can simply copy the form template file (which will have an .XML file extension) into your device or email the form template to yourself or others. Once the file has been copied to your device, it would be recognized by the Companion for Android application and you will be able to begin data collection.
Save Form as Template
This method is best when you want to make the template available on a shared network drive or website for your data collection team to download and save to their device at a later time.
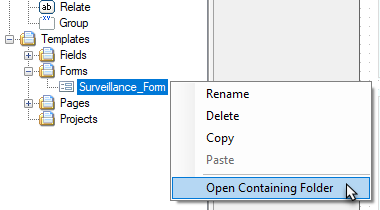
To create a form template, right click the form name in the Project Explorer and select “Save Form as Template”. Enter the name for the new template and click OK.
In the example shown below, the form ‘Surveillance’ along with its three pages, ‘Person’, ‘Hospital Info’, and ‘Case Report’, will be included in the template along with all associated Check Code.

The resulting template is stored in the \Templates\Forms folder.
Expand the \Templates\Forms folder. Right-click the new template and select “Open Containing Folder”
This opens Windows Explorer to the folder where the template was saved. The template is an XML document.
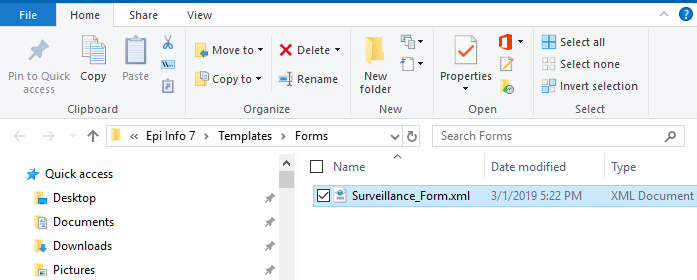
You can copy and save this XML document to a shared network drive, a website, or an FTP site for downloading to the target devices at a later time. You can also save this file as an attachment to an email and send it to the recipient who can access the email on their device.
Ultimately, the template XML document needs to be copied to the mobile device. For the Epi Info Mobile Companion for Android app to recognize the questionnaire, save it to the device to the Internal storage\Download\EpiInfo\Questionnaires folder.
Share Form via Email
This method is best when the recipient can access email on the mobile device.
To create a form template and automatically attach it to an email using your default email app, right click the form name in the Project Explorer and select “Share Form via Email”.
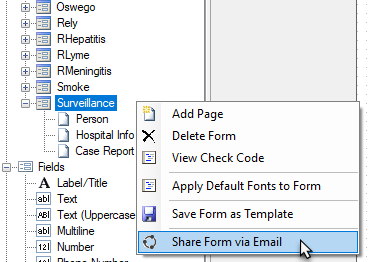
An example of an email with the Surveillance form template attached is shown in the image below.
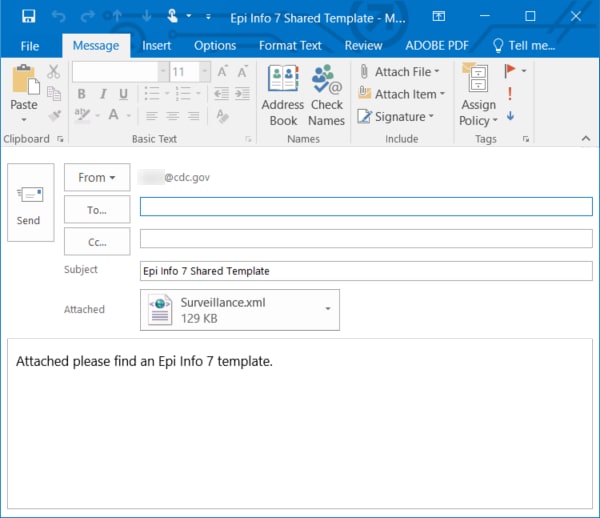
The name used for the template in the attachment will be the form name with a .xml extension. As with the steps described under “Save Form as Template”, the template file is created as an XML document and saved under the Epi Info 7\Templates\Forms folder on the desktop.
When the recipient receives the email, they may open the attachment using the Epi Info Mobile Companion for Android. The Epi Info app will automatically save the template to the right place on the device and open the form in the Enter Data tool. If the device’s default app for opening XML documents is not the Epi Info Mobile Companion, then you may need to manually save the attachment the the Internal storage\Download\EpiInfo\Questionnaires folder on the device.
Working with Child Forms
The Companion for Android application supports data collection for a relational database model. Child forms are copied from Epi Info 7 to the Companion for Android application using the same mechanism previously mentioned. However, child forms have additional naming convention requirements as follows:
Requirement 1
When creating a related form in Epi Info 7, the name of the Relate Field and the name of the Related Form must match. In the example below, the Field Name and the Related Form name assignments match.

Figure 6.8: Field Name and Related Form name parameters.
Requirement 2
When copying the related form to the Android device, please add an underscore “_” prefix to the template name to indicate to the Android app that this template is for a related form.

Figure 6.9: Child form name requires a _ prefix (i.e _ContactFollowup)
Companion for Android
- Companion for Android Introduction
- Initial Set Up
- Designing Forms for Mobile
- ›Copy Form to Mobile Device
- Collect Data on Mobile Device
- Preload Data on Mobile Device
- Transfer Data From Mobile Device
- Configuring Cloud Synchronization
- Share Spreadsheets Between Mobile Devices
- StatCalc Epidemiologic Calculators
- Analyze Data
- Chapter 6: Companion for Android – Full Chapter