Epi Info™ User Guide
Form Designer
How To: Use the Group Field
A Group field is a way to group together one or more fields on a page for visual and practical purposes. Visually, a group helps to tie similar fields together into a common category. Grouped fields also provide organization and structure to the form. A background color can be added to a group to enhance its appearance. You can nest groups and arrange them so they overlap specific fields for situations where you need a Venn style “diagram” on your form.
Group fields also have several practical purposes. In Classic Analysis and the Visual Dashboard, you can run statistics on individual fields, but if the fields are contained within a group, then you can use the group field and the statistics will be done on each field within the group.
Similarly, several Check Code commands can be run on all fields within a group by using just the group name, rather than using each field name individually. This makes commands such as Enable, Disable, Clear, Highlight, Set-Required, Set-Not-Required, among others, much easier for you to write.
Fields contained within the Group box are automatically members of the Group field. To remove a field from a group, simply drag the field outside of the boundaries of the group box. Likewise, dragging the group box itself will move all the fields within the group. When the group box is released, any additional fields within the boundaries of the group box are automatically members of the group field for analyses and Check Code execution.
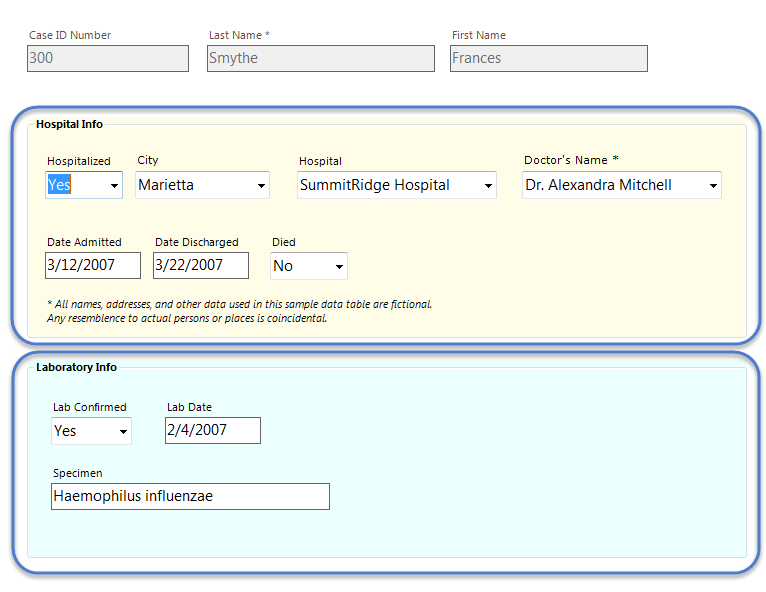
The following figure provides an example of how Group fields (circled in blue) appear in Enter.
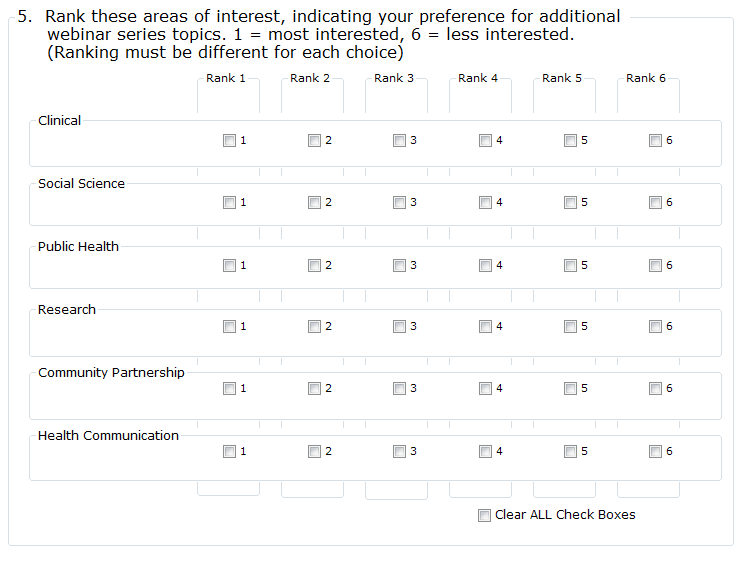
The next image demonstrates that group fields can overlap other group fields. In this example, Check Code will enable or disable all check box fields within a selected rank column and within a selected interest row.
To create a Group field:
- Click and drag a rectangle around one or more fields to be grouped. Each field in the selection appears highlighted with a rectangle.
- From the Form Designer toolbar, select Insert > Group or right click on a blank part of the canvas and select New Group Field from context menu. The Group Properties dialog box appears.

- Enter the Question or Prompt. The text entered in this field will display on the canvas and prompt the user to enter a response.
- Click in the Field Name text box or press the tab key. Epi Info automatically suggests a field name based on the Question or Prompt, however, it is very important that field names be short, intuitive, and usable. The field name is used for data validation in Check Code and when doing analyses. Field names cannot start with a number or contain any spaces or non-alphanumeric characters (except the underscore character “_” is permitted).
Note: It is best to simplify the field name at this time. Field names cannot be changed after data collection starts.
- Click OK to create the group. The fields appear in the group box.
- Move the group by clicking and holding the group name with the mouse.
- Resize the group box by move the cursor over the group and adjust the box dimensions by clicking and dragging the corner boxes to the desired dimensions. If the new size includes additional fields, they become members of the group.
- Fields in the group are rearranged in the same process as on the Form Designer canvas. Click on the field and drag the field to the desired location.