Epi Info™ User Guide
Form Designer
How To: Use the Option Field
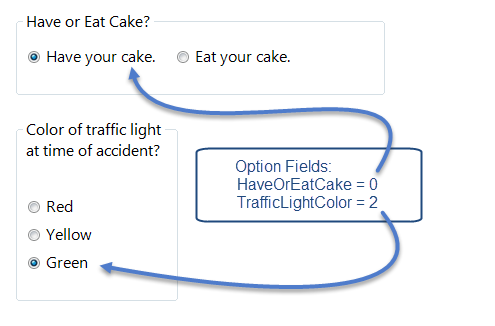
The Option field creates a group box containing mutually exclusive option buttons, also known as radio buttons. These are used for fields requiring one and only one answer. When a choice is made, any other selection within the group is cleared. In the database, the values are stored as a zero-based array. The first option is 0, the second is 1, the third is 2, and so on. The image below shows an example of two option fields. Since the options are mutually exclusive, in the first example you can’t select both options “Have your cake” and “Eat your cake”. You may select only one or the other. The field name for this example option field is “HaveOrEatCake”. Since the first option is selected, the field “HaveOrEatCake” has the value of zero (0). In the next example, the field name is “TrafficLightColor”. Since the selected color is the third option, the value of “TrafficLightColor” has the value of two (2).
To add a Option field:
- Open the Option Field Definition dialog box.
- Enter the Question or Prompt. The text entered in this field will display on the canvas and prompt the user to enter a response.
- Click in the Field Name text box or press the tab key. Epi Info automatically suggests a field name based on the Question or Prompt, however, it is very important that field names be short, intuitive, and usable. The field name is used for data validation in Check Code and when doing analyses. Field names cannot start with a number or contain any spaces or non-alphanumeric characters (except the underscore character “_” is permitted).
Note: It is best to simplify the field name at this time. Field names cannot be changed after data collection starts.
- Select Vertical or Horizontal from the List options vertically or horizontally field to choose how the options are displayed in the Option field.
- In the Start listing options on the left or right field, select Left or Right to choose where the options are listed.
- In the Attributes field, select Right or Left to determine how the radio buttons are aligned with the option text.
- Select the Number of Choices in the Attributes field. You can have a maximum of 16 options. The number of options selected corresponds to the number of rows listed under Option Definition.
- Enter the option name in each row of the Option Definition section.
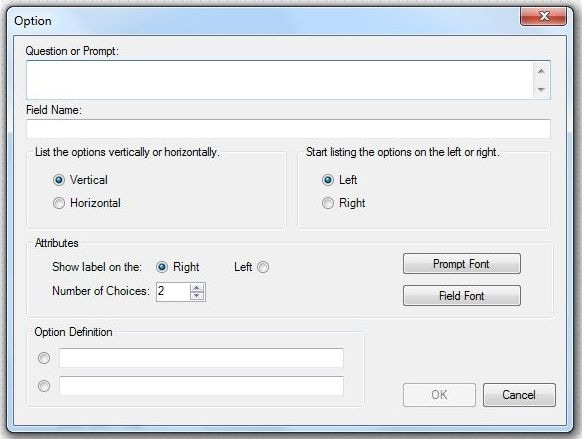
- Click OK. The Option field appears on the canvas.