Epi Info™ User Guide
Form Designer
How To: Use Templates
Templates are a time-saving feature that allows you to save all or part of your project to be reused in other projects and shared with other Epi Info™ 7 users without sharing data collected with the project. For example, you might want to save certain fields for use on forms you will create later, as opposed to having to create those same fields over and over ( e.g. case demographic information). Saving fields for later use could also be a good way to have a library of fields already built and ready to go in case of a public health emergency. Templates are saved to the Epi Info™ Templates folder using the Extensible Markup Language (XML) format. There are four types of templates: Field, Page, Form, and Project.
Epi Info™ 7 is packaged with a number of project and field level templates that demonstrate many of the various field types and features of Epi Info™ 7 including some Check Code examples. These are listed in the Project Explorer under the Templates category.
One of the best ways to see how Epi Info™ can be used is to create a project using these templates and examine how they were done. A new project can be created from one of the sample Project Templates in the Form Designer when you open it for the first time.
Project Templates
Since Epi Info™ 7 Projects contain one or more forms, and each form has one or more pages with fields, Project Templates contain an example of all of the above including any Check Code that may have been saved with the template. Project templates are an effective and convenient way to share projects between colleagues without including collected data.
How To: Create a New Project From a Template
A list of demonstration templates are located in the Project Explorer under Templates > Projects. Use one of them to create a new project.
- Double-click the template of choice or select File > New Project from Template. The New Project from Template dialog opens.

- Select a template from the list. The Name and Data Repository used when the template was created is automatically populated in their respective fields.
- Edit the Project Name, if necessary (optional).
- The default location for the project is the Projects folder within the Epi Info™ 7 folder. Specify another location, if necessary (optional).
- Select the database format from the Data Repository drop-down list. The default option is Microsoft Access 2000-2003, however SQL Server is also available. To use the SQL Server option, you need to have access to a SQL Server database.
- If you selected Microsoft SQL Server for the Data Repository, then click the browse button (…) to the right of the Data Repository field to enter the connection information for the SQL Server database. Contact your SQL Server database administrator for the required information requested in this dialog.

- Click OK. The Form Designer creates the project and after a few moments, the new project appears with the first form’s initial page shown on the canvas.
For additional information on creating new projects, refer to the topic Create a New Blank Project and Form.
How To: Create a New Template from a Project
There are two options to create a project template that includes all the forms, pages, fields, and Check Code in the current project – Save Project as Template, which allows you to specify a template name and description, and Quick Save Project as Template which automatically names the template based on the project name and the current date and time. Both options save the template in the same way, but Quick Save does not allow for a custom name and description.
- In the Project Explorer, right click on the project name. The project name is the top most item in the Project Explorer.
- From the drop-down list, select Save Project as Template or Quick Save Project as Template. If Quick Save Project as Template is selected, the template is immediately saved to the Templates > Projects folder with the name of the project and a timestamp.

- If the Save Project as Template option is selected, a dialog appears to allow you to add a Template Name and an optional Description.

- Click OK. The template is saved to the Templates > Projects folder.
- To retrieve the template to send to someone, locate the template in the Project Explorer.
- Right click the template name and select Open Containing Folder. This opens the folder in Windows Explorer. From Windows Explorer, you can copy and paste the XML template file into an email or save it to a shared network location for others to use.

How To: Get a Template
If you receive a template from a colleague, an easy way to copy the template to the correct location within Epi Info™ 7 is to use the Get Template feature.
- From the Form Designer menu, select File > Get Template… The Open dialog appears.
- Locate the template file.
- Click Open. The template is saved to the corresponding Epi Info 7 > Templates folder according to the type of template. If the template is a Project template, then the New Project from Template dialog opens.

Form and Page Templates
Form and Page templates are created and used in similar ways. The difference is in the item selected when right clicking to get the context menu. Also, form templates can be used to create a single form project, whereas a page template can only be added to a form in an exising project.
How To: Create a Form Template
If you want the template to include all the pages and associated Check Code for a given form then right click the form name in the Project Explorer and select Save Form as Template. In the example shown below, the form ‘Surveillance’ along with its three pages, ‘Person’, ‘Hospital Info’, and ‘Case Report’, will be included in the template along with all associated Check Code.

How To: Create a Page Template
If you want the template to include the contents of a specific page, and the Check Code for the fields on that page, then right click the page name in the Project Explorer and select Save Page as Template. In this example, only the selected page ‘Hospital Info’ and its Check Code will be in the template.

The Add Template dialog appears for you to enter a Template Name.

Click OK. The page template is created and saved to the respective folder under Templates in the Project Explorer.
How To: Use Form and Page Templates
Form and Page Templates are very similar in the way they are used. In order to use either template, there must be an existing Project already open in the Form Designer. The difference is that a Form Template contains the instructions to create a set of pages, each with one or more fields and Check Code, if any. A Page Template has only the page layout information and instructions to create the fields on a single page along with Check Code, if any.
Since all field names and page names must be unique within a given form, a new form created from a Form Template requires very little additional work to make the form usable after it is created from a Form Template.
A Page Template, on the other hand, can be used repeatedly on a given form. Because of this, during the process of creating the new page from a Page Template, if any field names already exist for the form, Epi Info™ 7 automatically appends a number to new field name from the template. Epi Info™ 7 does this to avoid having any duplicate field names. Unfortunately, this has the side effect of potentially breaking the Check Code that may exist for that page template. The field names within the Check Code are not synchronized. Therefore, the Check Code must be manually updated with the new field names.
To use a Form or Page Template, follow these steps:
- With a project open in Form Designer, locate the template in the Project Explorer – Templates > Forms for form templates, or Templates > Pages for a page template.
- If you cannot find the template you need, but you know it is saved somewhere, use the File > Get Template… feature to browse for the template.
- Click and Drag the template to the canvas. Epi Info™ 7 will create the new form or page and place it in the Project Explorer.
- If a page template was used, to change the page order, clicking and drag the page in the Project Explorer to the appropriate position.
Field Templates
Field templates allow for easy and concise sharing of common fields and enable consistent collection of routine information. Each field template includes the field definition and attributes for one or more fields, along with any Check Code written for the selected fields. A list of demonstration field templates are available in the Project Explorer under Templates > Fields.
How To: Create a Field Template
A convenient way to reuse a field or set of fields along with their Check Code or to share fields with a colleague, is to create a Field Template and send it out. To do this, follow these steps:
- Select the fields to add to the template by drawing a rectangle around them. To do that, click and drag the mouse from the top left of the desired fields diagonally down to the lower right until all needed fields are contained in the blue box.

- Release the mouse button and the selected fields will remain highlighted.

- Right click on a blank area of the canvas, not on the selected fields, then click Save Selection as Template from the context menu.
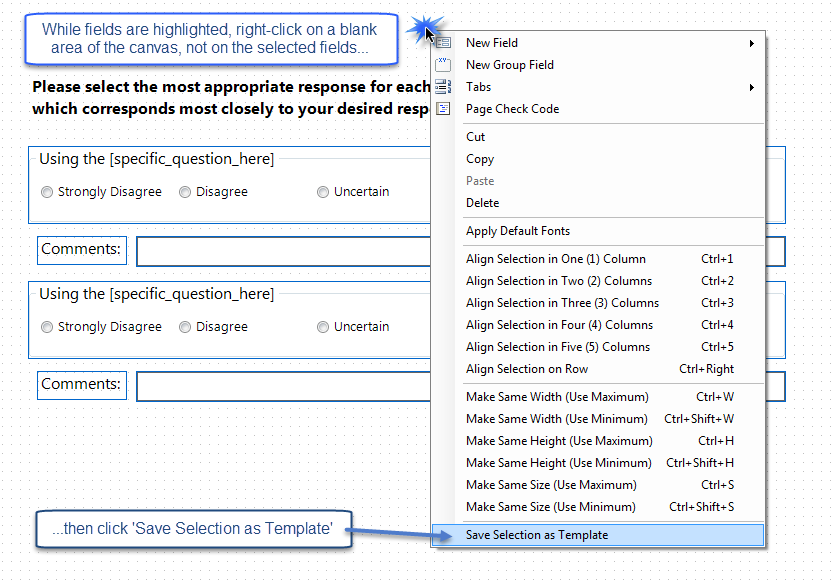
Note: Right clicking on a field or field group will not display the proper menu options to create a field template. Right click on a blank portion of the canvas only.
- Enter a Template Name in the Add Template dialog box.

- Click OK. The field template appears under Templates > Fields in the Project Explorer.
How To: Use a Field Template
To use a Field Template to create a new set of fields, follow these steps:
- Locate the Field Template in the Project Explorer.

- If you cannot find the template you need, but you know it is saved somewhere, use the File > Get Template… feature to browse for the template.
- Click and drag the desired template from the Project Explorer onto the page in the appropriate location. As you drag the template over the canvas, you will see a blue rectangle showing the approximate footprint that the fields will occupy when created.

- Drop the template where new field(s) should be placed. When the template is released, Epi Info™ 7 will create the new fields and copy the associated Check Code into the Check Code Editor.

Epi Info™ 7 creates fields from Field Templates using the field name specified in the template UNLESS a field by that name already exists on the form, perhaps on another page. To avoid duplicate field names within a given form, Epi Info™ 7 automatically appends a number to the field name of any field that already exists in the same Epi Info™ Form. Unfortunately, this has the side effect of potentially breaking the Check Code that may exist for the new fields. The field names within the Check Code are not synchronized. Therefore, the Check Code must be manually updated with any new field names.
- For each new field created from the template, right click the field and select Properties. The Field Property dialog box for the selected field opens. Notice the Field Name.

- If a data table has not been created for the form, edit the Field Name and other properties as needed.

Sample Field Templates for Demonstration
There are several field templates that are packaged with Epi Info™ 7 for demonstration purposes. While these fields could be used “As Is” for data collection, these field templates and the Check Code they contain are meant to illustrate the features and functions of Epi Info™ 7.
Demographics
The demographics template has common fields used to for patient information. Some of the fields originate from the Public Health Information Network (PHIN) vocabulary set such as Sex and Ethnicity Group.
Field Types Illustrated: Group; Text; Comment Legal Drop Down; Lable-Title; Checkbox; Multiline; Command Button; Number; and Phone Number

Diagnosis
The diagnosis template contains multiple Yes-No fields related to common patient diagnoses. The template also includes text fields for collecting additional information.

Geo-Location
The geo-location field template contains fields for Address, Latitude, and Longitude. It also has a command button, Get Coordinates for which Check Code was written using the GEOCODE command. This command uses a geolocation service to populate the Latitude and Longitude fields with coordinates based on the information entered into the Address field. These coordinates can then be used in mapping functions in the Epi Info™ Maps tool.

Medical Facility
The Medical Facility template contains fields commonly used to collect medical facility information.

States
The States field template is an example of a comment legal field. Comment legal fields store only the code or abbreviation in the database, but the full description is shown in the drop-down list. The data source for this field includes all state and territory names and abbreviations for the United States of America in sorted order (alphabetical).
