Classic Analysis: Command Driven Analyses and Data Management
‹View Table of Contents
How to Manage Variables
Use the DEFINE Command
This command creates new variables.
Syntax
DEFINE <variable> {<scope>} {<type indicator>} {("<prompt>")}
- From the Classic Analysis Command Tree, click Variables > Define. The DEFINE Variable dialog box opens.
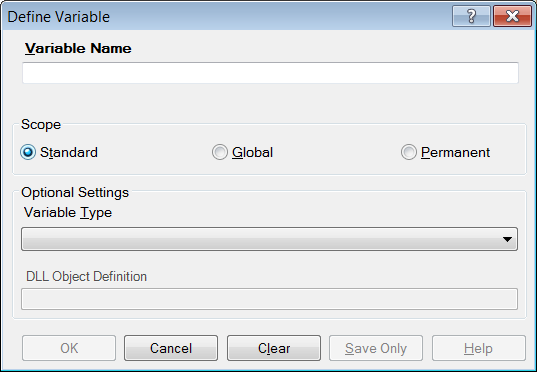
Figure 9.15: Define Variable Dialog Box
- From the Scope section, select one of the following variables:
- Standard variables remain in a current project and are one variable in that form. They can assume new values with each record during a file query (e.g., a LIST or FREQ).
- Global variables persist throughout program execution. They pass values from one form to a related form, and do not change during a file query.
- Permanent variables are stored in the EpiInfo.Config.xml file or system registry and retain any value assigned until changed by another assignment, or until the variable is undefined. They are shared among Epi Info 7 programs and persist even if the computer is shut down and restarted.
- From the Variable Type drop-down list, select one of the following types: Date, Numeric, Text, or Yes-No.
- Optional: Variable Type is required and cannot be used if <scope> is omitted. <type indicator> is the data type of the new variable and must be one of the following reserved words: NUMERIC, TEXTINPUT, YN, or DATEFORMAT. If omitted, the variable type will be inferred based on the data type of the first value assigned to the variable. However, omitting field type is not recommended.
- Click OK.
Define a Group
To define a group, take the following steps:
- From the Classic Analysis Command Tree, click Variables > Define Group. The DEFINE GROUP dialog box opens.
- In the Group Variable field, type a name.
- From the Variables list box, select the variables to be included in the group.
- Click OK.
Convert a Number to Text
Numbers can be converted to text using the FORMAT function. FORMAT changes the format of one variable type to another.
Syntax
FORMAT(<variable>, {"<format specification>"})
Example
The Format function can be used to convert a numeric postal code or zip code field to a text type variable for mapping.
- The READ command opens a new file that contains a numeric field called zipcode. To use Epi Map with the zipcode values, change the values to text.
- The DEFINE command creates a new variable called NewZip. The variable NewZip will hold the values of zipcode in a text format. The code appears in the Program Editor as DEFINE NewZip.
- The ASSIGN command formats the variable NewZip with the values of ZipCode and the format of text. Text values are enclosed in quotes. The code appears in the Program Editor as:
ASSIGN NewZip=FORMAT(ZipCode,"00000")
- The variable NewZip can now be used as a geographic variable in Epi Map because it is a text type variable that contains numeric data.
Try It
For this example, use the Classic Analysis Program Editor to create the code.
- Read in the Sample.PRJ project. Open Oswego. Seventy five (75) records should be listed in the Output window.
- In the Program Editor window, place the cursor under the created Read command.
Type DEFINE MyAge TEXTINPUT.- Do not press the Enter key. Leave your cursor on the line of code you just created.
- In the Program Editor window, type the following:
ASSIGN MyAge = FORMAT(Age, "00")
- From the Program Editor navigation menu, click Run Commands. The code will turn gray to indicate a syntax review.
- From the Classic Analysis Command Tree, click Statistics > List. Click OK. The records appear.
- Notice that the values in ‘MyAge’ are all two characters with a leading ‘0’ before each single digit year. The leading zero is present because of the ‘00’ format specification.
- From the Classic Analysis Command Tree, click Variables > Display. Click OK. The variable types appear.
- The variable MyAge now contains the values of Age and the format type of Text.
Use IF Statements with Permanent or Global Variables
- If the condition of an IF statement depends on global or permanent variables, the value is computed immediately and only the true or false branch, as appropriate, is followed.
- If the condition of an IF statement depends on a field variable, neither branch is followed. However, computations within the branches are saved for execution as appropriate on each record. In the second case, non-computational commands (e.g., READ, SELECT, SORT, HEADER, and ROUTEOUT) are never executed.
Handle Date Fields
Date formats are often determined by default computer settings. To access Regional Settings in a Windows environment, click Start > Control Panel > Regional and Language Options.
- Date fields in forms are entered in European, American, or ISO format as specified in Form Designer. They are stored in the database in a neutral format.
- Date fields in Excel, and Text files are read into Classic Analysis according to the date format found in Regional Settings, and stored in a neutral format. Excel files prepared with one date format often do not import properly on machines with a different date format.
- Date fields in forms are displayed in European, American, or ISO format as specified in Form Designer by the following Classic Analysis commands: LIST, LIST GRIDTABLE, TABLES, and FREQ.
- Date fields in forms are displayed according to the date format found in Regional Settings in the following Classic Analysis commands: DISPLAY, and GRAPH.
- Date fields in tables without forms are displayed according to the date format found in Regional Settings.
- Date fields written to Excel or Text files are written according to the date format in Regional Settings.
- Date literals in Form Designer, Check Code, or Classic Analysis Programs; and date-type permanent variables in the EpiInfo.Config.xml file, should be in American format unless enclosed in braces or pipe symbols. European date format (DD/MM/YYYY) literals must be enclosed in braces (i.e., {23/11/2007}). ISO date literals (YYYY/MM/DD) must be enclosed in pipe symbols (i.e.,|.,2007/11/23|.
- Dates formatted with the FORMAT function are formatted according to the date format found in Regional Settings when no format is specified as a second argument.
- Dates converted from text with TXTTODATE are converted to a neutral format according to the date format found in Regional Settings. For multi-national applications, it may be safer to use the NUMTODATE function.
If you are not sure, conduct experiments and examine the results.
How to Use Undefine
The Undefine command in Classic Analysis removes a defined variable from the system.
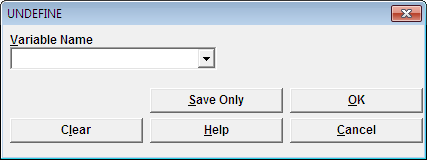
Figure 9.16: Undefine Command Box
- Variable Name indicates the name of the variable to be removed from the data table.
- OK accepts the current settings and data, and subsequently closes the form or window.
- Save Only saves the created code to the Program Editor, but does not run the code.
- Cancel command generation window without saving or executing a command.
- Clear empties fields so that information can be re-entered.
- Help opens the Help topic associated with the module being used. (Currently Disabled).
Use the ASSIGN Command
This command assigns the result of an expression or the field value to a variable. Variables are usually created with the DEFINE command and subsequently assigned a value.
Syntax
 ASSIGN <variable> = <expression>
<variable> = <expression>
- From the Classic Analysis Command Tree, click Variables > Assign. The ASSIGN dialog box opens.
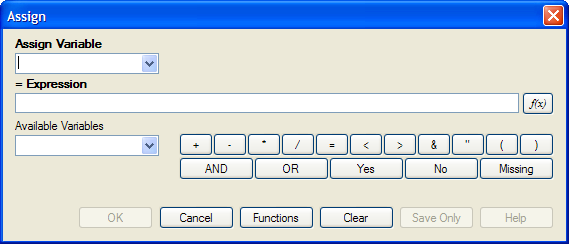
Figure 9.17: Assign Variable Dialog Box
- From the Assign Variable drop-down list, select the variable to have a value assigned.
- In the =Expression field, create the assignment syntax based on the needed data.
- Click OK. The code appears in the Program Editor.
Try It
In the following example, the zip code field is a number. To use the zip code in a map, a new zip code variable must be defined and assigned text values.
- From the Classic Analysis Command Tree, use the READ command to open the Sample.PRJ project.
- From the form section, click Surveillance. Click OK.
- Click Variables > Display. Click OK. The variables information appears.
- Click Variables > Define. The DEFINE dialog box opens.
- In the Variable Name field, create a new variable named Zip2.
- Click OK.
- From the Classic Analysis Command Tree, click Variables > Assign. The ASSIGN dialog box opens.
- From the Assign Variable drop-down list, select Zip2.
- In the =Expression field, type the syntax FORMAT(ZipCode,”00000″).
- In this example, the FORMAT function is used to convert the format of the values of the variable ZipCode into the text format. Text values are always surrounded by double quotes and are assigned to the new Zip2 variable.
- Click OK. The code appears in the Program Editor.
- Use the DISPLAY command to view variable information.
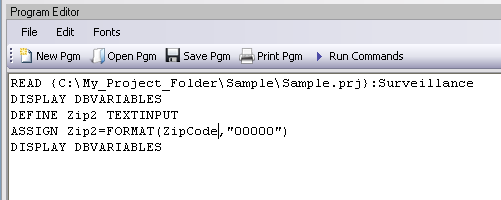
Figure 9.18: Assign Variables in Program Editor
How to Use Recode
The Recode command allows grouping of data for age and other variables, or changing code from one system to another.
- To insert a line in the table, select the row and press Ctrl-Insert.
- To delete a line in the table, select the row and press Ctrl-Delete.
- Delete any blank rows prior to selecting OK or Save Only.
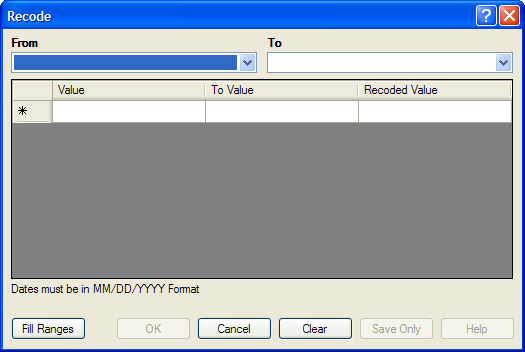
Figure 9.19: Recode Dialog Box
- The From drop down identifies the variable whose values are to be recoded.
- The To drop down identifies the variable slated to receive the recoded values.
- Value (blank = other) identifies the bottom of a range of values, a single value, or all remaining values slated to be recoded. Enclose text in quotation marks. The word LOVALUE may be used to indicate the smallest value in the database. HIVALUE may be used to indicate the largest. To recode a single value instead of a range, use only this column. To recode all unspecified values, leave this column and the To column blank.
- To Value (if any) identifies the top of a range of values that will be recoded.
- Recoded Value identifies the value to be assigned to the destination variable for the specified values of the source variable. Enclose text in quotation marks.
- Fill Ranges allows you to redefine recoded ranges of equal distribution.
- OK accepts the current settings and data, and closes the form or window.
- Save Only saves the created code to the Program Editor, but does not run the code.
- Cancel command generation window without saving or executing a command.
- Clear empties fields so information can be re-entered.
- Help opens the Help topic associated with the module being used. (Currently Disabled).
Use the DISPLAY Command
This command displays table, form, and database information.
Syntax
DISPLAY <option> [<sub-option>] [OUTTABLE=<tablename>]
- From the Classic Analysis Command Tree, use the READ command to open a PRJ project file.
- If a .PRJ file is not opened, only language is shown for selected variables.
- From the Classic Analysis Command Tree, click Variables > Display. The DISPLAY dialog box opens.
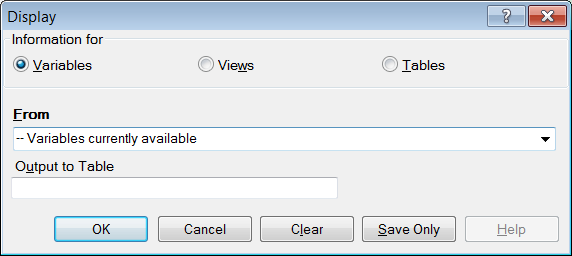
Figure 9.20: Display Dialog Box
- From the Information for section, select one of the following form data options:
- Variables displays information about all of the variables in the dataset; the defined, field, and selected variables.
- Forms displays the forms in the current dataset or a selected dataset. Information about forms and other Epi Info-specific tables is shown.
- Tables displays information about tables in a database. Information about tables and other Epi Info-specific or generic tables is shown.
- If needed, type an Output to Table name.
- Click OK. The information is displayed in the Output window.