Epi Info™ User Guide
Web Survey
Publish Form to Web
After designing a form that is compatible with the Web Survey System, the survey can be published to the web server. With the completed form open in Form Designer, complete the following steps.
- From the Form Designer menu, select File > Publish Form to Web.
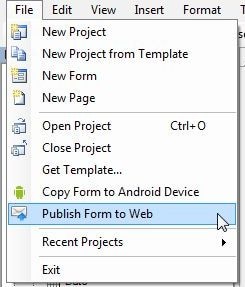
Figure 5.3: Publish Form to Web option
- If a form contains a non-supported field type, an error message occurs stating the name of each invalid field.
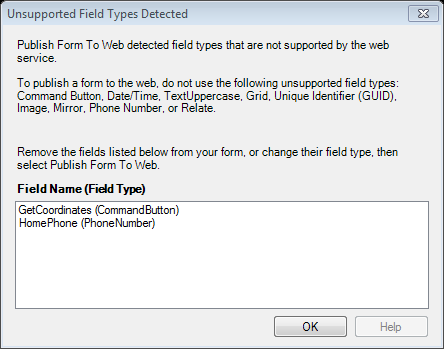
Figure 5.4: Unsupported Field Types error message
To meet publishing requirements, delete or change the field type of non-supported fields. Before deleting a field, be aware that any data collected with that field will be deleted as well. The data removal is automatic and irreversible. Consider backing up all data prior to deleting a field. Alternatively, use the Change To option to change the field to a supported field type. This action can only be performed if there is not a data table associated with the form. For information regarding Delete Data Table, refer to the Form Designer section – How To: Delete an Existing Data Table Without Deleting the Form.
Note: Data tables are created when the form is accessed with the Enter Data tool, regardless of whether data has been collected. To remove a data table, select Tools > Delete Data Table
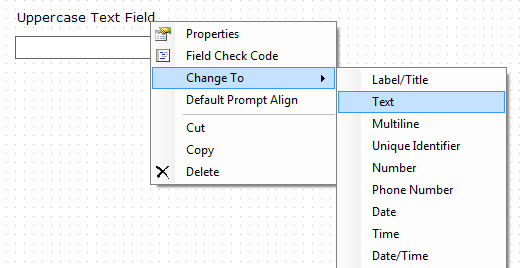
Figure 5.5: Fields Change To function
- In the Publish Form to Web dialog box, there are three tabs that must be filled out prior to publishing the survey:
- Introduction Page – provides information to the survey participant prior to beginning the survey
- Exit Page – provides closing remarks to the survey participant after the survey is submitted
- Publish Options – specifies technical aspects of the web survey posting process
The following navigation buttons are at the bottom of the dialog box:
- The Next button saves the information and proceeds to the next tab.
- The Clear button removes all entries from the page and returns the user to a blank Introduction Page.
- The Cancel button allows the user to exit the Publish Form to Web dialog box and return to the Form Designer window.
- The OK button will attempt to publish the survey. If any information is omitted, an error message will appear.
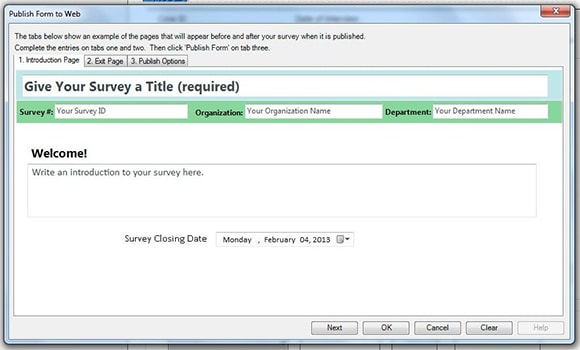
Figure 5.6: Publish Form to Web dialog box
- On the Introduction Page tab, click in the Give Your Survey a Title (required) textbox to enter the survey title. This title will appear at the top of each page in the survey.
- Enter your Survey Number or ID, Organization Name and Department Name. This information appears at the top of the introduction and exit pages.Note: The Organization Name is used for tracking purposes only. The Organization Key is the key that allows you to post a survey to the web server. The Organization Key should be kept secure and confidential. DO NOT PUT THE ORGANIZATION KEY INTO THE ‘Organization Name’ FIELD ON THE INTRODUCTION TAB.
The Welcome! textbox provides participants with a greeting, special instructions or additional information about the survey. Click in the Welcome! textbox and enter a message.
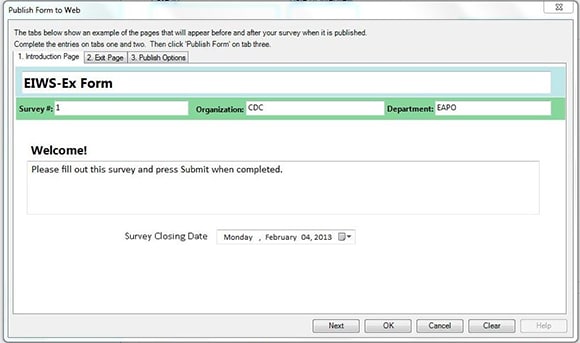
Figure 5.7: Introduction Page
-
- Select the survey closing date from the Survey Closing Date drop-down menu located below the Welcome! textbox. This field only accepts a date in the future.Note: The default setting is 10 days from the current date.
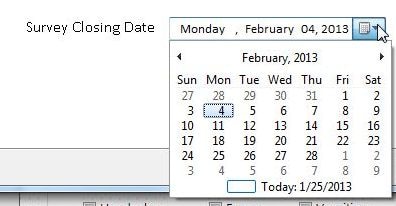
Figure 5.8: Survey Closing Date
At 11:59:59.99 pm on the selected survey closing date, any attempt to access the survey will prompt the message below.

Figure 5.9: Closed Survey dialog box
- Click Next to save this information and proceed to the Exit Page tab.Note: The Introduction Page can be edited at any point prior to publishing the survey by clicking on the Introduction Page tab.
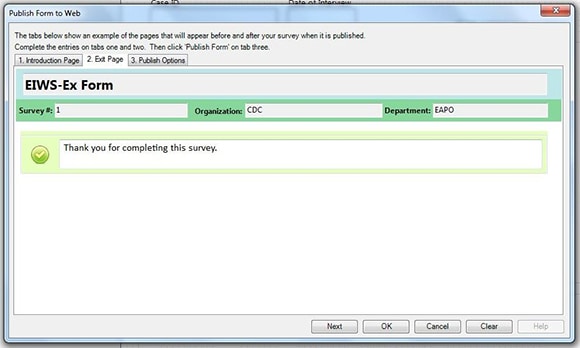
Figure 5.10: Exit Page
- The Exit Page displays closing remarks or additional instructions about the survey. Enter your comments in the textbox next to the green check mark. This example states “Thank you for completing this survey.” The Survey #, Organization and Department fields will automatically populate based on the information provided in the Introduction Page tab. Clicking on either of these fields will direct you back to the Introduction Page.
- Click Next to proceed to the Publish Options tab.

Figure 5.11: Publish Options
- To allow a participant to submit more than one response in a given session, select the Many responses allowed option button. The default setting is One response only, which closes the survey after the participant submits one record.Note: Selecting “One response only” will not prevent a participant from accessing a survey link more than once.
- Enter/Paste the Organization Key provided by the Web Survey System administrator.
Hint: If the organization key is provided in an email or other electronic file, copy and paste the key into the organization key field to avoid any mistakes. The organization key must be a valid global unique identifier to enable the Publish Form button. An example of an Organization Key is “3f6c6251-4af6-40f7-a440-cb2a9ca92e17.”
- Click Publish Form.If an error message appears, contact your Web Survey System administrator with the text displayed in the Form Publish Status field. Click the associated Log button to access detailed information regarding the error message if available. Typically, this error occurs with an invalid or missing endpoint address.After successfully publishing the survey, the URL, Survey Key and Security Token fields will automatically populate. Survey participants will use this URL to access the survey.
- Click the Copy All to Clipboard button. Save this information in a document or a format of your choosing for future use.
Important: The URL, survey key and security token are all required to access the survey and survey data. The security token cannot be recreated if it is lost. Keep the security token in a secure location. DO NOT SHARE THE SECURITY TOKEN WITH SURVEY PARTICIPANTS.
- Select the survey closing date from the Survey Closing Date drop-down menu located below the Welcome! textbox. This field only accepts a date in the future.Note: The default setting is 10 days from the current date.