Classic Analysis: Command Driven Analyses and Data Management
‹View Table of Contents
How to Manage Output
Header
The Header command in Classic Analysis sets up specific headings as part of the output in Analysis.
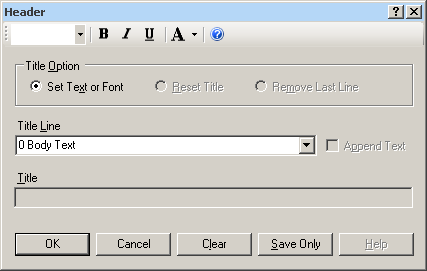
Figure 9.43: Header Command Window
- Title Option permits title lines to be set or changed. If you select Reset Title, the selected title level will be reset to default titles. If you select Remove Last Line, the last line of a title level will be removed.
- Title Line indicates which level of titles or body text is affected by the command and settings.
- Append Text adds a new line of text to an existing header. If not selected, the current title is replaced.
- Title indicates the text in the header title.
- Bold

displays header fonts in bold style text.
- Italic

italicizes header fonts.
- Underline

underlines header fonts.
- Font Size

sets the text font size.
- Font Color

allows you to apply a color to the header text.
- OK accepts the current settings and data, and subsequently closes the form or window.
- Save Only saves the created code to the Program Editor, but does not run the code.
- Cancel closes the dialog box without saving or executing a command.
- Clear empties the fields so information can be re-entered.
- Help opens the Help topic associated with the module being used. (Currently Disabled).
TypeOut
The TypeOut command in Classic Analysis inserts text, either a string or the contents of a file, into the output. Typical uses may include comments or boilerplates.
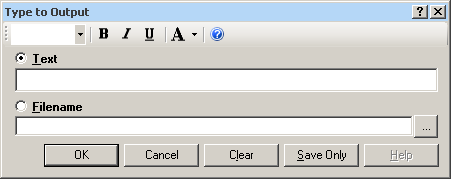
Figure 9.44: Type to Output, or TypeOut, Window
Selecting “Filename” opens the Windows File Explorer to allow you to select a file to be included in your output.
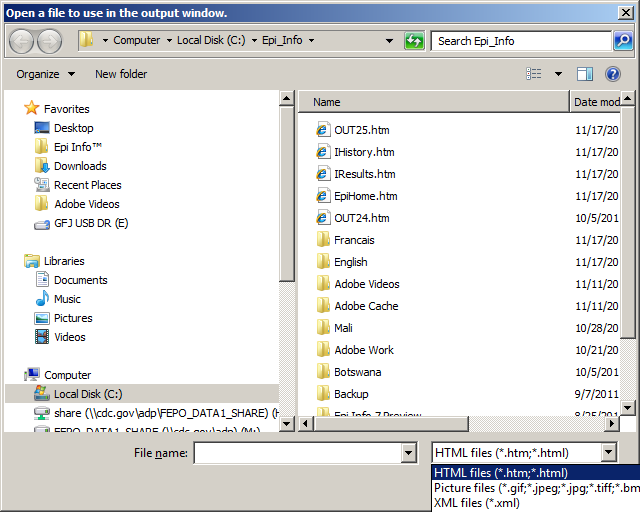
Figure 9.45: Open File Window
- The Text or Filename field contains the text or file name to be inserted in the output file.
- Bold
displays type fonts in bold style text.
- Italic
italicizes type fonts.
- Underline
underlines type fonts.
- Font Size
sets the type text font size.
- Font Color
allows you to apply a color to the type text.
- Type a filename or click the ellipse to locate a file (e.g., HTM, JPEG, XML).
- OK accepts the current settings and data, and subsequently closes the form or window.
- Save Only saves the created code to the Program Editor, but does not run the code.
- Cancel closes the dialog box without saving or executing a command.
- Clear empties the fields so information can be re-entered.
- Help opens the Help topic associated with the module being used. (Currently Disabled).
Use the ROUTEOUT Command
The ROUTEOUT command enables you to locate output. If no directory exists, the file is placed in the current project’s directory. Results accumulate until a CLOSEOUT command is executed. Output files can be placed in any folder. The ROUTEOUT command selects a path and filename. If no output file is selected, Analysis uses the default value. In each folder, Analysis creates a new index table that contains links to the files created.
- From the Analysis Command Tree, use the READ command to open a PRJ project file.
- From the Analysis Command Tree, click Output > RouteOut. The ROUTEOUT dialog box opens.
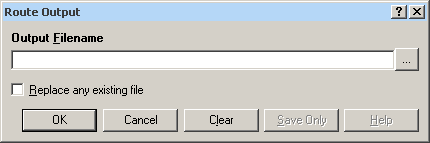
Figure 9.46: Route Output Window
- In the Output Filename field, enter a file name to locate an existing file.
- If necessary, select Replace Existing File to write over any files with the same name.
- Click OK. Create Output on the existing project.
- Notice the title bar contains the output filename specified in the ROUTEOUT command.
- The new file is placed in the selected directory with the extension .HTM.
- From the Output window toolbar, click Open. The Browse dialog box opens.
- Locate and select the file created with ROUTEOUT. Click Open. The Output appears in the Output window.
- The saved Output file can be opened by any application that can read an HTML file.
To end the ROUTEOUT command, choose one of the following options.
- From the Output folder, click Closeout.
- READ in a new project.
- Close Epi Info.
Closeout
The Closeout command closes the current output file.
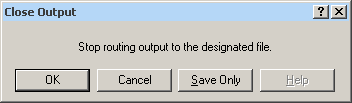
Figure 9.47: Close Output Window
- OK accepts the current settings and data, and subsequently closes the form or window.
- Save Only saves the created code to the Program Editor, but does not run the code.
- Cancel closes the dialog box without saving or executing a command.
- Help opens the Help topic associated with the module being used. (Currently Disabled).
Printout
Command Reference
The Printout command sends the current output file, or another file specified by the user, to the default printer. This differs from the print button on the output window because a command is generated that causes printing whenever it is run.
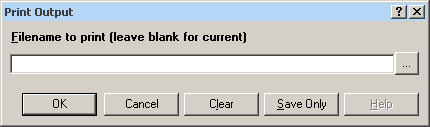
Figure 9.48: Print Output Window
- If Filename is selected, the file will print. If blank, it prints the current output.
- The ellipses (…) to the right of the filename opens a Windows dialog box and allows you to search the computer for the program or command to execute.
- OK accepts the current settings and data, and subsequently closes the form or window.
- Save Only saves the created code to the Program Editor, but does not run the code.
- Cancel closes the dialog box without saving or executing a command.
- Clear empties the fields so information can be re-entered.
- Help opens the Help topic associated with the module being used. (Currently Disabled).
Storing Output
The Storing Output command defines how output files are stored in the current project directory with a name composed of a prefix and a sequence number.
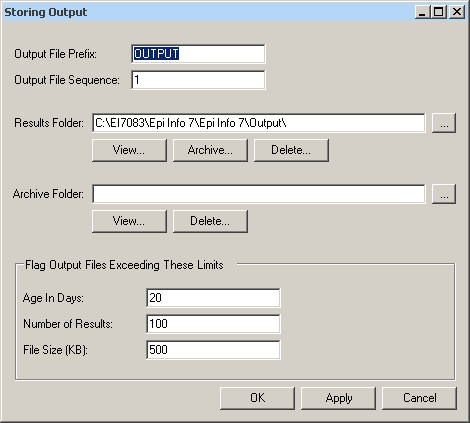
Figure 9.49: Storing Output Command Window
- Output File Prefix contains the first part of the filename of the output files. It is used with the Output File Sequence to store output files in the directory.
- Output File Sequence contains the second part of the filename for output files. This number is automatically incremented for each file. Along with the Output File Prefix, it stores output files in the directory.
- Results Folder locates the Results index file in the project directory.
- The Archive Folder allows you to locate the Archive file in the directory.
- Archive opens the Archive Results window, and allows specific output files to be selected and archived to the current directory.
- Delete opens the Delete Results window and allows you to delete specific files from the directory.
- Age in Days marks output files older than the indicated number of days in the form window if Flags are active. If output file limits are placed on number of days, it appears in the Flag Files operation.
- Number of Results marks output files in excess of the number indicated in the form window if Flags are active.
- File Size marks output files in excess of the size indicated in the form window if Flags are active. Enter output file size limits in this field.
- OK accepts the current settings and data, and subsequently closes the form or window.
- Apply accepts the current settings and data, and subsequently closes the form or window.
- Cancel exits the dialog box without saving or executing a command.