Epi Info™ User Guide
Form Designer
How To: Use the Grid Field
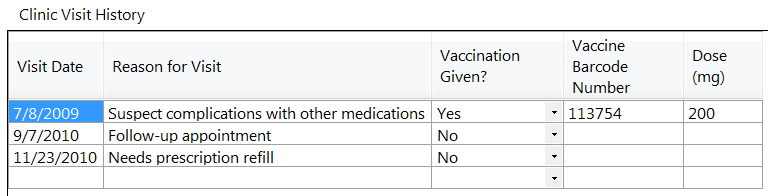
The Grid field allows users to enter data in the form of a spreadsheet on the page. This allows for simple and effective data entry for multiple data points.
When you create a Grid field, you specify each column for the grid, the type of data for the column, its size and properties.
Before deciding to use a Grid field on your form, please also know the following limitations with Grid fields:
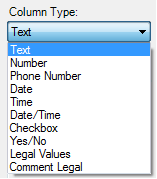
- Not all field types are supported as grid columns. Text, Number, Date, Time, Date-Time, Phone Number, Checkbox, Yes-No, Legal Value, and Comment Legal field types are supported.
- Grid fields do not support Check Code. This means that the many things that Check Code can offer, such as automatic calculations, skip patterns, enabling/disabling of fields, or other data entry validation, are not available to Grid fields.
- Grid column tab order cannot be changed. Pressing the tab key moves the cursor to the next field from left to right. Pressing the Enter key moves the cursor within the same column, but down to the next row.
- Grid fields are not supported on a Web Survey.
To add a Grid field:
- Open the Grid Field Definition dialog box.
- Enter the Question or Prompt. The text entered in this field will display on the canvas and prompt the user to enter a response.
- Click in the Field Name text box or press the tab key. Epi Info automatically suggests a field name based on the Question or Prompt, however, it is very important that field names be short, intuitive, and usable. The field name is used for data validation in Check Code and when doing analyses. Field names cannot start with a number or contain any spaces or non-alphanumeric characters (except the underscore character “_” is permitted).
Note: It is best to simplify the field name at this time. Field names cannot be changed after data collection starts.
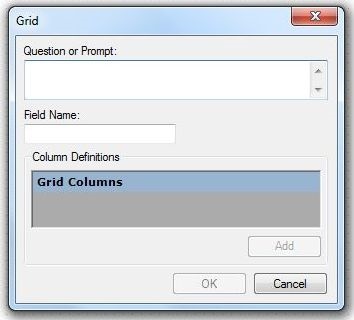
After setting the Question or Prompt for the Grid field and setting it’s Field Name, the Add button is enabled.
- Click the Add button.
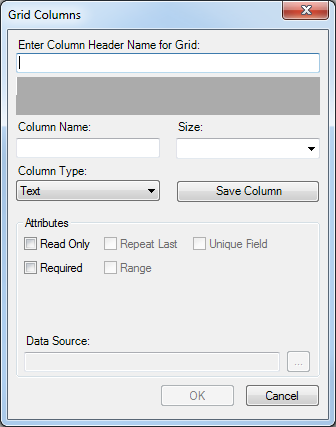
- Type the column heading into the Enter Column Name for Grid textbox. This text will display as the column heading on the form.
- Press Tab or click in the Column Name textbox. Epi Info automatically suggests a column name based on the Enter Column name for Grid field, however, it is very important that column names be short, intuitive, and usable. The column name cannot start with a number or contain any spaces or non-alphanumeric characters (except the underscore character “_” is permitted).
Note: It is best to simplify the column name at this time. Column names cannot be changed after data collection starts.
- Select the column size from the Size drop-down list. This determines the amount of characters that can be placed in that column’s cells. This setting only applies to Text type columns.
- Select the column format from the Column Type drop-down list. Available formats are shown in the image below:
- After selecting a Legal Values or Comment Legal column type, click the browse button next to the Data Source field and complete the steps outlined in the Legal Values and Comment Legal field sections below.
- Click Save Column to add the column to the grid.
- Repeat steps 5-10 until all desired columns have been added.
For information on other attributes that may be available, see the topic on Field Attributes.
- Click OK. The Grid field appears on the canvas.