Epi Info™ User Guide
Form Designer
How To: Use Tab Order
In the Enter module, during data entry, pressing tab or enter will move the cursor to the next field. Tab Order is the order or sequence that the cursor moves from field to field. Initially, the tab order is determined by the order in which the fields are added to the form. In many cases, as fields are moved around the page, added from a template, or pasted from somewhere else, the tab sequence may become disorganized. There are other situations in which you may prefer the tab order to move in a custom way, such as down a column of questions, or maybe from right to left across the page.
The proper tab order will make entering data more user friendly and efficient. Additionally, the tab order will determine how fields are displayed on a mobile device.
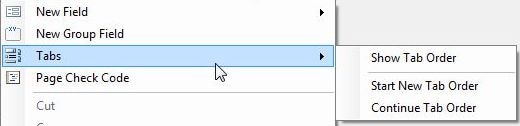
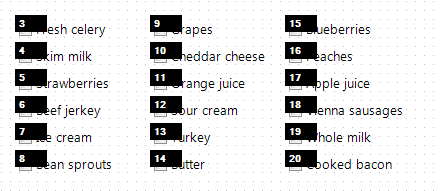
To show the tab order, right click on the canvas and select Tabs > Show Tab Order. The tab order number for each field is shown in a rectangle near the entry field. Red rectangles indicate the field is a Read Only field or one that cannot receive the cursor, such as Label/Title fields. Group fields also do not receive the cursor, but a tab number is reserved for the group, even though the tab order number for a Group box is not shown.
How To: Start New Tab Order
Right click the canvas and select Tabs > Start New Tab Order from the context menu. Selecting this function will automatically set the tab order according to each field’s position from left to right, then top to bottom.
How To: Customize the Tab Order
You can customize the tab order to meet the needs of your questionnaire. This process begins by showing the tab order on the canvas. The example below demonstrates how to adjust the tab order in the Food History form of the EColi project located in the Projects folder.
Right click the canvas and select Tabs > Show Tab Order from the context menu to show the current order of field entry.
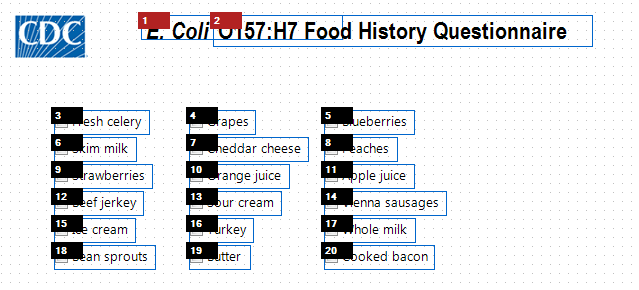
In the example shown in the figure above, the sequence will move the cursor from left to right, row by row.
Suppose you wanted to have the order run down the first column, from ‘Fresh celery’ to ‘Bean sprouts’, then over to the ‘Grapes’ in the second column. There are a couple of methods to do this.
Customize Tab Order using the Mouse
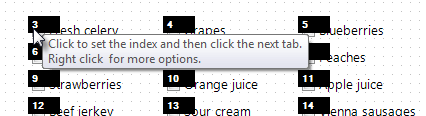
- With the Tab Order showing, hover the mouse pointer over the field you want to be the first field in the sequence. In this example, we want to start the sequence with ‘Fresh celery’ at tab order 3. A prompt appears showing the options available to reset the tab order.
- Click on the tab order number to set the index. In this example, we click the number 3 in order to set the index at 3.
- Click on the tab order number for the next field you want to follow the index field. In our example, the field below ‘Fresh celery’ is ‘Skim milk’, currently tab order 6. When we click on the number 6, the number changes to follow our index field and becomes 4 (one more than 3—our index).

- Click each successive field’s tab order box in the desired flow and the numbers are updated sequentially. In our example, we clicked on the tab order boxes 9, 12, 15, and 18 to set the order to be 5 through 8 consecutively.
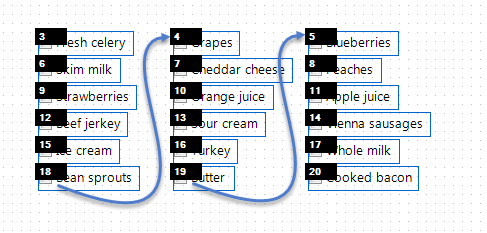
- After clicking the tab number at the bottom of the first column, move the mouse up to the first field of the second column to continue the sequence. Continue clicking each successive tab order number until you are finished. Click anywhere on the canvas to hide the tab order numbers.
Customize Tab Order using ‘Continue Tab Order’
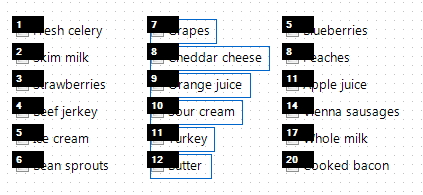
The Continue Tab Order feature sequentially renumbers the tab order for a selected set of fields based on the current index value. As an example, the figure below shows the original tab order in the Food History form of the EColi project located in the Projects folder.

In order to have the order run down the first column, from ‘Fresh celery’ to ‘Bean sprouts’, then over to ‘Grapes’ in the second column using the Continue Tab Order option, follow these steps:
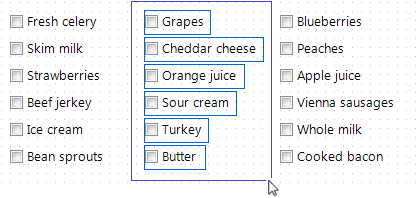
- Click and drag a rectangle around the first column of fields. This will select just those fields.

- Right click the canvas and select Tabs > Start New Tab Order. This will reorder only the selected fields beginning with the first tab order number.

- Click and drag a rectangle around the second column of fields to select them.
- Right click on the canvas and select Tabs > Continue Tab Order. This will reorder the second column of fields continuing from the last Tab Order Number used in the previous action.
- Repeat steps 3 and 4 until all fields’ Tab Order are renumbered as needed.
How To: Disable Tab
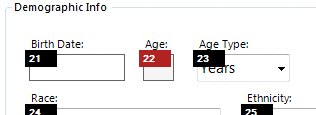
The Disable Tab feature makes the field essentially a Read-Only field that does not receive the cursor. In the example shown in the figures that follow, the Age field is calculated in Check Code based on the value entered for Birth Date. Therefore, the designer of this form wants the cursor to skip over the Age field by disabling its tab.
- Right click the canvas and select Tabs > Show Tab Order from the context menu.
- Right click on the desired field’s tab order box and select Disable Tab.
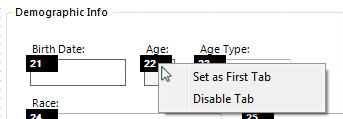
After disabling the Tab for a field, the tab order box becomes red to indicate that it is no longer a field that will receive the cursor. Pressing the tab key will bypass any disabled tabs.
Note: Check Code only runs when the cursor enters a field. If a field’s tab order is disabled, Check Code will not run for that field.