Epi Info™ User Guide
Form Designer
Before You Begin
While you can change these format settings at any time during the form design, if these questions are considered earlier, there may be less rework required to make the form presentable than if these settings are changed after fields are added to the pages.
Decide on a Naming Convention for Field Names
Before beginning to design your form it is helpful to have a standard way to name the data fields. While Epi Info™ will attempt to suggest a field name based on the question or prompt, in many cases these suggestions are too lengthy or cumbersome. Having a standard naming convention to assign to fields as they are added to the form will make later analyses much easier. The following suggestions may help:
- Keep field names short.
- Capitalize words within field names to help improve their readability.
For example, “PatientLastName” is easier to read than “patientlastname”. - Use a prefix to keep associated fields together in alphabetized lists.
How To: Customize the Form Designer
One of the most helpful things you can do before beginning to develop your questionnaire or survey form is to decide on the layout and overall look of the form.
Aspects to consider include the following:
- What Font do you want the Questions and Entry Fields to have? You may want to set the Default Prompt and Input Fonts You specify the fonts in Format > Set Default Prompt Font and Set Default Input Font.
- How far apart should fields be spaced? You may want to adjust the settings for the grid. The grid square size and other grid settings are set in Format > Grid Settings.
- Will the form need to be printed? If so, what size paper will likely be used? You may want to use a corresponding page size when designing the form. You specify the page size in Format > Page Setup.
- What page orientation should be used, Portrait or Landscape? The answer to this may depend on what devices and platform will be used for data entry. If the form will be published to a website or uploaded to a mobile device, consider a smaller page size and an appropriate page orientation. The page orientation is set in Format > Page Setup.
- Would you prefer the Question or Prompt to appear above the Input Field or to the left of the Input Field? You set the question and input field positioning in Format > Page Setup and select Vertical or Horizontal.
- What screen resolution will likely be used for data entry? If the anticipated screen resolution is less than your usually setting, you may consider reducing your resolution while designing the form so the layout of your fields will be consistent when viewed in the Enter tool.
How To: Set a Default Prompt or Input Field Font
Set the character font to be used as fields are added to the form using the Format menu.
Default Prompt Font
- Format > Set Default Prompt Font. The Font dialog box appears.
- Select a font, font style, and sizes.
- Click OK.
Default Input Font
- Format > Set Default Input Font.
- Select a font, font style, and sizes.
- Click OK.
How To: Change Grid Settings
Use the Format settings to customize the Form Designer canvas.
- From the Form Designer toolbar, select Format. The drop-down menu opens allowing you to customize your canvas.
- Select Format > Grid Settings to open the grid settings dialog box.

- Check the Snap to Grid box to force fields in the form to snap to the grid nearest the field edge.
- Check the Show Grid box to see the grid as the canvas background.
- Use the up and down arrows in the Grid Square Size field to alter the displayed width between grid lines.
- Select the Snap prompt to grid or Snap entry field to grid check boxes depending on the snapping effect you want to use.
- Click OK. The Form Designer page appears with new settings.
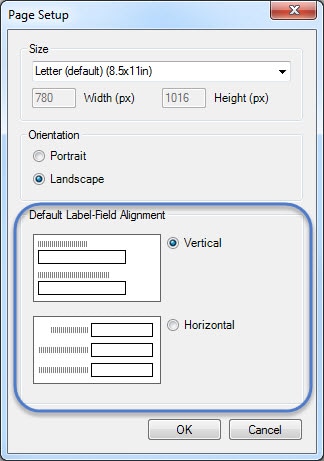
How To: Set the Page Size, Orientation, and Default Prompt Alignment
The Page Size, Orientation, and Default Prompt Alignment are set using the Page Setup dialog.

- On the Form Designer menu, select Format > Page Setup.
- Set the page size to be any of the pre-configured sizes listed in the Size drop-down list or use a Custom Size and specify the Width and Height in pixels.

- Set the preferred page orientation – Portrait or Landscape.
- Portrait orientation is good for data entry forms that need to be printed and when the data entry is done from printed forms that have a portrait orientation. Portrait orientation may also be preferred for forms uploaded to small mobile devices such as smart phones or tablets.
- Landscape orientation is better for forms intended to be published to a website for entry using an Internet browser on a desktop or laptop computer.
Set the default alignment to be vertical so the field is below the prompt and left aligned, or horizontal where the field is to the right of the prompt on the same row.
How To: Insert a Background Image or Color
- From the Form Designer toolbar, select Format > Background. The Background dialog box opens.

- To set a background image, use the Background Image section of the dialog, click Choose Image. The Background Image box opens.
- Locate the image file. Click Open. The selected image appears in the Background Image dialog box. Image formats include bitmap (.bmp), picture (.ico), and JPEG (.jpg).
- Use the Image Layout drop-down list to customize the image on the screen (None, Tile, Center, and Stretch).
- From the Image and Color section, use the option buttons to Apply to all pages or Apply to the current page only.
- Click OK. The image appears in the form.
- To remove the image, select Clear Image from the Background Image box.
- To set a background color, click Change Color. The Color dialog box opens.
- Select a background color from the palette or select Define Custom Colors to enter a more specific color request.
- Click OK. The selected color previews in the background box.
- From the Image and Color section, use the option buttons to Apply to all pages or Apply to the current page only.
- Click OK. The color appears in the form as a background.
- To remove the color, select Clear Color from the Background Color box.