Visual Dashboard: Performing Statistical Analyses with Visual Tools
‹View Table of Contents
Defining New Variables
The Defined Variables Gadget in Visual Dashboard allows you to create, edit, or delete variables with no coding. To access the Defined Variables gadget, move your mouse over Defined Variables on the left-hand side of the screen or by clicking the variable symbol (x) in the Visual Dashboard toolbar.

Figure 8.69: Visual Dashboard toolbar, with the Variable button circled
Creating a New Variable
Project data are not always in the proper format needed for analysis. As an example, a patient’s age may be entered in a questionnaire but the ages may need to be in five-year increments for proper analysis. The data may contain county codes, but descriptive county names may be more useful for analysis. Creating a new variable is one of the functions of the Defined Variables gadget. By creating a new variable, the ages of patients can be recoded to five-year increments, or county names may be assigned to the county codes making the data useful for analysis. A new variable may be created to change the format of existing data with recoded value, simple assignment, formatted value, assigned expression, or by grouping existing variables.
Recoded Value
The New Variable with Recoded Value option assigns a new value to existing data and places the results in a defined variable. Click New Variable in the gadget and select With Recoded Value. The Add Recoded Variable dialog box appears.
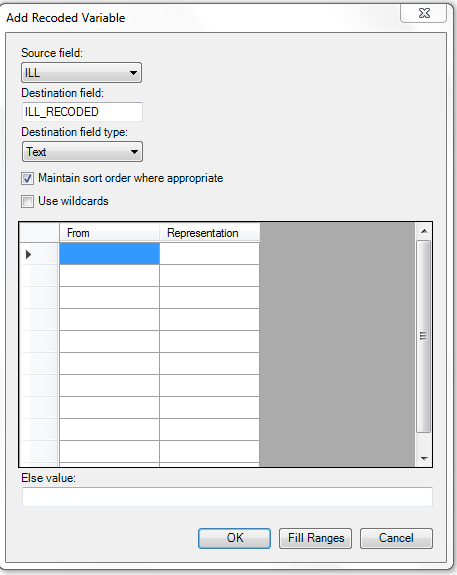
Figure 8.70: Add Recoded Variable dialog box
- The Source field drop-down list represents the column in the current data source that will have its values recoded.
- The Destination field drop-down list represents a new column that will be temporarily created in the current data source to store the recoded values.
- The Destination field type represents the data type of the new column that will be created to store the recoded values. The available options are text, numeric, or Yes/No.
- The Maintain Sort Order Where Appropriate box is checked by default. Usually output in Visual Dashboard is sorted alphabetically or sequentially. Leave this box checked if you would like the output to remain sorted exactly in the sequence that the data were entered.
- The Use Wildcards option can be used for text searches in the FROM column. This option is unchecked by default. The asterisk (*) is the wildcard character.
- The From column identifies the bottom of a range of values or a single value. To recode a single value instead of a range, use this From column only and leave the To column blank. When used to recode a range of values, the recode range includes the value in the From column and extends up to, but not including the value in the To column. To recode all unspecified values, leave both From and To columns blank.
- To value (if any) identifies the upper limit of a range of values to be recoded. The recode range does not include the value in the To column. This option only appears if a numeric variable is selected.
- The Else Value represents an optional value to assign to any records that do not match the recoding rules above. If left blank, the value of the new variable on records that don’t match the recoding rules will be blank, null, or “Missing”.
- Representation Value identifies the value to be assigned to the destination variable for the specified values of the source variable.
- Fill Ranges can be used to automatically populate range values on a numeric source field and is a very quick way to create numeric groupings such as age categories.
- OK accepts the current settings and data, and closes the form or window.
- Cancel exits the window without saving or executing a command.
The following example demonstrates how to add a recoded variable:
In the E. coli Food History table, there are more than 60 different values for Age. When performing an analysis, it is difficult to compare all of the different age values. By grouping the age values in 10-year increments, analysis on this variable is simplified. To group the values in Age groupings or categories:
- Set the Data Source to the EColi.PRJ project.
- From the Form section, click FoodHistory. Click OK.
- On the left-hand side of the Visual Dashboard canvas, move the mouse cursor over the Defined Variables gadget. The gadget expands and becomes fully visible.
- Click the New Variable button.
- Select With Recoded Value. The Add Recoded Variable dialog box appears.
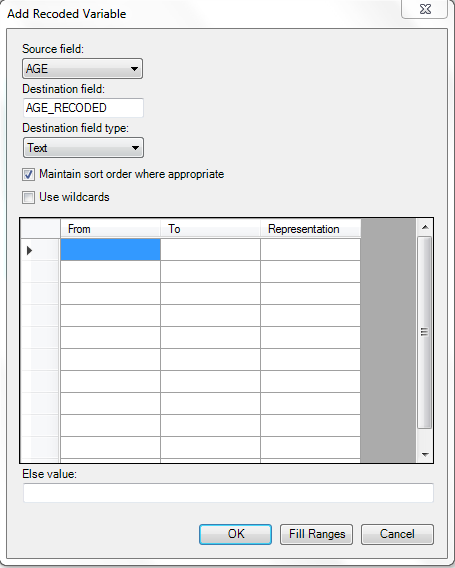
Figure 8.71: Add Recoded Variable dialog box
- From the Source field drop-down list, select Age.
- Click the Fill Ranges button. The Fill Ranges dialog box appears.
- Enter 0 for the Start value, 65 for the End value, and 10 for By.
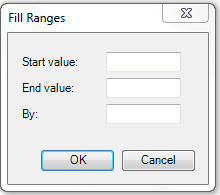
Figure 8.72: Add Recoded Variable/Fill Ranges
- Click OK. The Add Recoded Variable dialog box appears with the From, To, and Representation columns populated.
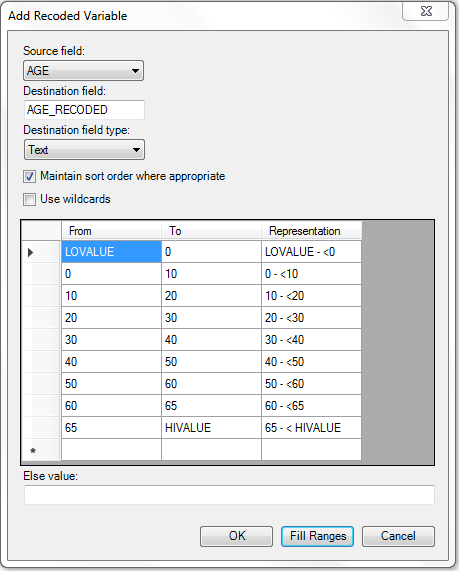
Figure 8.73: Add Recoded Variable Ranges populated
- Click OK. The variables are recoded and the conditions appear in the Variable Definitions textbox.
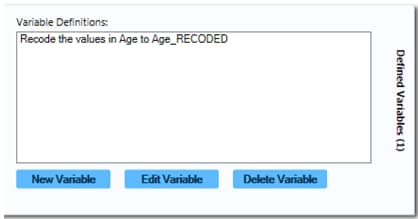
Figure 8.74: Variable Definitions dialog box
To see the frequency of the new Age_RECODED values, right click on the canvas, and then select Add Analysis Gadget > Frequency. From the Frequency of list, select Age_RECODED and click OK.
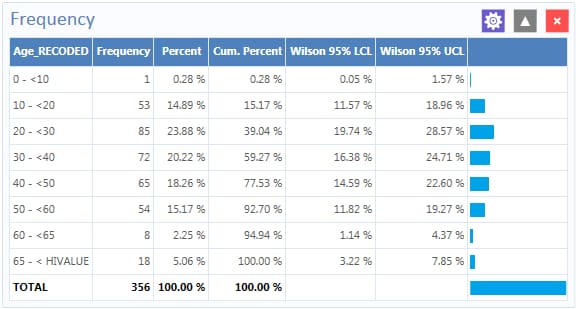
Figure 8.75: Age_Recoded Frequency list
The Age_Recoded variable contains eight distinct values, which makes analysis easier than with the original data set.
Simple Assignment
Simple Assignment will assign the value of an existing variable to a newly defined variable. The following example demonstrates Simple Assignment.
- Set the Data Source to the Sample.prj project.
- From the Data Source Explorer menu, select Surveillance. Click OK.
- On the left-hand side of the Visual Dashboard canvas, move the mouse cursor over the Defined Variables gadget, or click the Variables icon in the top left. The gadget expands and becomes fully visible.
- Click the New Variable button.
- Select With Simple Assignment. The Simple Assignment dialog box appears.
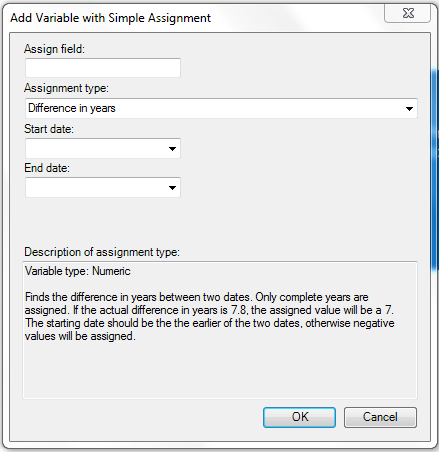
Figure 8.76: Add Variable with Simple Assignment dialog box
- In the Assign field, enter Age_New.
- Select Difference in years from the Assignment type drop-down list.
- Select BirthDate from the Start Date drop-down list.
- Select SYSTEMDATE from the End Date drop-down list. The System Date is a system-level variable that represents the current date and time on your computer.
- Click OK. A description of the assignment appears in the Variable Definitions textbox within the Defined Variables gadget.
To see the Age_New variable in line list view, right click on the canvas and then select Add Analysis Gadget > Line List. Select Age_New from List of Variables to display and then click OK.
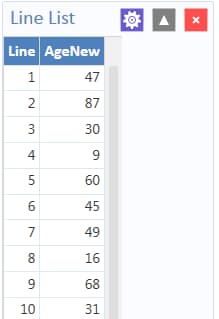
Figure 8.77: Simple Assignment Line List
In this example, the current age of the patient is calculated from the difference between the birth date in the data source and the date the variable is created (current date in your computer). The Analysis Gadget > Line List view displays the new variable created via Simple Assignment.
Conditional Assignment
The Conditional Assignment option defines conditions and one or more events that occur if the specified conditions are met. If the condition is true, the first event is executed. An alternative event can be given after the ELSE statement. The ELSE statement will be executed if the first set of conditions is not true. If the statement is false and no ELSE statement is selected, the statement is bypassed. To add a new variable with a Conditional Assignment, move the cursor over the Defined Variables gadget on the left-hand side of the Visual Dashboard canvas or click the Variables icon in the top left. The gadget expands and becomes fully visible. Click the New Variable button and select With Conditional Assignment.
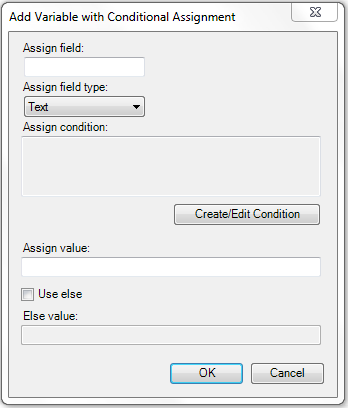
Figure 8.78: Add New Variable with Conditional Assignment
- Assign Field indicates the new variable name.
- Assign Field Type indicates the format of the new variable. The available options are Text, Numeric, or Yes/No.
- Assign Condition determines whether subsequent commands will be run. If the condition specified in this textbox is true, the Assign Value will be applied.
- Assign Value states the value of the new variable when the Assign Condition is true.
- Use Else checkbox indicates whether an Else Value is specified. This checkbox is unmarked by default.
- The Else Value is applied when the statement in the Assign Condition textbox is false.
In the following example, the YoungAdult variable will be conditionally assigned the value of Yes if the Age variable has a value between 17 and 30 inclusive. If the Age value falls outside of this range, a value of No will be assigned to YoungAdult.
- Set the Data Source to the Sample.prj project.
- From the Data Source Explorer menu, select Surveillance. Click OK.
- On the left-hand side of the Visual Dashboard canvas, move the mouse cursor over the Defined Variables gadget. The gadget expands and becomes fully visible.
- Click the New Variable button.
- Select With Conditional Assignment. The Add Variable with Conditional Assignment dialog box appears.
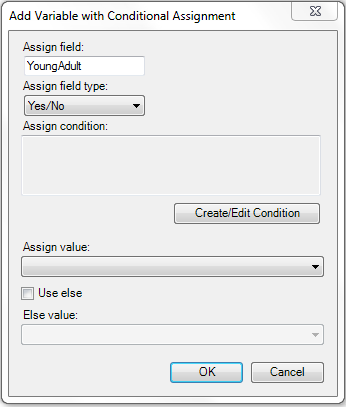
Figure 8.79: Conditional Assignment / Create Edit Condition
- In the Assign field, enter YoungAdult.
- Select Yes/No from the Assign field type drop-down list.
- Click on the Create/Edit Condition button. The Specify Assign Condition dialog box appears.
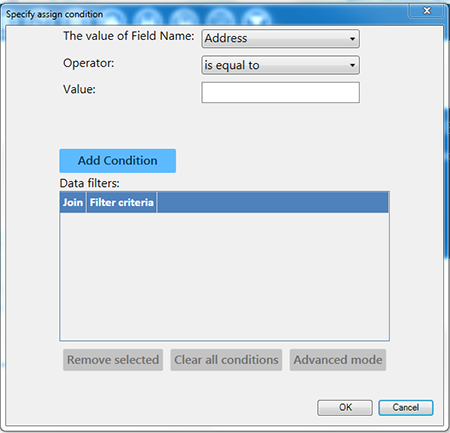
Figure 8.80: Specify Conditional Assignment Condition dialog box
- Select Age from the Field Name drop-down list.
- Select is between from the Operator drop-down list.
- Enter 17 and 30 for Values. Click Add Condition.
- Click OK. The filter criteria appear in the Data Filters list.
- Click OK in the Specify Assign Condition dialog box.
- The condition now appears in the Assign Condition textbox within the Add Variable with Conditional Assignment dialog box.
- Select Yes from the Assign Value drop-down list.
- Check the Use Else checkbox.
- Select No from the Else Value drop-down list.
- Click OK. A description of the assignment appears in the Variable Definitions textbox within the Defined Variables gadget.
To see the YoungAdult variable in line list view, right click on the canvas and then select Add Analysis Gadget > Line List. Select YoungAdult from List of Variables to display and then click OK. Check marks illustrate the lines for which the conditional assignment is true.
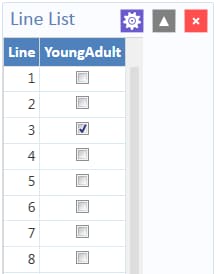
Figure 8.81: YoungAdult Conditional Assignment Line List
Note: The Else clause at the end of the IF statement is important to specify what should happen if the conditions are not met. Without the Else clause, YoungAdult would be null or missing for any values falling outside the 17 to 30 range.
Formatted Value
The format and name of an existing variable may be changed with the Formatted Value option. This is currently only useful with date fields as demonstrated by the example below.
- Set the Data Source to the Sample.prj project.
- From the Data Source Explorer menu, select Surveillance. Click OK.
- On the left-hand side of the Visual Dashboard canvas, move the mouse cursor over the Defined Variables gadget or click the Variables icon in the top left of the screen. The gadget expands and becomes fully visible.
- Click the New Variable button.
- Select With Formatted Value. The Add Formatted Value dialog box appears.
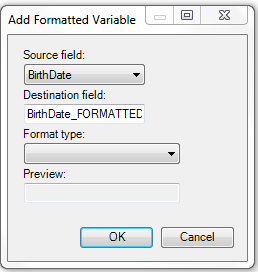
Figure 8.82: Add Formatted Variable dialog box
- Select BirthDate from the Source field drop-down list.
- The Destination field automatically shows the source field with a suffix of “FORMATTED” (i.e. “BirthDate_FORMATTED”). Modify the name of the Destination field as desired.
- Select the long date from the Format type drop-down list. Using the current system date, a sample long date value appears in the Preview field.
- Click OK. A description of the assignment appears in the Variable Definitions textbox within the Defined Variables gadget.
To see the BirthDate_FORMATTED variable in line list view, right click on the canvas and then select Add Analysis Gadget > Line List. Select BirthDate_FORMATTED from List of Variables to display and then click OK.

Figure 8.83: Formatted Variable line list
The Analysis Gadget > Line List view displays the new variable created via Formatted Value.
Assigned Expression
Assigned Expression assigns the result of an expression or the field value to a variable as demonstrated in the example below. In the following example, the zip code field is a number. To use the zip code in a map, a new zip code variable must be defined and assigned text values.
- Set the Data Source to the Sample.prj project.
- From the Data Source Explorer menu, select Surveillance. Click OK.
- On the left-hand side of the Visual Dashboard canvas, move the mouse cursor over the Defined Variables gadget or click the Variables icon in the top left of the screen. The gadget expands and becomes fully visible.
- Click the New Variable button.
- Select With Assigned Expression. The Add Variable with Expression dialog box appears.

Figure 8.84: Add Variable with Expression
- In the Assign Field, enter Zip2.
- In the Expression field, type the syntax: ZipCode + ‘-0000’.
- Select Text from the Data type drop-down list.
- Click OK. The assignment appears in the Variable Definition textbox within the Defined Variables gadget.
To see the Zip2 variable in line list view, right click on the canvas and then select Add Analysis Gadget > Line List. Select Zip2 from List of Variables to display and then click Generate Line List.
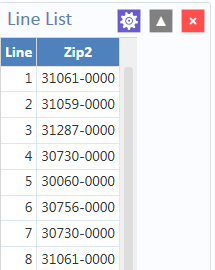
Figure 8.85: Add Variable with Expression Line List
Creating a Variable Group
The Create Variable Group option in Visual Dashboard allows for the temporary grouping of variables. This option is useful when there are many variables and analyzing each is impractical. Group variables can be used in the Combined Frequency and MxN/2×2 gadgets. The following example demonstrates how to create a variable group.
- Set the Data Source to the Sample.prj project.
- From the Data Source Explorer menu, select Oswego. Click OK.
- On the left-hand side of the Visual Dashboard canvas, move the mouse cursor over the Defined Variables gadget or click the Variable icon in the top left of the screen. The gadget expands and becomes fully visible.
- Click the New Variable button.
- Select Create Variable Group. The Create Group dialog box appears.
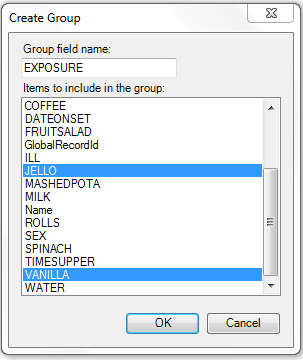
Figure 8.86: Create Group variable options
- In the Group field name, enter Exposure.
- Select JELLO and VANILLA from the Items to include in the group list. Hold down the Ctrl key on your keyboard to select more than one variable at a time.
- Click OK.
- The variable group statement now appears in the Variable Definitions textbox within the Defined Variables gadget.
Edit Variable
The Edit Variable option allows an existing variable definition to be changed. The following example will add a new variable to an existing Exposure group variable such as the one created in the section Creating a Variable Group.
- On the left-hand side of the Visual Dashboard canvas, move the mouse cursor over the Defined Variables gadget, or click the Variables icon in the top left of the screen. The gadget expands and becomes fully visible.
- Click the Edit Variable button.
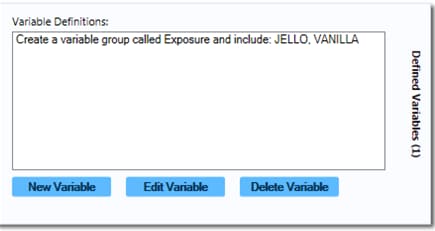
Figure 8.87: Variable group defined
- The Create Group dialog box appears, with JELLO and VANILLA highlighted.
- Press and hold the Ctrl key on your keyboard and select Spinach to add it to the variable.
- Click OK.
- The Exposure variable group now includes Spinach, which appears in the Variable Definitions textbox within the Defined Variables gadget.
Delete Variable
The Delete Variable option in the Defined Variables gadget removes a defined variable from the system. In this example, the Exposure group variable will be deleted.
- On the left-hand side of the Visual Dashboard canvas, move the mouse cursor over the Defined Variables gadget, or click the Variables icon at the top left of the screen. The gadget expands and becomes fully visible.
- Select the Exposure variable definition within the textbox.
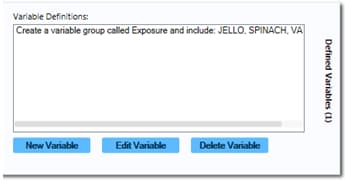
Figure 8.88: Variable Definitions box, illustrating Delete Variable option
- Click on the Delete Variable button.
- The variable is deleted from the Variable Definitions text box.