Classic Analysis: Command Driven Analyses and Data Management
‹View Table of Contents
How to Manage Data
Use the READ Command
To analyze data, it must be read or imported into Classic Analysis. The READ command allows you to select a project and/or data table to run statistics. The READ command is used almost every time you open Classic Analysis.
Warning!
Never manipulate the Form table in a software application outside of Epi Info 7.
The database may become corrupt and render the form unusable.
- From the Classic Analysis Command Tree Data folder, click Read. The READ dialog box opens.
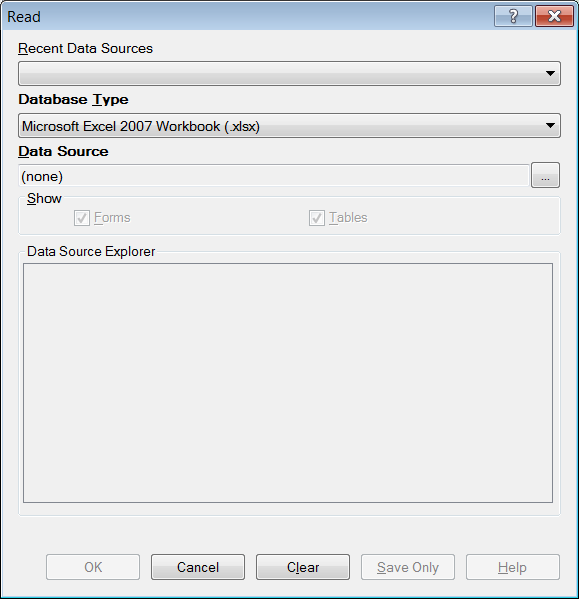
Figure 9.2: Read Window
- The Database Type field indicates the database file to be loaded (.PRJ, .MDB, .XLS). Specify the data format for the data to be read. Unless otherwise specified, output files created from these data are stored in this destination folder.
- The Data Source field indicates the file location/path. If you use an SQL Server database, the Data Source field will require server and database names.
- The Recent Data Sources field provides a list of recently-accessed databases in Classic Analysis or Visual Dashboard. By selecting one of the data sources available on the list, you do not need to provide Database Type or Data Source information. Only data tables or forms will need to be selected again. If you are reading an Epi Info 7 project file from the Data Source section, select the Forms checkbox to view available forms in the project, or select the Tables checkbox to view all project tables.
- From the Forms section, select a form in your project. This reads the data table associated with your form.
- Click OK. The READ command is saved in the Program Editor and run simultaneously. The current form file location, Record Count, and Date appear in the Classic Analysis Output window; the READ command appears in the Program Editor.
- Click Save Only to save the command in the Program Editor. The command does not run and the Record Count is not displayed.
Read a Microsoft Excel File
- From the Classic Analysis Command Tree, click Read. The READ dialog box opens.
- From the Data Formats drop-down list, select either MS Excel 97-2003 Workbook or MS Excel 2007 Workbook.
- In the Data Source field, click on the Browse button to browse and select the workbook (.xls or .xlsx) to import into Classic Analysis.
- Click Open.
- First Row Contains Field Names is checked by default. If the first row of the spreadsheet does not contain field names, deselect the checkbox.
- Click OK.
- Select a Worksheet from the list provided in the Data Source Explorer.
- Click OK. The Record Count and file information appear in the Classic Analysis Output window.
Read a Microsoft Access File
- From the Classic Analysis Command Tree, click Read. The READ dialog box opens.
- From the Data Formats drop-down list, select either MS Access 2002-2003 (.mdb) or MS Access 2007(.accdb).
- In the Data Source field, click on the Browse button to browse and select the file to import into Classic Analysis.
- Click OK.
- Select a data table from the list provided in the Data Source Explorer.
- Click OK. The Record Count and file information appear in the Classic Analysis Output window.
Read an ASCII Text File
- From the Classic Analysis Command Tree, click Read. The READ dialog box opens.
- From the Data Formats drop-down list, select Flat ASCII File.
- In the Data Source field, click the Browse button to browse.
- Click the Browse button again. Select directory of the file to import into Classic Analysis.
- Click OK.
- Select the file from the list provided in the Data Source Explorer.
- Click OK.
Note: There are two forms of text files. Since both have only one table per file, you do not have to specify a table. Both put the data for one record on a single line. The difference is in how the fields are indicated.
Read an SQL Server Database
- From the Classic Analysis Command Tree, click Read. The READ dialog box opens.
- From the Data Formats drop-down list, select Microsoft SQL Server Database.
- In the Data Source field, click the Browse button to browse.
- When the Connect to SQL Server Database dialog opens, specify the server name and database name to connect and import into Classic Analysis.
- Click OK.
- From the list provided in the Data Source Explorer, select a data table.
- Click OK. The Record Count and file information appear in the Classic Analysis Output window.
Use Related Forms
To use RELATE, the READ command must open at least one form/table. The form/table to be linked requires a key field that relates records in the two forms/tables and can be used to join them together. The keys in the main and related tables or forms do not require the same name. If the table was created in Form Designer and the data entry completed using Enter, Classic Analysis can establish a relationship automatically using the Global Record ID and Foreign Key variables created by Epi Info 7. If the relationship was created in another program that uses different keys, the key variables in both files must be identified.
Relationships are represented by double colons (::). Classic Analysis can establish relationships using multiple keys. Currently, only Epi Info 7 projects can be related in Classic Analysis.
After issuing the RELATE command, the variables in the related table may be used as if they were part of the main table. Variable names are duplicated in the related tables; variable names will be suffixed with a sequence number. Frequencies, cross-tabulations, and other operations involving data in the main and related tables can be performed. The WRITE command can create a new table containing both sets of data. More than one table can be related to the main table by using a series of RELATE commands.
Relate keys can contain mathematical or string concatenation expressions. Epi Info 7 functions can be used to determine relationships. It may be easier, however, to write out a new file in which the complex key is included as a single variable. Use this single variable as a key.
PRJ File RELATE Syntax
Use READ to open the first PRJ file, and RELATE to open the second and create the relationship.
READ {.ProjectsSampleSample.prj}:Surveillance RELATE RHepatitis GlobalRecordId :: GlobalRecordId
Try It
Epi Info 7 has a related database in the Sample.PRJ file which contains two forms: Surveillance and RHepatitis. The variable GLOBAL RECORD ID is the internal Epi Info 7 identification key located in more than one form in the project.
- Read in the Sample.PRJ project. Open Surveillance.
- Click RELATE. The RELATE dialog box opens.
- Select RHepatitis. The Build Key button activates.
- Click Build Key. The RELATE-BUILD KEY dialog box opens. Make sure the Current Table radio button is selected.
- From the Available Variables drop-down list, select GLOBALRECORDID.
- Select the Related Table radio button.
- From the Available Variables drop-down list, select GLOBALRECORDID.
- Click OK. The Related Tables field populates.
- Click OK. The RELATE dialog box opens and the Key field populates with the join information.
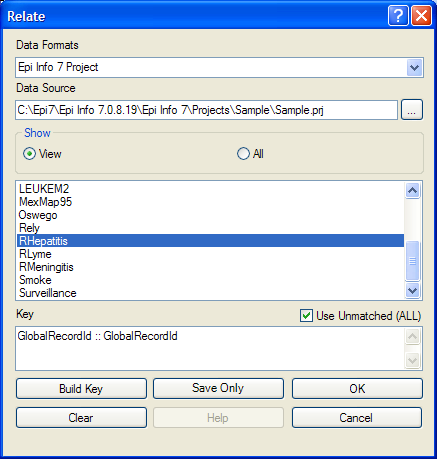
Figure 9.3: Relate Dialog Box
- Click OK. The related form information appears in the Output window.
- Data from the two tables can now be used to compute statistics.
Use the WRITE Command
Use to create a new file with selected variables.
Syntax
WRITE <METHOD> {<output type>} {<project>:}table {[<variable(s)>]}
WRITE <METHOD> {<output type>} {<project>:}table *
WRITE <METHOD> {<output type>} {<project>:}table * EXCEPT {[<variable(s)>]}
To use the WRITE command, open a project using the READ command. Follow these steps:
- From the Classic Analysis Command Tree, click Write. The WRITE dialog box opens.
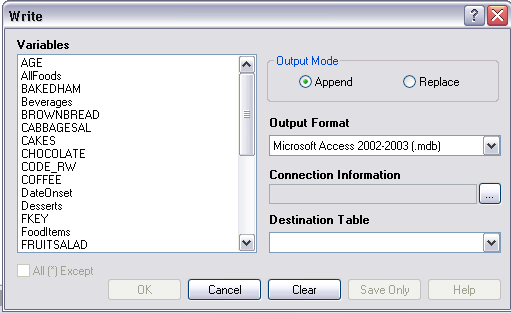
Figure 9.4: Write Dialog Box
- Keep the default setting All (*) unchecked to write all the variables to a new file.
Note: You can also choose individual variables from the file list by clicking on the variable name or select All (*) Except to exclude specific variables. - From the Output Mode section, click the Replace radio button.
- Replace creates a new file and overwrites any existing variables and records. To overwrite or replace data in a table, use the Replace selection.
- Append adds new variables and records to the end of existing data.
- Using the drop-down list, select the desired Output Format.
- Available output formats are the same as ones that can be imported using the READ command (i.e., MS Access, MS Excel, SQL Server and Flat ASCII file).
- Click the Browse button in the Connection Information field to specify file name and location.
- Click OK.
- Establish a name for the Destination Table or select a table name from the drop down list (if the table already exists).
- Click OK.
- To see the data, use the READ command to open the newly-created project.
- The WRITE command will not create a form and cannot create a data table to work with a form. To preserve forms, use the MERGE command.
- Not all output formats support all possible input formats.
Use the MERGE Command
Use the MERGE command to join records. MERGE is only supported if the READ data source is an Epi Info 7 project. A merge requires a key, called the GLOBAL RECORD ID, which represents an internal matching variable inside both sets of data.
Syntax
MERGE <table specification> <key(s)> <type>
- From the Classic Analysis Command Tree, use the READ command to open a PRJ project file.
- From the Classic Analysis Command Tree, click Data > Merge. The MERGE dialog box opens.
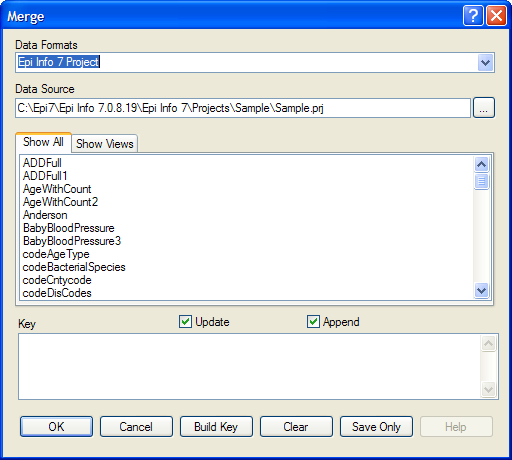
Figure 9.5: Merge Dialog Box
- From the Data Formats drop-down list, specify the other Epi Info 7 project to be read. (Other data sources will be supported in a future release).
- In the Data Source field, click the Browse button. The Merge File Name dialog box opens.
- Select the project file that contains the data to be merged.
- Click Open. The MERGE dialog box populates with available tables or worksheets.
- Merge a data table or worksheet. The Build Key button activates.
- Click Build Key. The RELATE – BUILD KEY dialog box opens.
- There must be a variable in the Current Table that corresponds to a one in the Related Table (i.e., Patient ID).
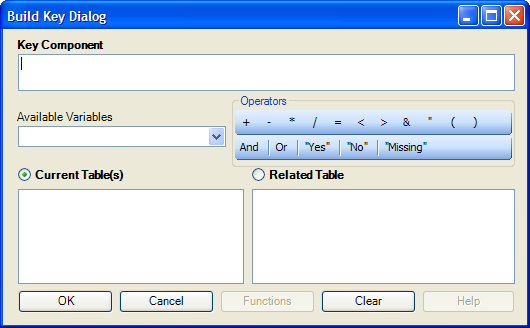
Figure 9.6: Build Key Dialog Box
- There must be a variable in the Current Table that corresponds to a one in the Related Table (i.e., Patient ID).
- From the Available Variables drop-down list, select the current table merge variable.
- Click OK. The Current Table field shows the selection.
- From the Available Variables drop-down list, select the related table merge variable.
- Click OK. The Related Tables field shows the selection.
- Click OK to accept the Build Key designations. The MERGE dialog box opens.
- Make Update and Append selections from the corresponding checkboxes.
- For matching records, Update replaces the value of any field in the READ table whose build key matches the MERGE table.
- or unmatched records, Append creates a new record in the READ table with values only for those fields that exist in the MERGE table.
- For most merges, select Update and Append records. If you select both options, records containing the same selected merge variables will be updated (overwritten) if there is new information. All other records will be appended (added) to the end of the data table.
- From the Merge dialog box, click OK.
- If the MERGE table is the same project as the READ table, the Record Count in the Output window updates to reflect any new records added to the table.