Data Packager: Sharing and Merging Data
PAGE 3 of 5
‹View Table of Contents
Import Data from Data Package
- From the Enter screen, select File > Import Data > From Data Package.
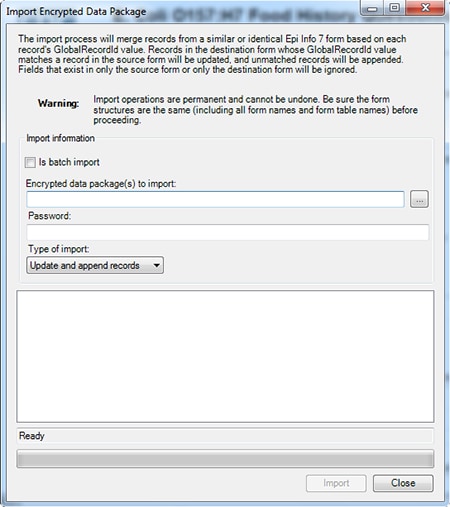
Figure 7.6: Import Encrypted Data Package dialog box
- Check the Is Batch Import checkbox if attempting to import more than one *.edp7 file. When selected, the batch import will only prompt for the folder location containing the *.edp7 files. All files in the selected folder will be imported at once. This option is unchecked by default.
- Click the ellipses to browse the location for the Encrypted data package(s) to import.
- Select the location of your *.edp7 file. Click Open.
- If the data package is encrypted, enter the password in the Password textbox. This password was created when the data was initially packaged. If the data is not encrypted with a password, leave the password textbox blank and continue to the next step.Note: When accessing an encrypted data package, if the password is incorrect or left blank, the message below will appear at the bottom of the dialog box. In addition, when using batch import, all files in a directory must contain the same password or you will get the error message below:
Import FAILED. The package was unable to be decrypted. Check to make sure the password is correct and try again. - Select the Type of Import from the drop-down list.
- Update and append records – Records in the destination form containing the same GlobalRecordId values as the source form will be updated (overwritten) if there is new information. However, values in the destination table will never be overwritten with a null or missing value. All other records will be appended (added) to the end of the table.
- Update records only – Records in the destination form containing the same GlobalRecordId values as the source form will be updated (overwritten) if there is new information. However, values in the destination table will never be overwritten with a null or missing value. All other records will be ignored.
- Append records only – All records in the source form will be appended (added) to the end of the table. No records will be updated (overwritten).
Note: Import operations are permanent and irreversible. Be sure that the form structures are the same (including all form names and form table names) before proceeding.
- Click Import. Import Complete will appear at the bottom of the dialog box upon successful completion of the import.

Figure 7.7: Import Complete
- Click Close to exit the dialog box. The imported data appears in the form on the Enter screen.