Check Code: Customizing the Data Entry Process
‹View Table of Contents
Additional Check Code Commands
Call
This command redirects to another command block in check code and returns after it has been executed. This command is commonly used with subroutines. Subroutines act as a unit of common check code, which is usually dependent on two variables. The benefit of using subroutines is that it allows maintenance of check code in one common location. Here is an example of a subroutine:
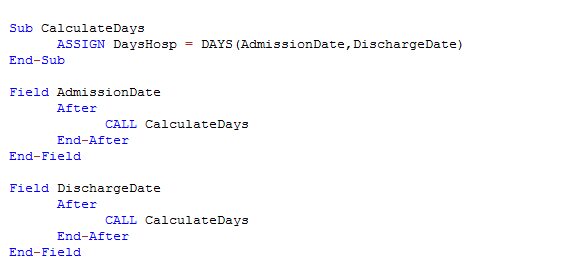
Figure 3.54: Check code syntax for Subroutines
In the example above, the calculation of days hospitalized would have been required to be placed in the AFTER event of the Admission Date and Discharge Date fields. However, through the usage of subroutines, users can update and maintain check code only in one location. By using the CALL command, the block of check code will execute when data are entered or updated in either field.
To create a subroutine, complete the following steps:
- From Form Designer, Open your form.
- Click Check Code. The Check Code Editor opens.
- From the Choose Field Block for Action list box, expand the Subroutine item.
- Double click on the Add new item. The New Subroutine window opens.
- Assign a name to your subroutine (i.e. MySubroutine1).
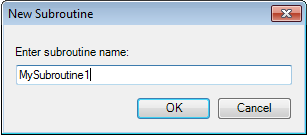
- Click OK.
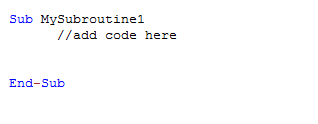
A block of code for the subroutine called MySubroutine1 is created and displayed in the Check Code Editor.
At this point, you can establish the check code commands to be incorporated into the subroutine.
Make sure to Verify your code and Save once done.
Clear
CLEAR sets a field to a missing value, as though the field had been left blank. For example, it is useful to clear a previous entry in a field after an error has been detected. The CLEAR command can be followed by a GOTO command in order to place the cursor back into the field for further entry after an error. In the example below, the Date of Interview field is cleared after the user is notified that the date value entered is greater than today’s date.
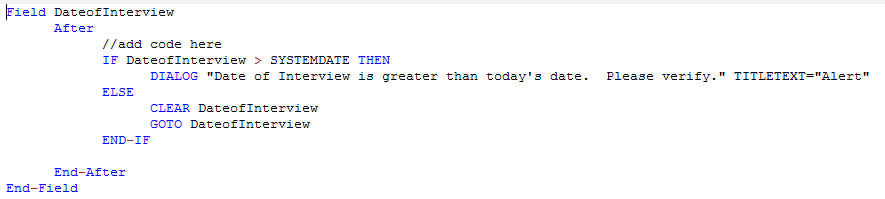
Figure 3.55: Check code syntax for CLEAR command
Define
This command creates a new variable. In Check Code, all user-defined variables are saved in the DEFINEVARIABLES section.
The proper syntax is:
DEFINE < variable name > {< scope >} {< field type indicator >}
- < variable name > represents the name of the variable to be created. < variable > cannot be a reserved word. For a list of reserved words, see the List of Reserved Words section of the User’s Manual.
- < scope > is optional and is the level of visibility and availability of the new variable. This parameter must be one of the reserved words: STANDARD, GLOBAL, or PERMANENT. If omitted, STANDARD is assumed and a type indicator cannot be used.
- < field type indicator > is the data type of the new variable and must be one of the following reserved words: NUMERIC, TEXTINPUT, YN, DATEFORMAT, TIMEFORMAT and DLLOBJECT. If omitted, the variable type will be inferred based on the data type of the first value assigned to the variable. Thereafter, the variable type cannot be changed. An attempt to assign data of a different type to the variable will result in an error.
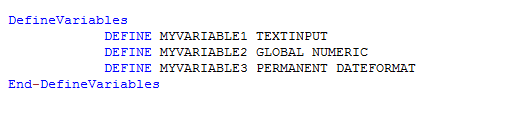
Figure 3.56: Check code syntax for DEFINE command
Below is a description for the optional SCOPE parameter used with the DEFINE command.
- STANDARD variables retain their value only within the current record and are reset when a new record is loaded. Standard variables are used as temporary variables behaving like other fields in the database.
- GLOBAL variables retain values across related forms and when a new form is opened by the program, but are removed when the Enter program is closed. Global variables persist for the duration of program execution.
- PERMANENT variables are stored in the EpiInfo.Config.xml file and retain any value assigned until the value is changed by another assignment or the variable is undefined. Permanent variables are shared among Epi Info modules (Enter, Classic Analysis, etc.) and persist even if the computer is shut down.
Enable / Disable
These two commands usually work in conjunction. The DISABLE command disallows data entry into a field while the ENABLE command allows data entry into a previously disabled field.
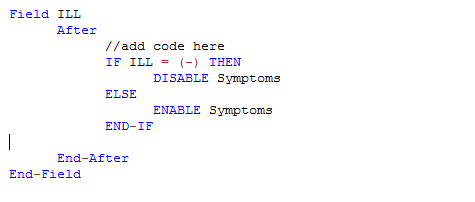
Figure 3.57: Check code syntax for ENABLE/DISABLE command
If there isn’t a need to capture information for a particular field, then it can be disabled. The Disable command is usually used with the IF, THEN, ELSE conditions. In this example, the field DoctorVisitDate will be disabled if the response to the DoctorVisit is No, otherwise it is enabled.
- Open the FoodHistory_NoCheckCode form in the EColi.prj.
- Click Check Code. The Check Code Editor opens.
- Select the DoctorVisit from the Choose Field Block for Action list box.
- Select after from the Before or After Section.
- Click the Add Block button.
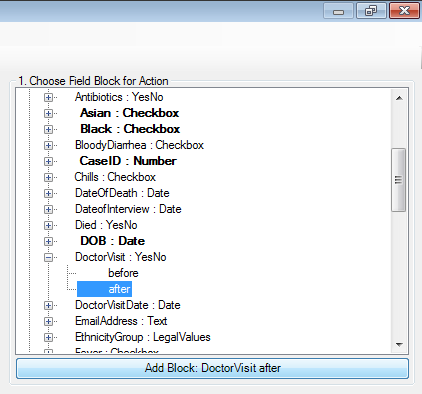
Figure 3.42: Choose the After Block for Action
- The code block appears in the Check Code Editor.
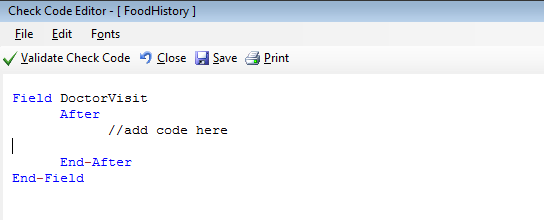
Figure 3.43: Disable Block Command
- Click IF from the Add Command to Field Block list box. The IF dialog box opens.
- From the Available Variables drop-down list, select the field to contain the action. For this example, select DoctorVisit. The selected variable appears in the If Condition field.
- From the Operators, click =.
- From the Operators, click No. The If Condition field will read DoctorVisit=(-).
- Click the Code Snippet button in the Then section. A list of available commands appears.
- From the command list, select DISABLE. The DISABLE dialog box opens.
- Select the field to be disabled based on a No answer from the list of variables. For this example, select DoctorVisitDate.
- Click OK to return to the IF dialog box.
- Click the Code Snippet button in the Else section. A list of available commands appears.
- From the command list, select Enable. The Enable dialog box opens.
- Select the field to enable based on a Yes answer from the list of variables. For this example, select DoctorVisitDate.
- In the Enable dialog box, click OK to return to the If dialog box.
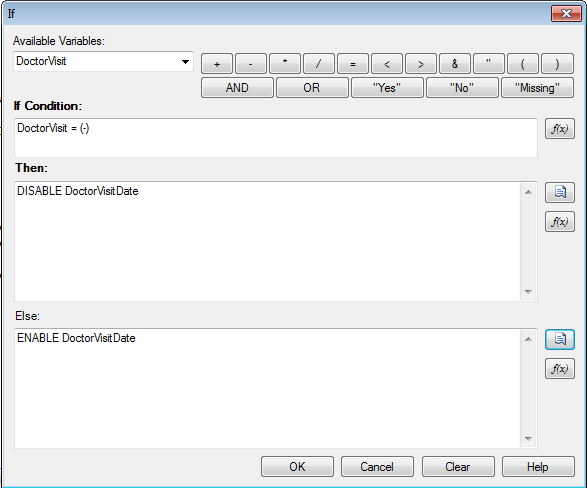
Figure 3.44: Disable- If dialog box
- Click OK. The code appears in the Check Code Editor. The example code appears as:
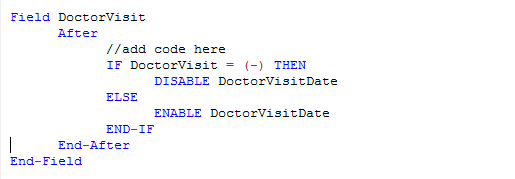
Figure 3.45: Disable Check Code Command
- Click Verify Check Code button.
- Click Save.
- Click Close to return to the form.
To test the Disable, open the form in the Enter Data tool. When No is entered for DoctorVisit, DoctorVisitDate should become disabled.
Hide/Unhide
A field may be hidden if there is not a need to capture information for a particular field or if it does not apply based on previously answered questions. The field on the form would be hidden from the form. In the following example, the Pregnant option box will be hidden based on the users Sex; Female or Male.
- Click Check Code. The Check Code Editor opens.
- Select Sex from the Choose Field Block for Action list box.
- Select after from the Before or After Section.
- Click the Add Block button. This creates code to run after data is entered and accepted.
- The code appears in the Check Code Editor.
- Click IF from the Add Command to Field Block list box. The IF dialog box opens.
- From the Available Variables drop-down list, select the field to contain the action. For this example, select Sex. The selected variable appears in the If Condition field.
- From the Operators, click =.
- From the If Condition field, type Sex = “Male”. Remember that Sex is a text field and the value must be enclosed in quotes.
- 1Click the Code Snippet button in the Then section. A list of available commands appears.
- From the command list, select Hide. The Hide dialog box opens.
- Select Pregnant.
- Click OK.
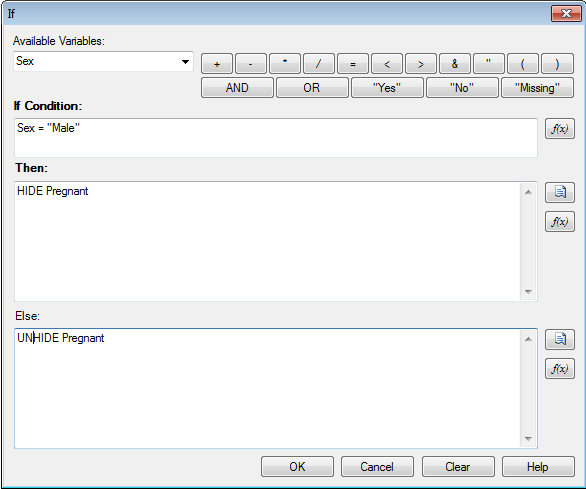
Figure 3.46: Hide- If dialog box
- Click the Code Snippet button in the Else section. A list of available commands appears.
- From the command list, select UNHIDE. The Unhide dialog box opens.
- Select the field to enable based on a Yes answer from the list of variables. For this example, select Pregnant.
- In the Unhide dialog box, click OK to return to the If dialog box.
- Click OK.
- Click OK. The code appears in the Check Code Editor.
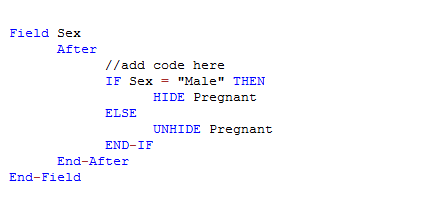
Figure 3.47: Hide Check Code Command
- Click the Save button.
- Click Close to return to the form.
Note: The Unhide command will display any hidden fields. You can select this command in the Add Command to Field Block section of the Check Code Editor.
Execute
Use to execute a Windows program.
Executes a Windows program – either one explicitly named in the command or one designated within the Windows registry as appropriate for a document with the file extension that is named. This provides a mechanism for bringing up whatever program is the default on a computer without first knowing its name. The EXECUTE command accepts a series of paths, separated by semicolons, as in:
EXECUTE c:UsersMyPCmyfile.xls;d:myfile.xls
If the first is not found, the others are tried in succession. In Check Code, the EXECUTE command can be placed in any command block, but is often used with a command button. Check code syntax is executed when the user clicks on the command button.
EXECUTE WAITFOREXIT “< filename >”
EXECUTE NOWAITFOREXIT “< filename >”
- The < filename > represents the path and program name for .exe (filename for registered Windows programs) and .com (filename -DOS binary executables) files.
- The < command-line parameters > represent any additional command-line arguments that the program can accept.
- When Wait for Exit command is specified (modal), the command should run and
Enter should wait until the command has finished executing before proceeding with running subsequent commands.
When No Wait for Exit command is specified (non-modal),
Enter should continue running any subsequent commands without waiting for the other program.
When EXECUTE is run modally, permanent variables are written before the command is executed and reloaded after the command is executed.
If the example below, the CDC website page is opened when the user clicks on a command button called OpenCDCWebsite. A .pdf file is automatically opened when the user clicks on a command button called OpenPDFdocument.
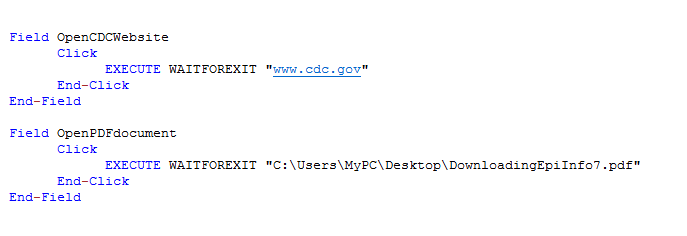
Figure 3.58: Check code syntax for EXECUTE command
Highlight/Unhighlight
The HIGHLIGHT/UNHIGHLIGHT command emphasizes the location of a field by highlighting in bright yellow, for example, if a data entry error was detected. It also unhighlights the field if needed. In the example below, the field Emergency is highlighted if the response to the field Vaccinated = “No”. All vaccinated questions are skipped and the field “Did you visit the emergency room?” is highlighted.
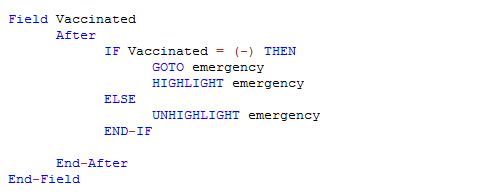
Figure 3.59: Check code syntax for HIGHLIGHT/UNHIGHLIGHT command
Geocode
The Geocode command uses the text entered into Address to retrieve and populate Latitude and Longitude coordinates into your form.
- From Form Designer, Open the FoodHistory_NoCheckCode form in the EColi.prj.
- Click Check Code. The Check Code Editor opens.
- Select GetCoordinates from the Choose Field Block for Action list box.
- Select Click.
- Click the Add Block button. This creates code to run after the Get Coordinates command button is clicked.
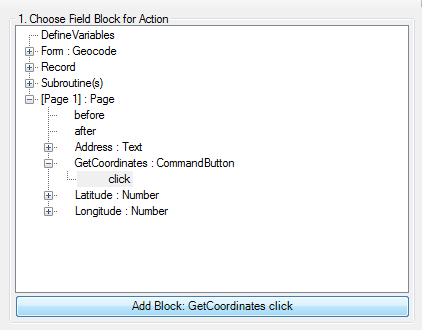
Figure 3.48: Geocode Block for Action
- The code appears in the Check Code Editor.
- Select Geocode from the Add Command to Field Block list box. The Geocode dialog box opens.
- From the Address drop-down list, select Address.
- From the Latitude drop-down list, select Latitude.
- From the Longitude drop-down list, select Longitude.
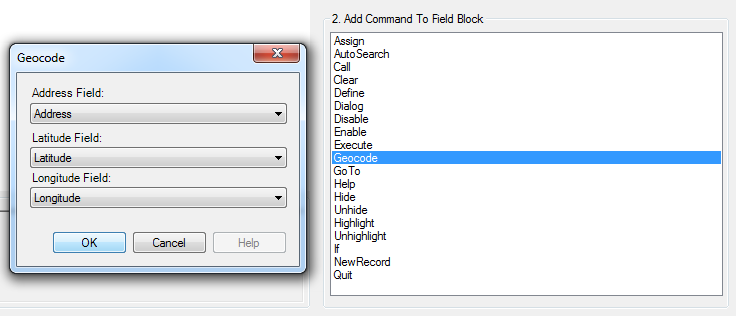
Figure 3.49: Geocode dialog box
- Click OK.
- Click OK. The code appears in the Check Code Editor.
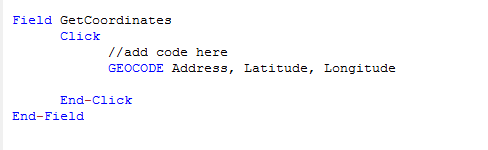
Figure 3.50: Geocode Check Code Command
- Click the Save button.
- Click Close to return to the form.
When the Get Coordinates command button is clicked after an address is entered into your form in the Enter Data tool, the Geocode Results dialog will appear.
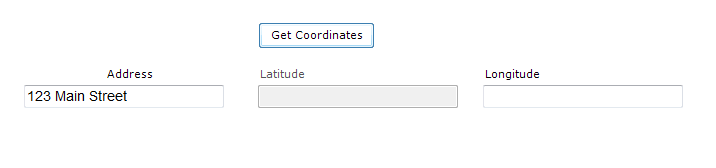
Figure 3.51: Geocode Enter Data Before
The Geocode Results dialog box contains, the Address entered into the form along with the Latitude and Longitude coordinates of that address. The confidence and quality of the geocoding service coordinates are also displayed.
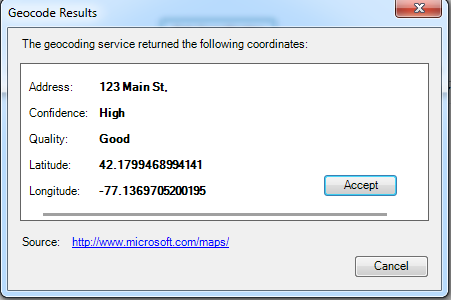
Figure 3.52: Geocode Results
After clicking Accept in the Geocode Results dialog box, the coordinates provided by the geocoding service are copied into the Latitude and Longitude fields in your form.
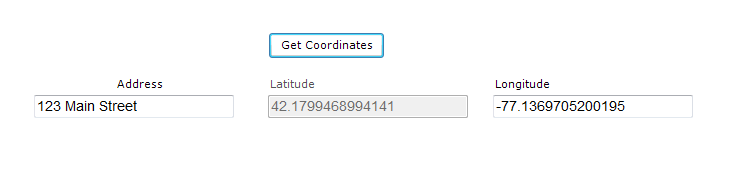
Figure 3.53: Geocode Enter Data After
New Record
The NEWRECORD command saves the current records data and opens a new record for data entry.
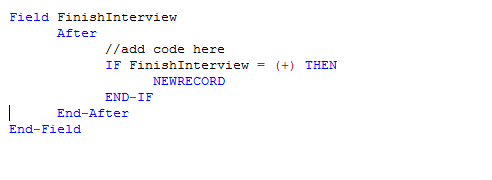
Figure 3.60: Check code syntax for NEWRECORD command
Quit
The QUIT command allows the saving of the current record and closing of the Enter application.
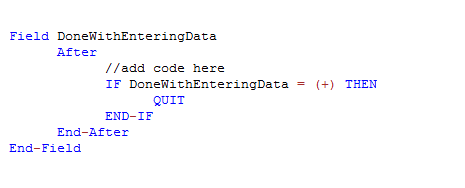
Figure 3.61: Check code syntax for QUIT command
Set-Required; Set-Not-Required
Sometimes users might want to set up a field as required only if a specific criterion is met. As with the REQUIRED property, if a field is set to required during data entry through check code, the Enter module will not allow further page navigation until a value has been entered into the field. In the example below, the field VaccinationDate is set as required if the Vaccination question is answered as Yes using the Set-Required command. Notice that the REQUIRE property has not been set during the creation of the field but it has been set with the check code. Once the criterion is met, the field is set back to its original state by using the Set-Not-Required command.
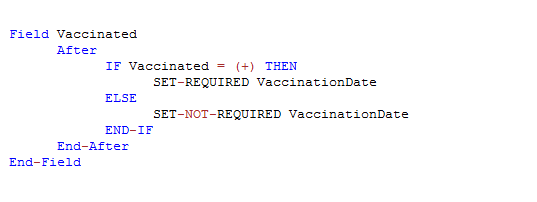

Figure 3.62a & b: Check code syntax for SET-REQUIRED command
Check Features Covered Elsewhere
The Enter tool can be programmed to do many interesting and complex operations not discussed in this chapter, including mathematical and logical operations with more than one field, popping up help windows, and calling programs in other languages that act on the contents of fields during data entry.
For information on other things that can be done in Check Code, refer to the sections covering the Command Reference and Functions and Operators.