Epi Info™ User Guide
Form Designer
How To: Use Fields
A Field is sometimes called a data entry field or input field. The field is usually where the answers to the questions are entered, although Epi Info™ 7 has a few field types that don’t receive any data such as Label Fields and Command Buttons.
Fields usually contain a question or prompt or some text describing the data that will be collected. In Epi Info™ 7, different fields are provided to collect different types of information. A list of available fields is shown in the Project Explorer under the Fields category. You can also right click on the Canvas and click New Field to see the same list of available field types. Fields may have attributes that are specific to the type of data the field will hold. These attributes, and the individual field types are described below.
The table below has links for each of the field types available in Epi Info. Many of these links share similar attributes. For information of some of these common attributes, refer to the Field Attributes topic.
How To: Add a New Field to the Canvas
Click and drag the type of field you want to add from the Project Explorer to the approximate location on the canvas.
Alternatively, right click on the canvas in the approximate location you want to add a field and select the field type from the New Field context menu.
A Field Definition dialog box appears. The contents of the Field Definition dialog depend on the type of field being added.
How To: Edit an Existing Field
To edit an existing field’s properties, right-click on the field and select Properties from the context menu. The Field Definition dialog box appears. Make the necessary changes and click OK.
How To: Edit a Field Name
Field Names are critically important to Epi Info™ 7 projects because they are the basis for everything from database management, to data validation, and analysis. Because field names are such an integral part of Epi Info™ 7 projects, field names cannot be changed after the data table has been created to begin collecting data—even when testing the form with test data.
Therefore, it is very important to establish a concise and usable naming convention for your field names when beginning to design your data entry form. Although Epi Info automatically suggests a field name based on the Question or Prompt, it does so by concatenating the first several words together, stripping spaces and invalid symbols. This can be convenient when the question is only a few short words, but if the prompts to your questions frequently begin with similar phrases such as “Please enter the …?” or “What is the …?”, then the suggested field names will also have the same ambiguous start creating a very challenging and tedious experience searching for a specific field when writing Check Code or using Analysis and the Visual Dashboard.
For these reasons, is very important that field names be short, intuitive, and usable. Field names cannot start with a number or contain any spaces or non-alphanumeric characters (except the underscore character “_” is permitted).
The field name cannot be changed after the data table is created. When testing a form in Enter, the data table is initially created. If the data table has no data or only test data that can be discarded, you can delete the data table in order to change the field name. Refer to the topic ‘Delete an Existing Data Table Without Deleting the Form’ for more information.
Invalid Field Names
Since field names cannot start with a number, if your question or prompt begins with a number, Epi Info’s suggested field name will begin with a leading letter “N” before the number.
Field names cannot have spaces or non-alphanumeric characters other than the underscore.
Since fields are referenced by their field name in the database, the field name must be unique—it cannot already exist as the name of another field in your form.
Finally, Epi Info needs to reserve some words for internal use and to avoid conflicts related to database interaction. For a complete list of reserved words, please see the appendix
If your desired field name is invalid for any of the reasons mentioned above, it will appear in red font and the OK button will be disabled. To avoid this, modify the field name slightly, perhaps add a suffix or prefix to make it an acceptable name. Then click OK.
How To: Delete a Field
To delete a field, follow these steps:
- Right click on the field. The context menu opens.
- Click Delete. The field is removed from the form and any data collected with the field is removed from the database.
Warning: The field and any data previously collected are permanently deleted from the form and the database. Deletions occur immediately. There is no prompt to verify the deletion before it occurs, and the only way to recover the field is by using the “undo” feature, however, “undo” will not recover deleted data.
How To: Copy, Cut, and Paste Fields
Fields can easily be moved between pages, or duplicated to accelerate the creation of the questionnaire. To Copy or Cut and Paste fields, follow these steps:
- Click and drag a rectangle around the field or fields to be copied or cut.
- From the Form Designer toolbar, select Edit > Copy or Cut from the drop-down list.
- Click in the new section of the form or select a new page in the project.
- Select Edit > Paste. The copied fields appear in the form.
When pasting fields, Epi Info automatically suggests a field name based on the name of the original field. To ensure the field name is unique, Epi Info appends a number. For example, if the field name of a field being copied is “Age”, then the pasted field is automatically named “Age1”. Copying and pasting this field again will result in a third field named “Age11”. The similarity of these names may lead to confusion and sometimes errors when used in Check Code and in analyses. Therefore it is important to change the field name as described in the next step.
For each field pasted, do the following:
- Right click the new field’s question or prompt and select Properties from the context menu.
- Click in the Field Name text. Change the field name making it more clear and intuitive for the instance of the new field.
- Field names cannot start with a number or contain any spaces or non-alphanumeric characters (except the underscore character “_” is permitted).
Note: Field names cannot be changed after a data table has been created or data collection has started.
Note: You can also right click on the field and use the context menu to copy or cut the field. Also, you can right click the canvas and use the context menu to paste a field from the clipboard.
How To: Align Fields
There are several ways to align fields in Form Designer. Aligning fields in a consistent format allows you to make the form appear more professional. The process of aligning fields begins with selecting the desired fields to be aligned.
- Click and drag a rectangle around the fields to be aligned.
- To align the fields vertically, select Format > Alignment > As Stack.
- To align the fields horizontally, select Format > Alignment > As Table.
- For additional options, right click on the canvas to display the possible alignment configurations.
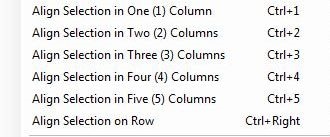
- The options appear as follows:
- Align Selection in Column(s) – aligns all fields vertically in the number of columns indicated (similar to Format > Alignment > As Stack).
- Align Selection on Row – aligns all fields horizontally which is similar to Format > Alignment > As Table.
How To: Set Field Size
There are several field sizing options available in Form Designer. Making field sizes consistent will allow the user to make the form appear more professional. The process of standardizing the field size begins with selecting the desired fields.
- Click and drag a rectangle around the fields to be re-sized.
- Right click on the canvas to display the possible sizing configurations.
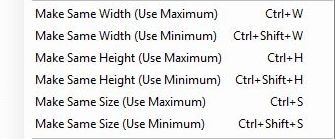
- The options are as follows:
- Make Same Width (Use Maximum) – Adjusts selected fields’ width to match the widest field of the selection
- Make Same Width (Use Minimum) – Adjusts selected fields’ width to match the narrowest field of the selection
- Make Same Height (Use Maximum) – Adjusts selected fields’ height to match the tallest field of the selection
- Make Same Height (Use Minimum) – Adjusts selected fields’ height to match the shortest field of the selection
- Make Same Size (Use Maximum) – Adjusts selected fields’ height and width to match the largest field of the selection
- Make Same Size (Use Minimum) – Adjusts selected fields’ height and width to match the smallest field of the selection
Manually Set Field Size
- Hover your mouse over the field to display the field’s frame and sizing handles.
- Hover the mouse over one of the sizing handles to see the mouse change to an arrow cursor.
- Click and drag a sizing handle to stretch the field to the needed size.

How To: Set Field Position
In certain cases, the field alignment or positioning will need to be adjusted manually. In Epi Info, the field and prompt can move together or separately. This is especially helpful if using a right-to-left language where the question or prompt should be to the right of the entry field.
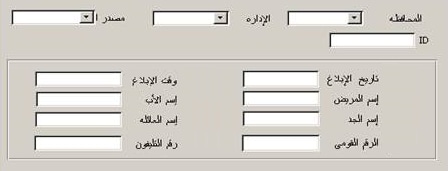
The following example is based on a form containing a Label/Title field and a Text field.
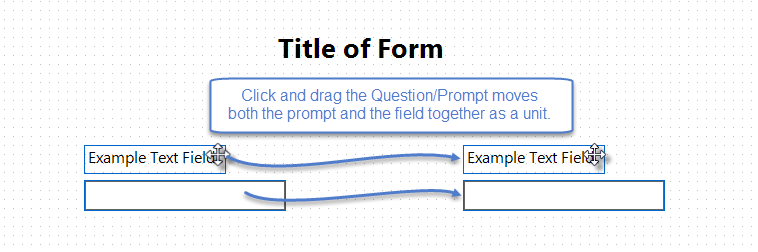
- To move a field and question together, click and drag the field’s prompt.
- To move the field and prompt separately, click and drag the entry field, not the prompt, as shown below.
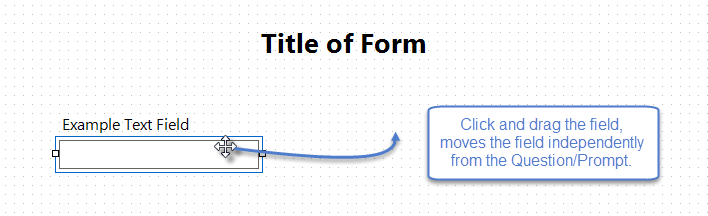
- Release the entry field at the desired location.

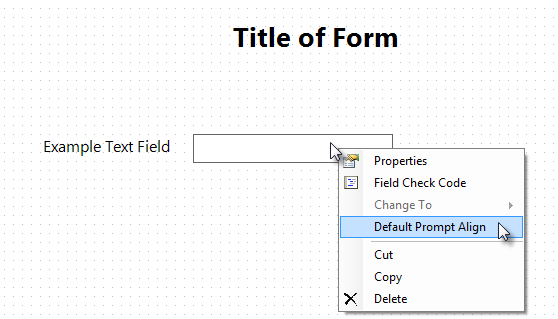
- To restore the original field and prompt alignment according to the default configuration, right click on the field or prompt and select Default Prompt Align.
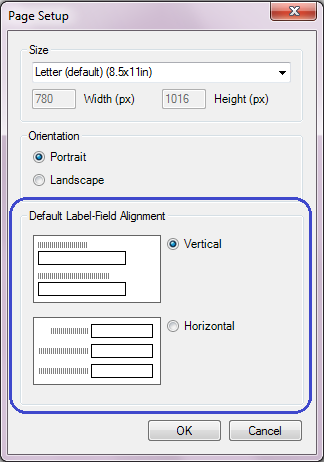
- To set the default prompt alignment, select Format > Page Setup from the Form Designer menu bar. Set the default alignment to be vertical so the field is below the prompt and left aligned, or horizontal where the field is to the right of the prompt on the same row.