Collecting & Analyzing Data on an Android Device

Configuring Cloud Synchronization with Windows Azure

You will need to first create a Windows Azure account at Windows Azure Home. The free tier is sufficient for many data collection activities. Please note that you MUST get organizational approval first if you are using this service for official purposes!

Please complete the steps documented below in order to set up your Companion for Android application with Windows Azure.

Create an Azure App Service Mobile App

1.    Create new Mobile App by clicking on: New > Web + Mobile > Mobile App

  • Remember “App Name” as it will be used by your Android app
  • Create a new Resource Group or choose from Existing
  • Choose App Service plan
  • Click on Create
  • Wait a few minutes; refresh your web browser
Screen shot of the Create an Azure App Service Mobile Application section in the Microsoft Azure portal.

Figure 6.37: Create a Mobile Application in Windows Azure

Screen shot of the Resource group creation

Figure 6.38: Resource group

2.  Click the new icon that got created on the dashboard that looks like a tablet. If you don’t see the icon you can go to All resources and find the App Service you just created.

Screen shot of the list of Resources available in the Microsoft Windows Azure portal.

Figure 6.39: All Resources list

3.  Under Settings, Go to Mobile Section and click on Easy tables.

Screen shot of the Easy tables section in the Microsoft Azure portal.

Figure 6.40: Easy tables

4. Click on “Need to configure Easy Tables/Easy APIs – Click here to continue.”

Screen shot of the Need to configure Easy Tables/Easy APIs dialog window.

Figure 6.41: Configuring Easy Tables

5. Perform Step 1 Connect a database -> “Click here to create one”.

Screen shot of the Connect to a database dialog window in the Microsoft Azure portal.

Figure 6.42: Connect to a database

6.  In Data Connections blade click on Add.

Screen shot of the Data Connections dialog window

Figure 6.43: Adding data connections

7.  In Add data connection blade click on “Configure required settings”.

Screen shot of the Configure SQL Database dialog window in the Microsoft Azure portal.

Figure 6.44: SQL Database configuration

8.  Create a new database or set an existing database.

Screen shot of the Create a new database dialog window in the Microsoft Azure portal.

Figure 6.45: Create a new database

  1. Provide Name for the database.
  2. Set pricing tier to Free or as per your need.
Screen shot of dialog window whcih contains the parameters for the creation of a new database in the Microsoft Windows Azure portal.

Figure 6.46: New database creation parameters

9.  Click on Configure required settings to configure database security setting.

Screen shot of Configure required settings to configure database security setting in Microsoft Windows Azure.

Figure 6.47: Configuring server

10.  In the New Server blade provide the Server name, Server admin login, Password, confirm password and choose the location of the server. Leave “Allow azure services to access server” checked.  Click OK.

Screen shot of New Server dialog window in Microsoft Azure requesting the Server name, Server admin login, Password, confirm password and the location of the server.

Figure 6.48: Configuring server parameters

11.  Click OK on New Database blade

12.  Click OK in Add data connection blade

13.  Data connection creation process starts. Wait for the process to complete in Notification area.

Screen shot displaying the Data Connection creation process.

Figure 6.49: Data connection process

14.  Easy Tables > “Need to configure Easy Tables/Easy APIs – Click here to continue” (yes, AGAIN!) > Initialize app

Screen shot showing the Configuring Easy tables process where user clicks on continue to complete the process.

Figure 6.50: Configuring Easy tables

15.  In Easy Tables blade, perform Step 2 of Initialize app by clicking the acknowledgement check box.

Screen shot for initializing the application service in Microsoft Windows Azure.

Figure 6.51: Initialize application service

16.  Wait for the process to complete, watch the notification area for progress.

Screen shot demonstrating the backend initialize process in Microsoft Windows Azure portal.

Figure 6.52: Initialize application service in progress

Screen shot demonstrating the application service backend initialize process in Microsoft Windows Azure portal.

Figure 6.53: Initialize application service

17.  In Easy Tables click Add to add the table.

  1. The “Name” here needs to match your Epi Info form name. Table created for both Parent and child form have exactly same name as form name in Epi Info even though we append an underscore on the form name when copying to Android tablet.
  2. Leave everything anonymous or disable certain functions (don’t enable authentication). Click OK.

18.  Newly created table is available in the list of Easy Tables.

19.  Click the newly created table.

20. In the blade for the table click on Edit Script.

Screen shot of Edit Script option.

Figure 6.56: Edit script option

21. Right-click on {your table name}.js and click on Delete in the context menu.

Screen shot of Delete option for Easy tables.

Figure 6.57: Deleting easy table with .js extension

22. Right-click on tables and click on Upload Files in the context menu.

Screen shot of Upload Files option for Easy tables.

Figure 6.58: Uploading file

23. Upload “easy_tables.js” file.

Screen shot of section for modifying the Easy_table.js file.

Figure 6.59: Import of Easy_table.js file

24. In the javascript file for easy_tables.js file change the text that says “CHANGE ME” to a token that you will use on the Android app.

Screen shot of script modification on Easy_table.js file for the epiToken parameter.

Figure 6.60: Modification of epiToken setting

25. Right-click on “easy_tables.js” and rename to {your table name}.js.

Screen shot of the Rename option for  the Easy_table.js file.

Figure 6.61: Renaming of Easy_table.js file

Screen shot of completion of renaming of the Easy_table.js file.

Figure 6.62: Renaming completed

26. Click {your table name}.json.
a. Set “softDelete” to false.

Screen shot of the softdelete parameter section in the .json file.  Default setting for softDelete parameter is "true"

Figure 6.63: Modification of softDelete parameter in .json file

Screen shot of the softdelete parameter section in the .json file.  Default setting has been changed to  "false"

Figure 6.64: Modification of softDelete parameter in .json file

Configuring the Application to Use the Settings

  1. From the Companion for Android main menu, click on the Settings option.
    Screen shot of the settings option available in the main menu of the Epi Info mobile application.

    Figure 6.40: Companion for Android Configuration Settings

  2. Provide the Windows Azure Mobile Application name to use for data synchronization in the Azure Mobile Application section. Also, provide the Windows Azure authorization token to use for data synchronization. This was established in the epiToken setting of the .json file corresponding to the form. Turn off “Use Microsoft Azure classic services”.
Screen shot of the Cloud Syncronization settings for the mobile application.

Figure 6.66: Specify Mobile Application name and Authorization token


Receiving Data and Creating a Data Table in Windows Azure

The last step required in order to synchronize data between the device and the cloud would consist of creating a data table in the cloud. In order to do so, please complete the following steps:

  1. Login into your Windows Azure account.
  2. Click on Mobile Services.
  3. Click on the corresponding mobile service.
  4. Click on Data.
  5. Click on Create (located at the bottom of the screen).
  6. Provide a table name. Please Note that this Table Name must exactly match the corresponding Form Name in the Companion for Android application.
    Create the data table in a cloud service

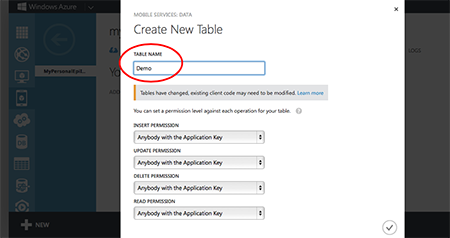
    Figure 6.42: Create data table in cloud service


  7. Click on the check mark icon to complete the table creation process.

At this point, you should be able to start entering data into your android device and synchronizing data using the Sync with Cloud option of the Collect data module.


Select Sync with cloud

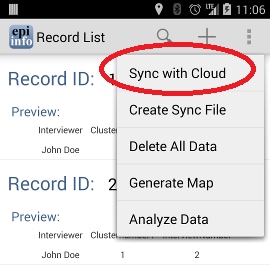
Figure 6.43: Synchronize data with cloud

Page last reviewed: September 16, 2022, 12:00 pm