Epi Info™ User Guide
Check Code
Check Code: Customizing the Data Entry Process
Check Code Commands
Searching for Records – Using the AUTOSEARCH command
The Autosearch command automatically searches for an existing record that matches the entered values and notifies the user. A choice is then offered between editing the matching record or continuing with data entry in the new record. Duplicate records are detected and may be prevented with the AutoSearch command. For this example, we will incorporate the Autosearch command on the CaseID field.
- From Form Designer, Open the FoodHistory_NoCheckCode form in the EColi.prj.
- Click Check Code or select Tools > Check Code Editor. The Check Code Editor opens.
- From the Choose Field Block for Action section, expand the node for the page where the CaseID field is located, which in this example is Page 1.
- Expand the node for the field CaseID.
- Double click on the after event.
- A block of code for the CaseID field is created and displayed in the Check Code Editor.
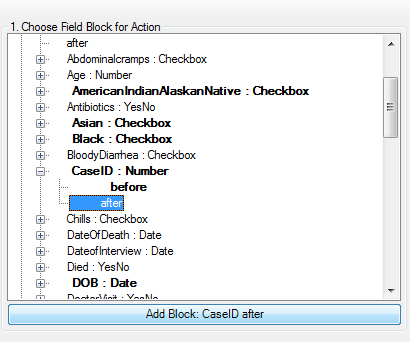
Figure 3.25: AutoSearch Block for Action
- The code appears in the Check Code Editor.
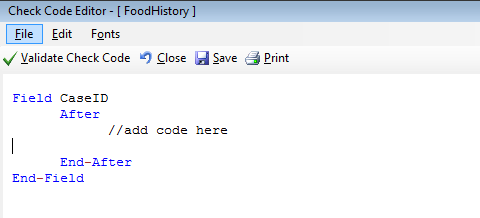
Figure 3.26: AutoSearch Block Code
- From the Add Command to Field Block list box, click Autosearch. The Autosearch window opens.
- Select the variable(s) to be searched during data entry. In this example, select CaseID.

Figure 3.27: Auto Search dialog box
- Click OK. The code appears in the Check Code Editor window.

Figure 3.28: AutoSearch Check Code Command
- Click the Verify Check Code button from the Check Code Editor.
- Click the Save button from the Check Code Editor.
- Click Close to return to the form.
When a duplicate record is entered in the Enter Data tool, the Autosearch dialog box opens with all the matching records listed. To view the potential duplicate record, double-click the arrow that appears next to the record. The field where the potential duplicate was entered is cleared. Alternatively, click Cancel to remain on the current record and accept the duplicate value. To display other variables when a matching record is found, add the variable names after the DISPLAYLIST parameter (i.e. Last Name, First Name and Date of Birth as shown below)
Field CaseID
After
//add code here
AUTOSEARCH CaseId DISPLAYLIST CaseID LastName FirstName DOB
End-After
End-Field
In the check code above, the autosearch will be done on the field CaseID and if any matching records are detected, the fields CaseID, LastName, FirstName and DOB will be displayed on the grid.

Figure 3.29: AutoSearch Results
Note: For more information on using Autosearch, please see the Autosearch topic in the Command Reference.