User Manual - SEALS

SEALS is designed to capture, store, and analyze data for local school sealant programs. Data is saved
in a format that allows local and state oral health programs to generate reports summarizing the effectiveness and efficiency of school sealant programs. Local programs can also export data stored
in SEALS for further analyses.
October 2018
* State users should refer to the State User Supplemental Manual for information relevant to
the state user role in SEALS.
USER ROLES AND RIGHTS OF ACCESS
SEALS is designed to capture and store school sealant program (SSP) data in a form that allows multiple users to access that data, and to generate summary reports on SSP costs and impact. There are three levels of users: local SSP, state, and CDC. User types differ by the information each can input into SEALS, by the access rights each has, and by the type of summary reports each can generate:
Local SSP users will need to input information on schools served by their program, logistics of sealants delivery, per-unit resource costs, and resource use and services delivered at each school sealant event. Local SSP users also have the option to input child-level data, including oral health status and socio-demographic characteristics. Local SSP users can create summary reports on the cost and effectiveness of their SSP and export their data for further analyses. Finally, local SSP users can create accounts for other personnel in their sealant program.
State users will need to create one account for state personnel to access SEALS and separate accounts for each sealant program in the state to input its information into SEALS. State users can create summary reports for individual SSPs or for all SSPs combined generated from data input by sealant programs in their state.
CDC users include project officers and an administrator. Project officers can view SSP reports for all states. The CDC administrator can generate summary reports for a local SSP, a funded state, or all states combined. The CDC administrator can also view and export data for further analyses. In addition, the CDC administrator can create state user and local SSP user accounts.
More details on user roles and access rights are provided in the Appendix (Section 1, page 22).
VIEWING SEALS
SEALS is designed to operate on desktop computers or laptops. It is not optimized for mobile devices such as tablets or cell phones. Viewing SEALS on a desktop is easiest when the resolution is set to 1680×1050 or higher. Paper forms to collect information on schools served and individual children (where applicable) can be found in the Appendix (Section 7, page 32).
ACCESSING SEALS
SEALS is accessed at https://nccd.cdc.gov/SEALS/Default/Login.aspx
After an account has been created, users logging in with a registered email address and password will land on the SEALS home page. The home page provides contact information for state school sealant program administrators, who act as the first point of contact for SSP personnel with questions about using SEALS.
TASKBAR OVERVIEW
SEALS tasks are accessed via taskbars with left side navigation. There are two top-level headings: Program Administration and Program Data. Under Program Administration, there are two tasks types: Program-Level Management and Event-Level Management.

User Tip Figure 1 (page 6) provides a quick overview of each data entry task and the required
order of entry.
Clicking on the plus (+) sign to the right of these tasks opens additional taskbars. Taskbars under Program-Level Management allow you to:
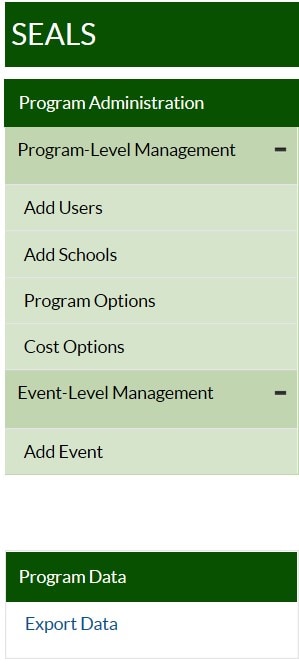
Add Users – Input program staff authorized to input or export data.
Add Schools – Input the name of each school you serve.
Program Options – Input information on the characteristics of your program and create a list of schools associated with each school year.
Cost Options – Input information (or accept provided values) on the cost of resources used by your program.
Under Event-Level Management, the taskbar allows you to:
Add Event – Input data for each sealant event (consecutive days spent delivering sealants at the same school), including child-level data.
Under Program Data, clicking Export Data allows you to create an Excel file containing your program data.
Figure 1. Information on when in the school year your program should enter data into
the SEALS Cost Calculator.
Ongoing Entry During the School Year
After each sealant event, go to ADD EVENT to input information on units of resources used (labor hours, vehicle mileage, etc.) to deliver services AND if entering aggregate child data, number and types of services delivered OR if entering child-level data, each child’s oral health status, socio-demographic characteristics, and services received.
One-time Entry at End of the School Year
To finish your SEALS entry for the school year, go to COST OPTIONS to input information
on administrative and supply costs.
PROGRAM-LEVEL MANAGEMENT TASKS
ADD USERS
The Add Users taskbar allows your program to add staff. Clicking on this taskbar you see:

To add program staff:
- Click on Add New User.
- Under User Type, select Program User, then add that user’s first and last name and email address. Under Program, select your program name.
- Click on Add User to save.
Note: SEALS will send new users an email with instructions on how to set their password.
ADD SCHOOLS
The Add Schools taskbar allows your program to add schools that it serves.
Clicking on this taskbar you see:
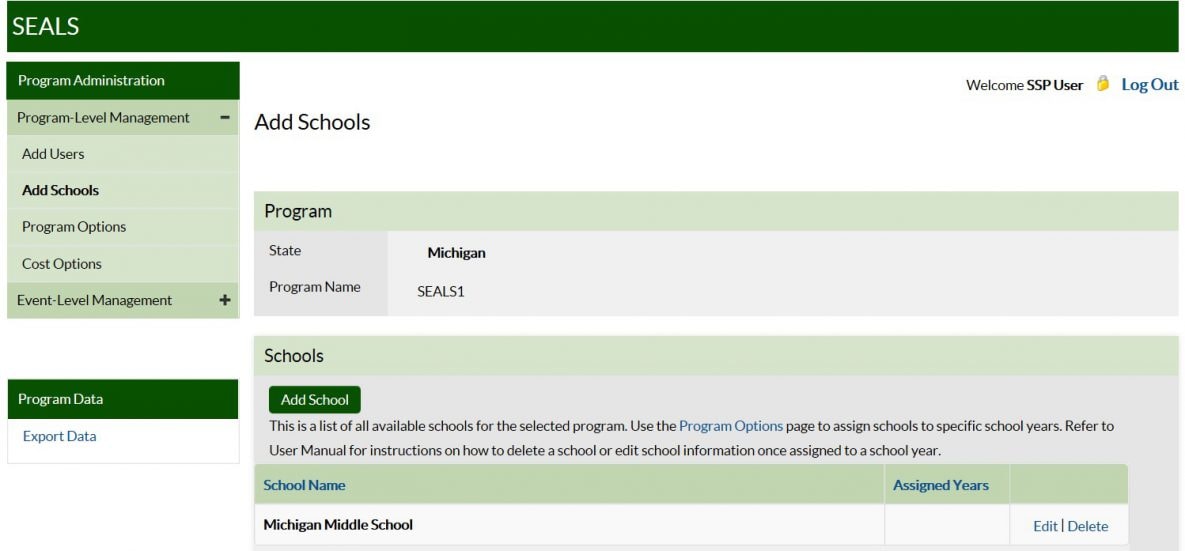
To add a school:
- Click on Add School.
- Enter the school’s name in the dialogue box.
- Click on Add School to save.
Note: Once an SSP inputs a school, it will be available in all future years.
User Tip Input a school’s full name so that it can be differentiated from other schools with similar names that your program might serve in future years. Be sure to include “Elementary,” “Middle,” or “High School” in the name.
PROGRAM OPTIONS
The Program Options taskbar allows your program to create a list of schools and input information describing your program. Clicking on this taskbar you see:

Under Program Options, first select the current school year. Create a school record for each school your program plans to serve during the school year. To create a school record:
- Click on Add School, and a dialogue box with a drop-down menu of all school names you have entered in Add Schools in the current or past years will appear.
- Select a school and specify if it is rural or high-need. Criteria for “rural” and “high-need”
can be found in the Appendix (Section 2, page 23). - Click on Add School to save.
The school will now appear in the section titled Schools.
To remove a school record for the current year, first make sure that there are no child or event records associated with that school. In the far right column of the row in which the school to be removed is located, you should see Edit and Remove. Click on Remove, then confirm this choice in the pop-up dialogue box. Finally, click on Save.
Next, answer the Options questions on specific practices and services delivered:
- Indicate whether your program ever reimburses workers for their time in travelling to and from the sealant event location.
- Indicate whether your program ever reimburses workers for their mileage when they drive their own personal vehicles to the school event.
- Indicate whether program provides fluoride varnish or prophylaxis (other than with a tooth brush) in addition to sealants.
- Indicate whether children are screened and sealed at the same seating or at different seatings.
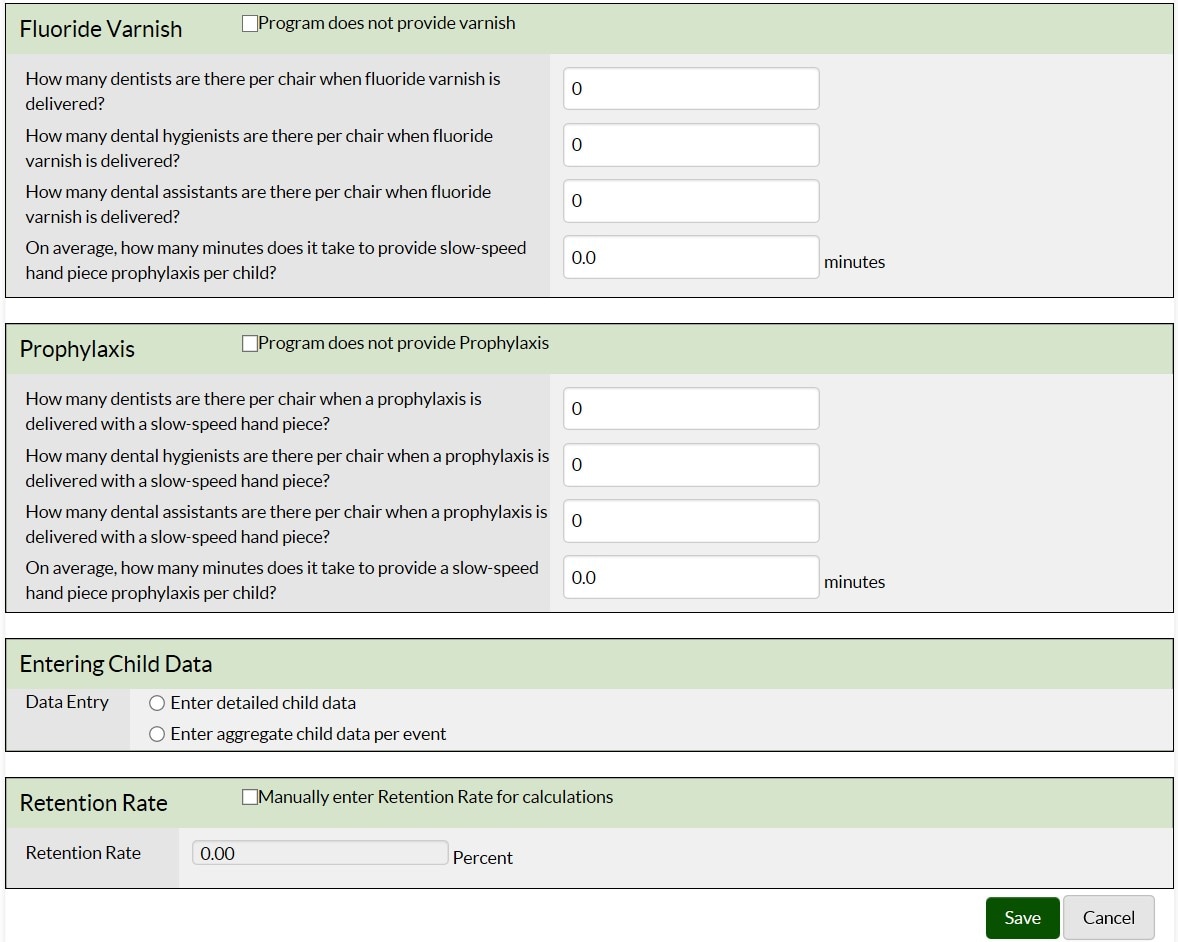
In the Fluoride Varnish section, answer the questions on the number of operators (dentists, hygienists, and assistants) required to deliver 1 fluoride application, as well as the application time in minutes.
If your program does not provide varnish, check the “does not provide” box to disable these fields.
In the Prophylaxis section, indicate if you provide prophylaxes with a handpiece or power scaling. Please note that cleaning tooth surfaces with a toothbrush is not considered an additional service as it is a required step in sealant placement. Input information on number of operators (dentists, hygienists, and assistants) required2 to deliver 1 prophylaxis, as well as the application time in minutes. If your program does not provide prophylaxis, check the “does not provide” box to disable these fields.
In the Entering Child Data box, click the button indicating whether your program will enter child-level data (oral health status and services received) or aggregate data (number of children screened).
Finally, input information on annual sealant retention rate (optional). Note that your program should complete this field only if it will not input child-level data on number of sealants retained within 9–15 months of initial sealant application.
Click Save to complete this page.
COST OPTIONS
The Cost Options taskbar allows your program to input or accept provided values for various costs. Clicking on this taskbar you see:
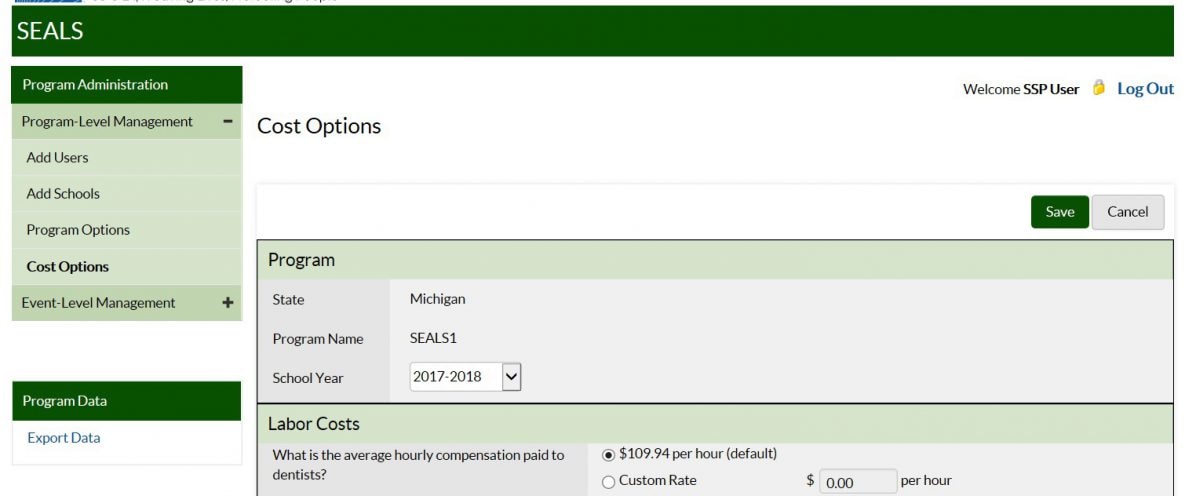
In this section, your program can add information for the various categories of costs. Default costs for a given year are in dollars for the most recent year with an annual CPI. For example, for the 2017/2018 school year default costs are in 2016 USD . This is because when sealants were delivered in the fall of 2017, 2016 would be the most recent year with annual Consumer Price Index (CPI) data. Note that you must place your cursor to the immediate left of the decimal point to input cost information.
LABOR COSTS – Input program-specific data for hourly wage for dentists, hygienists, assistants, and
non-dental workers, or accept default costs from the US Bureau of Labor Statistics.
ADMINISTRATIVE COSTS – Input actual costs. Note that data collection logs and further details on estimating administrative costs are provided in the Appendix (Section 3, page 24).
VEHICLE COSTS – Input program-specific mileage reimbursement rate, or accept default value. Note that the default value will be used to depreciate program vehicles even if your program does not reimburse for mileage.
SEALANT – Select the appropriate sealant options and enter your per-tooth sealant material cost.
Note that costs for common sealant materials are provided in the Appendix (Section 4, page 28).
SEALANT STATION – Enter the number of sealant stations manufactured by Aseptico, DNTLworks, or other company, then accept the default annual cost or input your program-specific value. See the Appendix (Section 5, page 29) for information on sealant station components, prices, and how annual costs are calculated. Note that any sealant station more than 15 years old is fully depreciated, and its annual cost is $0.
REUSABLE INSTRUMENTS
- Input the number and annual per-set cost of instruments. Only count instrument sets that are 7 years old or less. Note that the cost of commonly used instrument sets (mirror and explorer)
are provided in the Appendix (Section 4, page 28), where you can also find instructions on how to estimate the annual cost of reusable instruments if your program has unequal numbers of mirrors and explorers.
Note: SEALS assumes that a program uses either reusable or disposable instruments exclusively. If you indicate a number of instrument sets greater than 0, then SEALS will not include the cost of disposable instruments when calculating supply costs. - Input the annual cost of your autoclaves, or accept default values. If an autoclave is more than 15 years old, reject the default value and put in $0 as the cost. If you do not accept the default estimate, then you need to divide the price of your autoclave by the annuity factor associated with a useful life of 15 years. Please see the Appendix (Section 4, page 28) on how to estimate the annual cost of durable equipment (equipment that lasts more than 1 year).
SUPPLIES – Input your annual cost of supplies, or accept default estimates of supply costs. Calculations for default supply cost estimate are provided in the Appendix (Section 6, page 30).
Click Save and you are done.
EVENT-LEVEL MANAGEMENT TASKS
What is a school sealant event?
SEALS was designed to measure the cost of school sealant events. A sealant event is defined as consecutive or clustered days spent at the same school delivering sealants onsite using portable dental equipment. If your program provides other services and doesn’t always provide sealants, you will need to distinguish between “sealant” and “non-sealant” events. If any of the following criteria apply, an event might be a non-sealant event:
- Did your program target grades such as kindergarten or preschool where children are likely not to have permanent teeth eligible for sealants?
- Did you revisit the same school later in the year with a primary goal of providing other preventive services such as a second application of fluoride varnish?
- Did you primarily provide fluoride in classes where the majority of children had already received sealants from your program?
User Tip If your program serves multiple grades during the same sealant event, consider inputting data only for grades with children likely to have erupted permanent molars.
The Add Event taskbar allows you to input information on resources used and services delivered for an event. Please note that programs can enter event-level data directly into SEALS via the Add Event Taskbar or submit a batch file with event-level data to CDC. If your program is interested in submitting batch data please contact CDC as SEALS@cdc.gov. To enter data directly into Seals, click on the Add Event taskbar and you will see:

To create an event:
- Click on Create New Event.
- Input information on event date. If an event occurs over more than 1 day, click on the date of the first day, the date of second day, and so on until you reach the last date. If entering dates manually, be sure to place a comma in between each date. NOTE: After selecting a date on the calendar, you must click outside the calendar to leave this field.
- Select the school where the event was held from the drop-down menu of schools.
- Input information on the number of consent forms distributed.
- Input information on the amount of resources used to deliver services.
Resource categories include:
LABOR – Input the total number of hours spent at school for each labor category.
For example, if your program sent 2 dental hygienists to a school for 2 days (8 hours
per day), then the total number of dental hygienist hours spent at school equals 32.
User Tip Input hours for travel time and personal vehicle mileage only if your SSP reimburses workers for these items. If your program reimburses workers for their travel time to and from a sealant event, then input total number of travel hours. For example, if both dental hygienists in the example above drove his/her car to the sealant event and the travel time each way was 30 minutes, then total travel time for dental hygienists would be 4 hours (2 hygienists * 2 days * 2 30-minute trips). Finally, if your program reimburses mileage for workers using their own vehicles, then input the total miles for personal vehicles driven
to and from that event. Returning to our example, if the sealant event was 45 miles from the SSP office, then total mileage would be 360 miles (45 miles * 2 trips per day * 2 hygienists * 2 days).
PROGRAM VEHICLES – Input the number of vehicles owned or operated by your SSP that were driven to the event and the total mileage per vehicle. For example, if a program owns 1 van and the roundtrip distance is 20 miles, then the number of vehicles is 1 and miles for a 2-day event is 40 (1 vehicle * 20 miles * 2 days).
A template for a paper log to record this information is provided in the Appendix (Section 7, page 31).
CHILD DATA
Aggregate child data – If you selected Enter aggregate child data per event in the Entering Child Data item on the Program Options screen, you will be asked to enter the number of children screened, number of children sealed, number of teeth sealed, number of children receiving fluoride varnish, and number of children receiving prophylaxis (provided with handpiece or scaler). Click Done when you’ve finished entering data for this event.
WARNING Once your program inputs detailed data for a child, event date(s) cannot be edited unless all data for each child has been deleted.
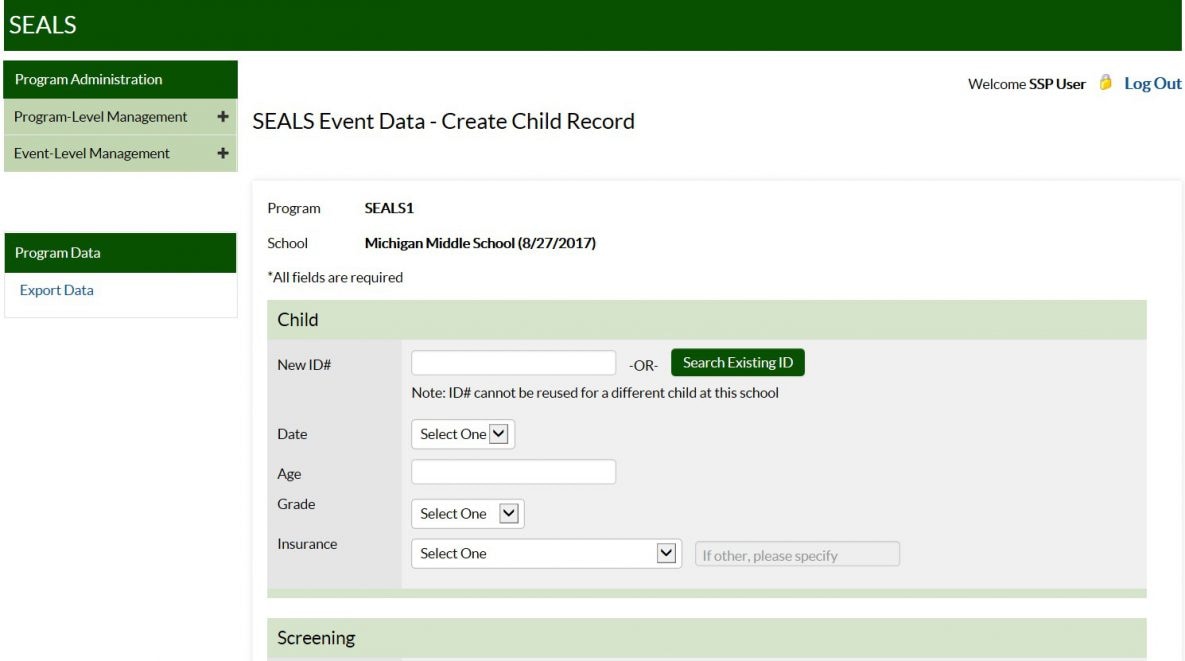
Detailed child data – If you selected Enter detailed child data in the Entering Child Data item on the Program Options screen, you will see Enter Child Data on the bottom right of the screen. Click on Enter Child Data, and the following screen will appear:
Your program must input data for all fields displayed on this page. If your program indicated that it did not provide fluoride varnish and/or prophylaxes, then you will not be able to enter data in these fields. If you mistakenly indicated you did not provide preventive services in addition to sealants, then you must go back to the Program Options page and edit the fluoride varnish and/or prophylaxes fields.
User Tip SEALS allows an SSP inputting detailed child data to follow a child during the school year. Figure 2 (page 18) provides a quick overview of how to input data for the same child at initial and follow-up events.
FIRST EVENT
Child Information – The first time your program enters data for a child, you will need to assign the child a unique identification number (ID#) that will be associated with him or her during the current and subsequent school years. The ID# can consist of letters and numbers. Please note that each child attending the same school served by your program must have a unique ID# that should not be assigned to a different child in future years. Also, please ensure that the ID# you assign could not be used by anyone outside of your program to determine the child’s identity.
You will also need to select the date that the child received services from the menu of dates associated with that event. The first time you see a child, you will also need to input the child’s age (only numbers from 4 through 18 will be accepted) and select the child’s grade and dental insurance status from the drop-down menus.
Screening Information – The first time a child is seen, you will need to indicate whether the child had at least 1 tooth with:
- a sealant prior to the program placing sealants.
- untreated decay.
- treated decay (fillings).
You must also indicate whether the child was referred to a dentist, the urgency of the referral, and the number of permanent 1st molars having untreated or treated decay.
Preventive Services – Each time a child is seen during the year, you will need to indicate the number of sealants that were placed on permanent 1st molars, permanent 2nd molars, other permanent teeth, and primary molars. You will also need to indicate whether the child received a fluoride varnish application and/or prophylaxis.
When all fields are complete, you can input data for another child by clicking on Add new child, or click on Done to save your data and exit. Once an event is created, it cannot be deleted unless all child records associated with that event are deleted.
Note that if your SSP selects child level data in the Program Option page you will have to input data for each child. If your program decides to switch to aggregate child data during the school year, you will have to delete all child records and input aggregate data for each previous event.
FOLLOW-UP EVENTS
After inputting event information, click on Add new child. On the SEALS Event Data – Create Child Record page, click on Search Existing ID to the right of the New ID# field. Next, input the child’s ID# into the Existing ID field and click on Search. Indicate whether your program wants to provide additional services or conduct a retention check by clicking on the appropriate box and then clicking on Select. The following information will appear: school name, current event data, and previous dates the child was seen during the current school year as well as the types of service delivered. Note that you can only select the retention box if the current event data is more than 9 months (270 days) but less than 15 months (450 days) since the child was first seen during the school year. SEALS only collects information on the number (0–8) of permanent molar sealants retained.
User Tip When inputting retention data you can check how many of a child’s permanent
1st and 2nd molars received sealants from your program if you scroll down.
EDITING EVENT DATA
If your program would like to edit data for an event, click on the SEALS Event Data page. From the list of existing events, locate the event you want to edit and click on Edit. If you would like to add or edit a child record, then click on Add Child and input data for new child or search Exising ID # field for children already seen. Note that event dates and school name fields cannot be edited once child records have been added to the selected event.
DELETING EVENT DATA
To delete an event, all child records associated with that event must be deleted. To delete a child record, click on the Add Event task bar and then click on the number under Number of Children Screened. A pop-up box will appear with columns containing the child’s ID#, the visit date, and type of services provided (screening, prevention, or screening/retention). If a child received services from your program on more than one day during the event, there will be a separate row for each service date. Click on View/Edit in the right column and a record of the child’s screening data and service history will appear. To delete the record, click on Delete Record on the bottom left of the screen and confirm in the dialogue box. If a child received screening and preventive services on different days, deleting the screening record will result in all other service records being deleted. If you delete a preventive service record, the screening record will remain. Once all child records associated with an event have been deleted, you can delete the event by returning to the Add Event screen and clicking on Delete in the far right column and confirming the change.
Figure 2: Entering Detailed Child Level Data
First Event Where SSP Sees Child
After an event is created and resource usage information is completed, click on
Enter Child Data and complete all data entry fields for the child:
- Child data (ID# and socio-demographic information).
- Screening information.
- Preventive services delivered.
Follow-Up Events at Same School
After an event is created and resource usage information is completed, click on
Enter Child Data and input child’s ID# into Search Existing ID. Indicate whether preventive service, retention check, or both were provided. (Note that retention check can be selected only if event data is between 9 and 15 months after first time data was entered for child.)
Program can only input data on services delivered or retention check information.
(Note that child’s screening and socio-demographic data from first visit and past
services delivered will appear below preventive services fields.)
Note: To edit child data at first or later events, select the relevant event and then click the number in Number of children screened to bring up a list of ID#s of all previously seen children. Click on the relevant ID and edit child’s record.
TASK – EXPORTING DATA
Exporting Program Data allows programs to export SEALS data for more in-depth analyses.
To do this, click on the task Export Data, select the year, and then click on Export Program Data.
Exporting SSP Worksheet provides information needed when entering detailed child data into the
SSP Measures Workbook. To download an Excel file with this information, click on the task Export Data, select the year, and then click on Export SSP Worksheet. The SSP Measures Workbook uses these values to calculate annual performance measures that can be used to determine:
- whether children served were at elevated risk for cavities and lacked access to dental care.
- the annual 1st molar cavity attack rate (the annual probability that a sound 1st molar would develop a cavity if it were not sealed).
- the number of children receiving services.
- the number of cavities prevented and the increase in sealant prevalence.
Further information on the SSP Measures Workbook and how to copy information from the
SSP worksheet into the SSP Measures Workbook is provided in the Appendix (Section 7, page 32).
Export SSP Cost Report provides a detailed list of the cost of resources used to deliver sealants in school settings. To download an Excel file with this information, click on the task Export Data, select the year, and then click on Export SSP Cost Report. This report summarizes costs for sealant stations, instruments, supplies, labor, administration, and mileage. It also provides a summary of the services delivered by the program and summary measures on how efficiently program used resources to deliver services. Efficiency measures include cost per child screened, cost per child sealed, cost per tooth sealed, clinical labor time per child sealed, and clinical labor costs per child sealed.
EXAMPLE: Practice Using SEALS
Let’s get some hands-on practice using SEALS with the following example for a hypothetical school, ‘Madison Elementary’, served by your program. Please note that information provided is meant solely to illustrate how to use the app. In the steps below, we provide hypothetical information that you will input for your program. Please be sure to go back and input the correct information for your program once you have completed this example. You will also need to delete the school ‘Madison Elementary’ from SEALS. Let’s assume that your program inputs aggregate child data.
STEP 1 Use the Add Schools taskbar to create a record for Madison Elementary.
ABCSeals serves 1 school, Madison Elementary.
STEP 2 Use the Program Options taskbar to input this information for Madison Elementary.
Madison Elementary is a high-need (>50% of students participate in the free/reduced meal program), rural school.
STEP 3 Use the Program Options taskbar to input this hypothetical information for your program.
Characteristics of hypothetical programs include:
- Does not reimburse labor for mileage or travel time to schools.
- Delivers fluoride varnish in addition to sealants.
- The program uses 1 dental hygienist, 1 dental assistant per child, and takes 1 minute to apply fluoride.
- Screens and seals a child at the same seating.
- Enters aggregate child data per event.
STEP 4 Use the Cost Options taskbar to input the following hypothetical cost information for your program. Assume you pay the following amounts per unit of resource used in delivering sealants:
- $52.06 per dental-hygienist hour.
- $25.91 per dental-assistant hour.
- $2,500 annually for administrative costs.
- Depreciates program vehicles used to transport equipment at federal mileage rate of $0.56 per mile.
- Uses light-cured sealant material applied with two-handed delivery (1 dental hygienist and 1 assistant per station); sealant material costs $1.03 per tooth.
- Own 2 DNTLworks sealant stations less than 15 years old.
- Uses disposable instruments.
STEP 5 Use the Add Event taskbar to input the following hypothetical information for services delivered at Madison Elementary on July 14, 2018:
- Used disposable instruments.
- Sent 2 dental teams – each team had 1 dental hygienist and 1 assistant. Each team drove a van 15 miles to the school and then spent 8 hours at the school to set up/break down equipment and deliver services.
- Services delivered included screening and delivering fluoride varnish to 60 children and delivering 150 sealants to 40 children.
STEP 6 Go to Program Data and export program data and cost report in Excel worksheet. Please note that because you input aggregate data for children you will not be able to export an SSP worksheet.