EMERGENCY RESPONSE RESOURCES
Surface sampling procedures for Bacillus anthracis spores from smooth, non-porous surfaces
Revised April 26, 2012
General
These sampling procedures were prepared by the Centers for Disease Control and Prevention (CDC) to provide standardized methods for industrial hygienists, or other trained samplers under the direction of sampling experts, to use when sampling for Bacillus anthracis (B. anthracis) spores. These procedures supersede previous CDC procedures for collecting environmental samples for B. anthracis, including Comprehensive Procedures for Collecting Environmental Samples for Culturing Bacillus anthracis, which were developed during the 2001 anthrax terrorist events. As stated in that guidance, CDC planned to update the guidance as new information becomes available. In particular, one major change is the recent efforts by CDC to validate methods for the laboratory processing and analysis of B. anthracis spores.
These procedures are meant to be used for collection of samples on smooth, non-porous surfaces and can be used in both indoor and outdoor environments. Examples of non-porous surfaces are stainless steel, painted wall board, floor tile, or wood laminate. Each sampling method has its specific uses and advantages. Sampling methods must be coordinated with the laboratory to ensure that they are ready to accept and process all the samples. This is particularly important if deviating from the validated sampling procedure s.
Swabs are appropriate for sampling small surfaces or hard to reach locations of less than 4 inches square (in2), like crevices, corners, supply air diffusers, air return grills, and hard-to-reach places. Wipes are appropriate for sampling larger non-porous surfaces including walls, desks, and floors. An interagency effort known as the Validated Sampling Plan Working Group (VSPWG) is currently developing a document titled Reference Guide for Developing and Executing Bacillus anthracis Sampling Plans in Indoor Settings, which outlines approaches and methodologies to characterize and guide remediation of indoor sites with potential or actual contamination. The VSPWG document, once published, should be consulted for additional information about strategies and guidance for sampling B. anthracis. This document will also assist with the interpretation of results for samples collected with macrofoam swabs and cellulose sponges on smooth, non-porous surfaces following these collection procedures.
Note:
Additional information regarding Bacillus anthracis sampling, including recommendations for protecting investigators while sampling, are available at www.cdc.gov/niosh/topics/anthrax/ and www.cdc.gov/niosh/docs/2009-132/default.html.
The collection of samples associated with a crime scene or suspicion of a criminal event should be coordinated with law enforcement authorities. Sampling teams need to be aware that samples collected may be or become criminal evidence, and certain additional procedures associated with sample collection will be necessary.
Macrofoam Swab Procedure
Swab Materials
- Gloves, nitrile
- Ruler, disposable, and masking tape
or
Sample template, disposable, sample area size 4 in2 (26 cm2) - Macrofoam swab, sterile, 3/16 inch thick medical-grade polyurethane foam head, 100 pores per inch, thermally bonded to a polypropylene stick (such as the Sterile Foam Tipped Applicators Scored with Thumb Stop [Puritan, Guilford, Maine; catalog number 25-1607 1PF SC] or equivalent)
- General neutralizing buffer that will inactivate halogen disinfectants and quaternary ammonium compounds, 10 milliliter (mL), sterile (such as the Neutralizing Buffer [Hardy Diagnostics, Santa Maria, California; catalog number K105] or equivalent)
- Screw-cap centrifuge tubes, sterile, 15 mL (such as 15 mL High-Clarity Polypropylene Conical Centrifuge Tube [Becton Dickinson, Franklin Lakes, New Jersey; catalog number 352097] or equivalent)
- Sample labels
or
Permanent marker - Re-sealable plastic bag, 1-quart or smaller
- Re-sealable plastic bag, 1-gallon or larger
Swab Sampling Procedure
- Wearing a clean pair of gloves over existing gloves, place the disposable template over the area to be sampled and secure it. If the template cannot be used, measure the sampling area with a disposable ruler, and delineate the area to be sampled with masking tape.
- Remove the sterile swab from its package. Grasp the swab near the top of the handle. Do not handle below the thumb stop.
- If the sterile swab is not pre-moistened, moisten the sterile swab by dipping it in the 10 mL container of neutralizing buffer solution. Remove any excess liquid by pressing the swab head on the inside surface of the neutralizing buffer solution container.
Note: Once a sterile swab has been moistened, the remaining neutralizing buffer solution and container must be discarded.
- Swab the surface to be sampled using the moistened sterile swab. Use an overlapping ‘S’ pattern to cover the entire surface with horizontal strokes.
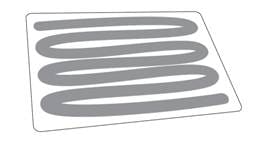 Note: Depending on the design of the swab, a rolling motion can be used when swabbing the surface to maximize swab contact with the surface.
 - Rotate the swab and swab the same area again using vertical ‘S’-strokes.

- Rotate the swab once more and swab the same area using diagonal ‘S’-strokes.

- Place the head of the swab directly into a sterile screw-capped centrifuge tube. Break off the head of the swab by bending the handle. The end of the swab handle, touched by the collector, should not touch the inside of the tube. Securely tighten the screw-cap and label the tube (e.g., unique sample identifier, sample location, initials of collectors and date and time sample was collected). Collection tubes and re-sealable bags may be pre-labeled to assist with sampling efficiency.
- Place the sample container in a re-sealable 1-quart plastic bag. Securely seal and label the bag (e.g., sample location, date and time sample was collected, and name of individual collecting the sample).
Note: Remove excessive air from the re-sealable plastic bags to increase the number of samples that can be shipped in one container.
- Dispose of the template, if used.
- Remove outer gloves and discard. Clean gloves must be worn for each new sample.
Cellulose Sponge Procedure
Cellulose Sponge Materials
- Gloves, nitrile
- Ruler, disposable, and masking tape
or
Sample template, disposable, sample area size 100 in2 (645 cm2) - Sponge, sterile, pre-moistened with 10 mL neutralizing buffer solution, 1.5 by 3 inches cellulose sponge folded over a handle (such as the 3M™ Sponge-Stick [3M, St. Paul, Minnesota; catalog number SSL-10NB] or equivalent)1
or
Sponge, sterile, dry, 1.5 by 3 inches cellulose sponge folded over a handle (such as the 3M™ Sponge-Stick [3M, St. Paul, Minnesota; catalog number SSL-100] or equivalent)
and
General neutralizing buffer that will inactivate halogen disinfectants and quaternary ammonium compounds, sterile, 10 mL (such as the Neutralizing Buffer [Hardy Diagnostics, Santa Maria, California; catalog number K105] or equivalent) - Screw-cap specimen container, sterile, individually wrapped 4 ounce (such as General Purpose Specimen Container [Kendall Healthcare, Mansfield, Massachusetts; catalog number 8889-207026] or equivalent)
- Sample labels
or
Permanent marker - Re-sealable plastic bag, 1-quart or smaller
- Re-sealable plastic bag, 1-gallon or larger
Cellulose Sponge Sampling Procedure
- Wearing a clean pair of gloves over existing gloves, place the disposable template over the area to be sampled and secure it. If a template cannot be used, measure the sampling area with a disposable ruler, and delineate the area to be sampled with masking tape. The surface area sampled should be less than or equal to 100 in2 (645 cm2).
- Remove the sterile sponge from its package. Grasp the sponge near the top of the handle. Do not handle below the thumb stop.
- If the sterile sponge is not pre-moistened, moisten the sponge by pouring the 10 mL container of neutralizing buffer solution over the dry sponge.
Note: The moistened sponge should not be dripping neutralizing buffer solution.Note: Any unused neutralizing buffer solution must be discarded.
- Wipe the surface to be sampled using the moistened sterile sponge by laying the widest part of the sponge on the surface, leaving the leading edge slightly lifted. Apply gentle but firm pressure and use an overlapping ‘S’ pattern to cover the entire surface with horizontal strokes.
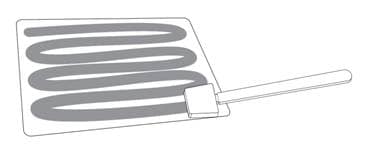
- Turn the sponge over and wipe the same area again using vertical ‘S’-strokes.
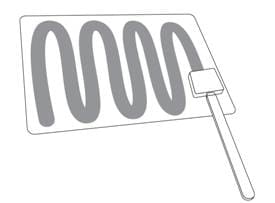
- Use the edges of the sponge (narrow sides) to wipe the same area using diagonal ‘S’-strokes.
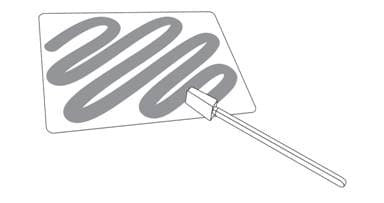
- Use the tip of the sponge to wipe the perimeter of the sampling area.
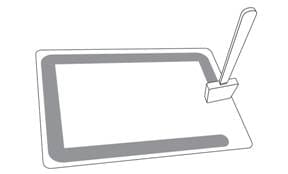
- Place the head of the sponge directly into a sterile specimen container. Break off the head of the sponge by bending the handle. The end of the sponge handle, touched by the collector, should not touch the inside of the specimen container. Securely seal and label the container (e.g., unique sample identifier, sample location, initials of collector and date and time sample was collected).
- Place the sample container in a re-sealable 1-quart plastic bag. Securely seal and label the bag (e.g., sample location, date and time sample was collected, and name of individual collecting the sample). Specimen containers and re-sealable bags may be pre-labeled to assist with sampling efficiency.
Note: Remove excessive air from the re-sealable plastic bags to increase the number of samples that can be shipped in one container.
- Dispose of the template, if used.
- Remove outer gloves and discard. Clean gloves should be worn for each new sample.
Gauze Procedure
Gauze Materials
Note: This sampling and analytical method has not been validated by CDC. A standard sampling procedure is provided in the event that the macrofoam swab or cellulose sponge methods cannot be utilized.
- Gloves, nitrile
- Gloves, sterile, nitrile
- Ruler, disposable, and masking tape
or
Sample template, disposable, sample area of 144 in2 (929 cm2) - Gauze, sterile, non-cotton, polyester blend sponge or rayon/polyester blend, 2 by 2 in (such as the Versalon All-Purpose Sponge [Kendall Healthcare, Mansfield, Massachusetts; catalog number 8042; includes two gauze squares/packet] or equivalent)
- General neutralizing buffer that will inactivate halogen disinfectants and quaternary ammonium compounds solution, 10 mL, sterile (such as the Neutralizing Buffer [Hardy Diagnostics, Santa Maria, California; catalog number K105] or equivalent)
- Pipette, 5 mL, sterile, individually wrapped (such as the Greenwood Products’ Sterile 5mL Standard Transfer Pipette [Greenwood Products, Inc., Middlesex, New Jersey; catalog number GS137038] or equivalent)
- Screw-cap specimen container, 4 ounce, sterile, individually wrapped (such as General Purpose Specimen Container [Kendall Healthcare, Mansfield, Massachusetts; catalog number 8889-207026] or equivalent)
- Sample labels
or
Permanent marker - Re-sealable plastic bag, 1-quart or smaller
- Re-sealable plastic bag, 1-gallon or larger
Gauze Sampling Procedure
- Wearing a pair of gloves over existing gloves, place the disposable template over the area to be sampled and secure it. If the template cannot be used, measure the sampling area with a disposable ruler, and delineate the area (144 in2to be sampled with masking tape.
- Partially peel open the sterile gauze package carefully exposing the gauze.
Note: The sterile gauze should not be touched without sterile gloves.
- Measure 5 mL of neutralizing buffer solution from the 10 mL container using a disposable pipette and apply to sterile gauze in its original packaging. Remove outer gloves.
Note: The moistened gauze should not be dripping neutralizing buffer solution.Note: Any unused neutralizing buffer solution and the pipette must be discarded.
- Don a pair of sterile gloves.
Note: Sterile gloves are required when sampling with gauze because of the direct contact with the sampling media.
- Remove one of the sterile gauze (if two per package) and dispose of or retain the other gauze as a field blank (see section 4.1).
- Completely unfold the remaining moistened sterile gauze, and then fold in half.
- Wipe the surface to be sampled using the moistened sterile gauze, fingertips should be held together and apply gentle but firm pressure. Use an overlapping ‘S’ pattern to cover the entire surface with horizontal strokes.

- Fold the exposed side of the gauze in and wipe the same area again using vertical ‘S’-strokes.

- Fold the exposed side of the gauze in once more and wipe the same area using diagonal ‘S’-strokes.

- Fold the gauze, exposed side in, and place it into a sterile screw-cap specimen container.
- Securely tighten the srew-cap and label the container (e.g., unique sample identifier, sample location, initials of the collectors and date and time sample was collected).
- Place the sample container into a re-sealable 1-quart plastic bag. Securely seal and label the bag (e.g., sample location, date and time sample was collected, and name of individual collecting the sample). Specimen containers and resealable bags may be pre-labeled to assist with sampling efficiency. Note: Remove excessive air from the re-sealable plastic bags to increase the number of samples that can be shipped in one container.
- Dispose of the template, if used.
- Remove outer gloves and discard. Clean sterile gloves should be worn for each new sample.
Blanks
Field Blanks
Field blanks are samples handled exactly the same as those used to collect field samples, except they are not allowed to come into contact with the contaminated surface. It is used to estimate contamination arising from preparation for sampling, sampler technique, and shipment and storage prior to analysis. The number of field blanks collected should be equal to at least 10% of the samples collected. Field blanks should be collected while in the contaminated area. While wearing clean (sterile gloves for handling gauze), the macrofoam swab, cellulose sponge, or gauze should be removed from its packaging, moistened (as needed, see sections 3.1, 3.2 and 3.3), and then placed in the appropriate container (either a centrifuge tube or specimen container). An aliquot of the unused portion of the opened neutralizing buffer solution should also be collected when using macrofoam swab, cellulose sponge, or gauze media that are not pre-moistened.
Media Blanks
Media blanks are unexposed samples used for background correction of sample readings or for recovery studies. Provide two unopened sample media (macrofoam swab, cellulose sponge, or gauze) per lot used and provide two unopened, unused samples of the neutralizing buffer solution (if not using pre-moistened media) as media blanks to the processing laboratory.
Decontamination
Sample Bag Decontamination
- Place multiples of the re-sealable 1-quart plastic bags into a 1-gallon re-sealable plastic bag. Securely seal the 1-gallon re-sealable plastic bag and label the bag (e.g., identify samples contained in the re-sealable plastic bag, sample locations, date and time samples were collected, and name of individual collecting the samples).
- Decontaminate the outer surface of the larger re-sealable plastic bag using a fresh pH-adjusted bleach solution (household bleach diluted 1:9; pH-adjusted to 6.8-8.0) with a 10-minute contact time before the re-sealable plastic bag leaves the contaminated area. This solution can be prepared by:
Step 1: Mixing one part household bleach (5.25 to 6.0 % sodium hypochlorite) with 5 parts water (v/v);
Step 2: Adding 1 part white vinegar; and
Step 3: Adding 3 parts of additional water.Note: Additional information about decontamination is available at www.epa.gov/opp00001/factsheets/chemicals/bleachfactsheet.htm. - Thoroughly dry the outside of the re-sealable plastic bag.
- Complete a chain of custody form.
Note: Once the outer re-sealable plastic bag is decontaminated, it should not be opened outside of appropriate containment in a laboratory.
- Place the larger re-sealable plastic bag into an appropriate container for shipping (See Sample Shipment section).
Decontamination of Bags Containing Documentation
- Place sample sheets and other documentation in a separate re-sealable plastic bag. The sheets should be placed two to a bag with the face of each sheet facing out. Securely seal and label the bag (e.g., corresponding sample locations, date and time samples were collected, and name of individual collecting the samples).
Note: It is important to only write on one side of the paper, the face, when collecting information.
- Decontaminate the outer surface of the larger re-sealable plastic bag using a fresh pH-adjusted bleach solution (household bleach diluted 1:9; pH-adjusted to 6.8-8.0) with a 10-minute contact time before the re-sealable plastic bag leaves the contaminated area. This solution can be prepared by:
Step 1: Mixing one part household bleach (5.25 to 6.0 % sodium hypochlorite) with 5 parts water (v/v);
Step 2: Adding 1 part white vinegar; and
Step 3: Adding 3 parts of additional water.Note: Additional information about decontamination is available at www.epa.gov/opp00001/factsheets/chemicals/bleachfactsheet.htm. - Thoroughly dry the outside of the re-sealable plastic bag.
- Complete a chain of custody form.
Note: Once the outer re-sealable plastic bag is decontaminated, it should not be opened outside of appropriate containment.
- Place the larger re-sealable plastic bag into an appropriate container for shipping.
Sample Shipment
- Transport all samples to the processing laboratory on wet ice or on cold packs.
Note: Samples may be stored at 2°C–8°C prior to processing and should be processed within 48 hours of collection.
- Appropriate chain of custody forms and analytical request forms should be included with each shipment sent to the processing laboratory. Containers used to transport the samples and accompanying contaminated documentation and equipment should be prepared and shipped according to the appropriate regulations for transporting infectious. The most current Code of Federal Regulations, International Air Transport Association guidelines, and other appropriate regulator or guidance publications should be consulted for compete instructions. The shipper is responsible for ensuring adherence to the most current and appropriate regulations.
Note: Do not transport contaminated equipment/supplies in the same container as the samples.
