At a glance
Refer to these steps when processing samples from patient skin using the Sabouraud Salt Dulcitol Broth to enrich for and chromogenic media to isolate C. auris from patient swabs.
Purpose
C. auris is an emerging fungal pathogen that is present in some healthcare environments. It can colonize patients' skin, often leading to bloodstream infections.
Samples from non-sterile body sites contain a complex community of microorganisms. It is necessary to isolate C. auris from this community to obtain accurate species identification.
This procedure uses broth enrichment to grow C. auris from patient skin, followed by culture on chromogenic media to obtain an isolate for species confirmation. This procedure will assist with determining whether a patient is colonized with C. auris.
Equipment
- Biological Safety Cabinet
- Pipets
- Shaking incubator set to 40°C
- Stationary incubator set to 40°C
Reagents and media
- Sabouraud Salt Dulcitol Broth (See Appendix A for preparation and quality control instructions) Hardy Diagnostics Auris Enrichment Broth (Catalog #R12).
- Sterile Cell Culture Grade Water, for example Fisher Scientific (Catalog #A1287306)
- Chromogenic Candida agar, for example, Hardy Diagnostics HardyCHROM Candida + auris (Catalog #G343) or CHROMagar Candida plus (CHROMagar catalog #CA242)
- 14 mL,17X100 mm, culture tubes with compression (rather than screw) caps, for example Fisher Scientific (Product# 14-959-11B)
- 10 µl inoculating loops, for example Fisher Scientific (Product #22-363-600)
- L-Spreaders, for example USA Scientific (Catalog #060208)
- Microcentrifuge tubes, for example Fisher Scientific (catalog #05-48-129)
Safety precautions
- Perform all procedures in a BSL-2 lab.
- Wear a lab coat, safety glasses, and gloves.
- Perform all work in a BSC.
- After the procedure, clean the BSC
- Use 10% bleach or another approved disinfectant for C. auris.
Sample information
Specimens received for testing must be labeled according to minimum requirements of the laboratory. Collect patient skin swabs using BD ESwab collection and transport system (cat. 220245; Becton Dickinson and Company, Sparks, MD) or a similar collection and transport system containing 1.0 mL of Amies buffer (See Appendix B).
After the specimen is collected, the swab should be placed into the tube containing the Amies buffer and stored at 4°C–25°C. Ship with an ice pack to the laboratory for processing within 96 hours of specimen collection.
The laboratory should develop specimen rejection criteria. Rejection criteria may include specimens:
- Received >4 days after collection.
- In damaged or leaking transport tubes.
- Missing submission forms.
- In tubes without specimen identifiers.
Individual institutions submitting swabs are responsible for the compliance with local human subjects/IRB regulations. Institutions are also responsible for applying for the IRB exemption for public health outbreak surveillance and emergency response.
Quality control
A positive and a negative control ESwab must be processed each day a new set of specimen swabs is processed.
- Fill two 14 mL culture tubes with 2 mL SSD Broth for the representative sample controls.
- For the positive control (C. auris), inoculate directly from a stock plate using fungal cultures (up to one month in age) by touching a single 1 mm colony with the swab and then placing the soft end of the collection swab into the tube.
- Snap off the end of the swab at the marked line by bending the plastic handle against the edge of the transport media container and secure the tube cap.
- Open the negative control ESwab, transfer the negative control swab into the collection tube, and secure the lid using a sterile BD ESwab.
- Be careful to keep the cap and swab of the negative control (sterile uninoculated swab) from touching any materials that may contaminate your control tube.
There should be visible growth within 48 hours for the positive control and no growth for the negative control.
If there is growth of the negative control, a second negative control must be immediately processed.
If there is growth in the negative control a second time, discard all media from that lot. Invalidate all patient specimens from that process date. Switch to a new QC validated lot and retest all invalidated specimens starting from the primary swab.
Procedure
Label the following items for each specimen and be sure that all information on the tube matches the submission document:
- Protocol worksheet
- 14 mL culture tube (with cap that allows gas exchange but keeps the contents sterile)
- Candida chromogenic agar plate (store at 4°C until use)
- 5 mL DNA microcentrifuge tube
Prepare the positive and negative controls as outlined in 8.2 above.
Transfer 2.0 mL of SSD Broth to each 14 mL culture tube.
To release the sample from the swab tip:
- Vigorously shake the BD ESwab tube containing the swab sample for 5 seconds, or
- Mix the tube using a vortex mixer for 5 seconds to release the sample from the swab tip.
Unscrew the BD ESwab cap to remove the swab applicator to gain access to the liquid transport medium.
Transfer 100 µL specimen in liquid transport medium to the 14 mL culture tube containing 2.0 mL SSD Broth. Make sure the cap is not fully compressed, thus allowing for gas exchange but keeping the contents sterile. Recap and secure the BD ESwab and store all original specimens at 4°C.
Incubate culture tubes by shaking at 250 rpm at 40°C.
Check the tubes daily for up to 5 days. Visible growth is typically detected in 48 hours or more.
Use a 10 µL blue transfer loop to inoculate and streak for isolation on the pre-labeled chromogenic media Candida Chromogenic agar plate. Record the growth in the broth on the worksheet by the appropriate tube number. Return the tube to the shaker.
If the initial growth in the tube does not reveal C. auris, continue to incubate tubes. Continue shaking at 250 rpm at 40°C for a total of 5 days.
Incubate CHROMagar media plates at 37°C for up to 2 days. Check the plate each day for yeast colonies.
Please note:
If chromogenic media plate has no growth suspicious for C. auris after 2 days, discard plate and record as negative.
For colonies that grow, the species is determined by MALDI-TOF or other available identification platform.
- MALDI should be performed only on colonies that are not green (C. albicans) or blue (C. tropicalis).
- Choose one colony for each unique colony color (phenotype) on the plate.
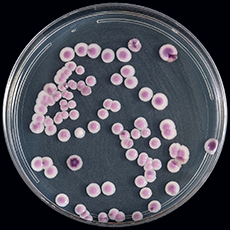
- C. auris can be cream, pink, or red.
On day 5, to avoid false negatives, transfer 100µl of broth from each remaining culture tube to a chromogenic media Candida plate. This includes tubes that remained negative and tubes that turned positive after C. auris was not identified in the first chromogenic media screen.
Incubate these final chromogenic media plates at 37°C and check daily for growth for up to 2 days. After 2 days, record as negative on the worksheet.
Turn-around time
Reporting depends on the growth of the organism (some require lengthy incubation), the degree to which the specimen may have competing organisms, and other factors.
In general, the turnaround time is approximately 4–8 days.
Disclaimer
CDC's Mycotic Disease Branch Reference Laboratory developed this document as a test procedure for C. auris isolation. The methods used and the results are for investigational or research purposes only and have not been validated for diagnostic purposes. This is not a controlled document.
The performance characteristics as generated at CDC are specific to the version as written. This test has not been cleared or approved by the U.S. Food and Drug Administration (FDA).
This is an enrichment media, not a selective media. It is a modification of the standard Sabouraud broth exchanging dextrose with dulcitol and adding Gentamicin and Chloramphenicol. Organisms other than C. auris can occasionally grow.
Preparing salt Sabouraud Dulcitol broth with chloramphenicol and gentamicin
- SAB Media: Sabouraud's dextrose (Emmons)
- Chromagar Media: CHROMagar Candida Chromogenic agar
Reagents and media for the broth
- Casein Peptone, for example Fisher Scientific (Catalog# R451102)*
- Peptic Digest of Animal Tissue, for example Fisher Scientific (Catalog# 7181A)*
- Dulcitol powder, for example Fisher (Catalog# AC117701000)
- Sterile Cell Culture Grade Water, for example Fisher Scientific (Catalog #A1287306)
- Sodium Chloride (NaCl), for example Fisher Scientific (Product# S671-500)
- Chloramphenicol; for example SIGMA-ALDRICH (Product# R4408-10ML)
- Gentamicin, for example SIGMA-ALDRICH (Product# G1397-10ML)
* Alternative product that combines items 1 & 2: Polypeptone peptone Animal tissue and Casein for example BD (Catalog #211910)
Other materials
- Sabouraud dextrose agar (Emmons), for example Fisher Scientific (Catalog #OXCM0041B)
- Blood agar plates, for example Fisher Scientific (Catalog #R01198)
- CHROMagar Candida Chromogenic agar, for example Hardy Diagnostics (Catalog #C9000)
- 14 mL, 17X100 mm culture tubes, for example Fisher Scientific (Product# 14-959-11B)
- 10 μL transfer loops, for example Fisher Scientific (Catalog #22-363-608)
- L-Spreaders, for example USA Scientific (Catalog #060208)
Candida auris
Escherichia coli
Candida glabrata
Procedure Note: Perform all procedures in BSL-2 lab. Refer to the Laboratory Safety Manual when working with BSL-2 organisms. Fresh Microorganism: fresh fungal cultures (up to one month in age at 4°C on Sab dextrose plates or slants); fresh bacteria cultures (up to one month in age at 4°C on Blood agar plates or slants); storing fungal plates at room temperature for 4 weeks is acceptable.
Expected results after 72 hours of incubation of quality control organisms
Escherichia coli
Specimen collection
Before collecting a specimen, make sure that proper PPE is used, including gown and gloves. The most sensitive results have been generated using a single ESwab to swab both axilla and groin. There is also a report that nasal swabs can detect skin colonization with high sensitivity, but this method has not been studied as well as composite axilla/groin ESwabs.
- Remove the ESwab from the packaging; take care not to touch the tip.
- Rub the ESwab on the axilla using all sides of the swab. Target the crease where the arm meets the body. Run the ESwab back and forth approximately five times. Repeat the procedure with the same ESwab on the other axilla.
- Using the same ESwab as for the axilla, rub the swab over the groin in the inguinal crease where the leg meets the pelvic region. Run the swab back and forth approximately five times. Repeat the procedure with the same ESwab on the other side of the groin.
- Place the ESwab in the transport media and break off the end as indicated in the directions that accompany the swabs.
- Replace the cap, making sure that the end of the swab slides into the cap as it is tightened.
- Place the tube on ice or at 4°C until it can be processed.
- Manufacturers generally suggest that ESwabs be processed within 72 hours. For C. auris, internal validation has shown no decrease in positivity rates up to four days after collection (CDC, unpublished results). Any deviation from the manufacturer's directions must be validated.