Setup
Steps for Using Skype for Business Audio in CITGO with a USB Headset
Getting Started: Before you use Skype for Business Audio in CITGO for the
first time
Step 1: Configure Windows 10
1. Plug in your Skype for Business approved headset to the USB port on your computer
2. Click on the Search button in the taskbar and enter “control”
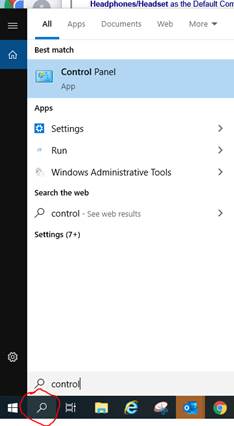
a. Click on Control Panel
3. Change the View from Category to Large or Small Icons

4. Double click on the Sound icon

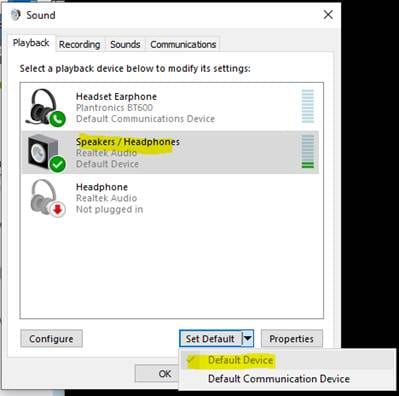
5. On the Playback tab highlight Speakers/Headphones and click on the drop-down button by Set Default
a. The
Green check, ![]() ,
indicates the Speakers are the Default Device while the green headset,
,
indicates the Speakers are the Default Device while the green headset, ![]() ,
indicates, in this photo, that the Plantronics is the Default Communications
device. This means your speakers will play all audio except for those
associated with phone calls or communications. Those will play thru the
headset.
,
indicates, in this photo, that the Plantronics is the Default Communications
device. This means your speakers will play all audio except for those
associated with phone calls or communications. Those will play thru the
headset.
b. From the Recording tab, select your Microphone Array as the Default Device, then select the Headset Microphone(Your USB Headset) as the Default Communication Device using the drop-down arrow on the Set Default button.
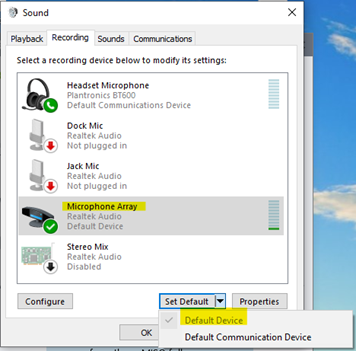
c. Again, the Green icons will indicate which device is set to be the Default Device or Communication Device. Additionally, you will see a check mark, in the drop-down menu next to the current configuration for that device. Above you will see both a Green Check on the Microphone Array indicating it’s the Default Device and a check next to Default Device in the drop down.
6. Click Ok to close the Sound panel.
Step 2: Configure the Citrix Receiver
1. If on a CDC computer, you must end Skype that is running locally first. Find the Skype icon in the lower right corner and Right Click on it and select Exit
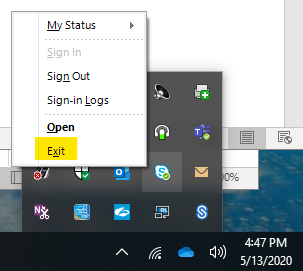
a. This will “release” your audio devices so the Skype inside of CITGO can use them
2. Logon to citgo.cdc.gov and launch the CITGO Virtual Desktop.
- Verify and/or change the Desktop Viewer Mic and Webcam preferences.
- From the CITGO Virtual Desktop, click the Desktop Viewer drop-down. This is the gray ‘connector’ that appears at the top of your CITGO Virtual Desktop.

- Click the Preferences icon.

- Select the Connections tab and select Connect Automatically under the Microphone & Webcam section.
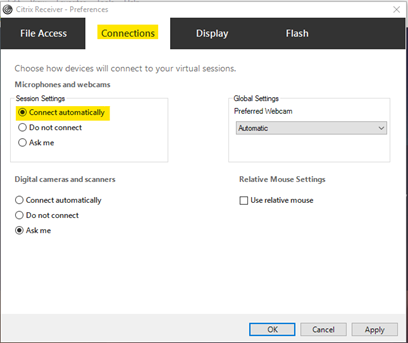
- Webcams for video conferencing in Skype and Zoom is disabled within CITGO due to the resource impact on the server. Webcams can only be used with the Skype for Business and Zoom clients running from the user’s pc outside of CITGO.
4. Click OK.
5. Logout of the CITGO Virtual Desktop to save your settings
- Right click on Start Menu
- Hover on "Shut down or sign out"
- Click on "Sign out"
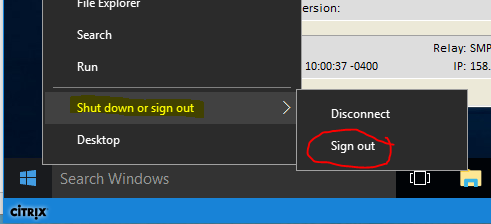
Note: You must take this step to activate your new settings
Step 3: Configure your Skype for Business Audio Device in CITGO
1.
Log back into the CITGO Virtual Desktop.
Microsoft Skype for Business starts
automatically in CITGO, by default.
Note: If Microsoft Skype for Business does not start automatically in
CITGO, click the Start button and select Microsoft
Skype for Business
2. If you are using a CDC computer, during the startup of the CITGO Desktop you will see these two pop ups:
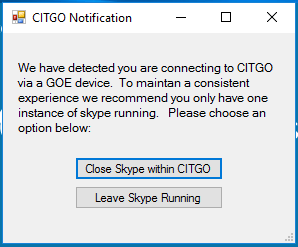
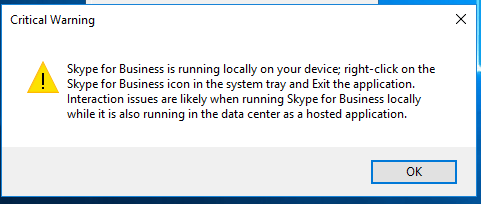
a. They appear because we detected you were using a CDC issued pc and assume that Skype is running automatically on it “outside” of CITGO. These are reminders that you should only have one instance of Skype running.
b. If you have not Exited Skype on your CDC pc BEFORE launching the CITGO Virtual Desktop then you must click on the Close Skype within CITGO button to end the CITGO version of Skype. If you do not and try to make or receive calls within CITGO using Skype, your Default Communications device will not be seen by Skype in CITGO and audio will not work.
c. Since the Citrix Virtual Desktop connects to your pc’s connected devices (Microphones and Printers) only at launch, to make any changes within CITGO you will need to Sign Out of CITGO before changing any default devices connected to your PC or Exiting Skype on your CDC pc before launching CITGO again to see the changes.
3. Configure your Skype for Business audio device.
a. From the upper-right corner of the Microsoft Skype for Business dialog box, click the gear icon to view the Options window.
b. Select Tools. Then, click Audio Device Settings. The Skype for Business – Options dialog box displays.
c. Under Customize Your Device, select Jabra UC Voice 550 for the Speaker, Microphone and Ringer options.
d. From the Secondary Ringer section, select Also ring. Then, select Speakers.
e. Click OK.
4. Validate your Skype for Business audio device is working properly.
a. From the upper-right corner of the Microsoft Skype for Business dialog box, click the gear icon to view the Options menu.
b. Select Tools. Then, click Audio Device Settings. The Skype for Business – Options dialog box displays.
c. Under Audio device, adjust your speaker, microphone and ringer.
d. Click the Check Call Quality button and verify the quality of the call.
e. Follow the prompts to record and play back a test call quality check.
5. Click OK
Important Information:
· You will not be able to use Skype for Business Web Cam/Video features through CITGO at this time.
· Your connection quality and last-mile issues can/will affect Skype for Business quality through CITGO. If using personal owned equipment (POE), please refer to the CITGO Help page (https://www.cdc.gov/citgo/help/index.html) and refer to the section on Citrix Client Software requirements for latest client software to enhance your CITGO experience.
· The buttons and lights on your USB headset cord (mute, volume control and disconnect) do not currently integrate with Skype for Business while logged on through CITGO. Users should use the mute and disconnect controls from within Skype for Business.
· If using your laptop or PC speakers, you may cause an echo effect to be heard by other users on your call. The Laptop/PC microphone sensitivity can be adjusted downward to minimize and/or eliminate the echo effect.
· If you are on a USB headset and have an echo, the microphone on the boom is picking up the ear piece audio and creating a feedback effect. Desensitize your microphone or turn down the volume on your headset.