 1.0 Tutorial for WISQARSTM
Nonfatal
1.0 Tutorial for WISQARSTM
Nonfatal
This tutorial provides a step-by-step overview to getting started with WISQARS Nonfatal. The purpose of the tutorial is to help you access the nonfatal injury data you want quickly and easily. This tutorial assumes you have a basic understanding of how to interact with a graphical user interface (e.g., Windows 95 or Mac OS) and a web browser (e.g., Netscape Navigator or Internet Explorer). For example, this tutorial assumes you understand how to use a mouse to select a button or an item from a menu.
Tutorial Menu
WISQARS Nonfatal Navigation
- Help
- Nonfatal Injury Reports
- Leading Causes of Nonfatal Injury Reports
Introduction
The first step for using WISQARS Nonfatal is choosing a report type. Your options are nonfatal injury reports and leading causes of nonfatal injury reports. Choose a report type based on your information needs. If you need detailed statistical estimates about a particular injury cause or intent for a particular population, than you need a nonfatal injury report. If you need information about the most common causes of injury for a specific intent or population, than you need a leading causes of nonfatal injury report.
To choose a report type, perform the following steps:
- Open the WISQARS home page in your Internet
browser. (The URL is http://www.cdc.gov/ncipc/wisqars/).
- Select a report type in one of two ways:
- Move your cursor to the left sidebar and select either "Nonfatal Injury Reports" or "Leading Causes of Nonfatal Injury Reports."
or- Move your cursor to the middle of the page, underneath the heading "Nonfatal Injuries." Select either "Enter Nonfatal Injury Reports" or "Enter Leading Causes of Nonfatal Injury Reports."
The appropriate report request page should appear.
The next step in obtaining a report from WISQARS is to select your report options. The two types of reports offer different report options.
A. Nonfatal Injury Report Options
Nonfatal injury reports feature the following options:
- Cause of injury (for example, falls, motor vehicle, fire/burn, cut/pierce, poisonings, firearm gunshot, dog bites, etc.)
- Intent of injury (for example, unintentional, assault, self-harm, legal intervention)
- Race/ ethnicity (for example, non-white Hispanic, black, Hispanic)
- Sex
- Disposition (where injured person went after leaving emergency department--e.g., treated and released, hospitalized, transferred)
- Year of reporting
- Display options.
Also, for transportation-related injuries, you can select whether the injury occurred on a public highway (was traffic-related).
For thorough definitions of each option's terminology, see help file section 4.0.
To select nonfatal injury report options, take the following steps:
- For items 1 and 2, select the button beside the intent of injury and cause of injury you desire (see Figure 1.1).
- If you select a transportation-related cause in item 2, then answer item 2b (Did the injury occur on a public road or highway?) by selecting the answer you want from the pull-down menu (see Figure 1.1).
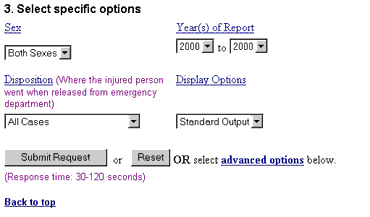
- For item 3, specify the sex, disposition, and year of data you want (see Figure 1.2); select the item you want from each option's pull-down menu.
- Select how you want the report to display through the display pull-down menu. The standard view contains hyperlinks, while the text-only view is plain text for quick printing or fast loading on a browser.
- At this point, you can submit your report request or select advanced report options (see section 1.4). To submit your report request, click on the "submit" button below item 3 (see Figure 1.2). Within 30-120 seconds, WISQARS will display a table containing the requested information.
Figure 1.1: Report Option Items 1, 2, and 2b
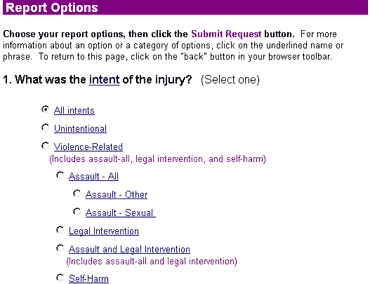
Figure 1.2: Report Option Item 3
B. Leading Causes of Nonfatal Injury Report Options
Leading causes of nonfatal injury reports allow you
to select EITHER one of nine precompiled reports ready for
viewing OR to request a customized report. The
customized report features the following options:
- Sex
- Disposition (where injured person went after leaving emergency department)
- Year(s) of Report
- Number of causes (5-20 available)
- Display options
For thorough definitions of each option's terminology, see help file section 4.0.
If you decide to request a customized report, select report options through the following steps:
- Specify the sex, disposition, year of data, and
number of
causes (see Figure 1.4) by selecting the
item you want from each option's pull-down menu.
Note: The default number of causes selected is 10. Sometimes a specific cause (such as dog bite) may not fall in the top 10 causes. If you're looking for a specific cause, you may need to increase the rankings to have the cause you want displayed (see Figure 1-4b). - Select how you want the report to display through the display pull-down menu. The standard view contains hyperlinks; the text-only view is plain text for fast loading on a browser; and the printer friendly view is formatted for quick printing.
- At this point, you can submit your report request or select advanced report options (see section 1.4). To submit your report request, click on the "submit" button at the end of the "Report Options" section (see Figure 1.4). Within 30-120 seconds, WISQARS will display a chart containing the requested information.
Figure 1.4: Report Option Items

Figure 1.4b: Number of Causes Option

1.4 Select Advanced Report Option
Both types of reports offer advanced report options. These options are not required for submitting a report request, but they allow you to customize the information in your report even further.
A. Nonfatal Injury Report Advanced Options
Nonfatal injury reports offer the following advanced
options:
- Age categories
- Age adjusting
- Advanced statistics
- Sorting by category: sex, age, age group, or race / ethnicity.
For thorough definitions of terminology used in the advanced report options, see help file section 4.0.
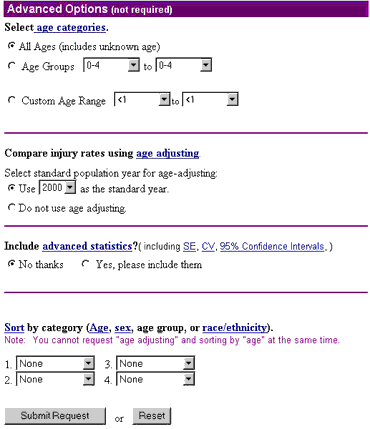
To select advanced report options, decide which option(s) you want to use, then select the item you desire from the pull-down menu(s) (see Figure 1.5).
Note: Do NOT select age adjusting and sorting by age or age group at the same time. If you do, WISQARS will automatically disable the age-adjusting function.
Figure 1.5: Advanced Report Options
B. Leading Causes of Nonfatal Injury Report
Advanced Options
Leading causes reports offer one advanced
option:
- Age-group formatting
For a thorough definition of this advanced option, see help file section 4.0.
To select an advanced leading causes report option, take these steps:
- Decide which option you want to use.
- Select the button beside the option you want (see Figure 1.6). If you decide to select a custom age range, you also must pick the low end and high end of the range from the pull-down menus.
Figure 1.6: Advanced Report Options

1.5 Download Report Option
Each report allows you to download the data in a comma-separated value (csv) format.
- Select the link at the bottom of the report that says "Download Results in a Spreadsheet (CSV) File." A window will appear asking whether to open the file or save it.
- Select "Save this file to disk" and click on the "OK" button.
- Browse for and select the location (folder, drive, etc.) where you want to save the data. Click on the "Save" button.